
User Manual
Page 12
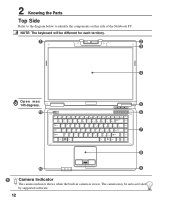
The camera may be different for each territory. 1 2 3 4 Open max 145 degrees. 5 11 6 7 8 10 9 1 Camera Indicator The camera indicator shows when the built-in camera is in use. 2 Knowing the Parts Top Side Refer to the diagram below to identify the components on this side of the Notebook PC. NOTE: The keyboard will be auto-activated by supported software. 12
The camera may be different for each territory. 1 2 3 4 Open max 145 degrees. 5 11 6 7 8 10 9 1 Camera Indicator The camera indicator shows when the built-in camera is in use. 2 Knowing the Parts Top Side Refer to the diagram below to identify the components on this side of the Notebook PC. NOTE: The keyboard will be auto-activated by supported software. 12
User Manual
Page 14
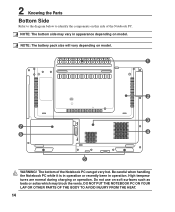
... PC ON YOUR LAP OR OTHER PARTS OF THE BODY TO AVOID INJURY FROM THE HEAT. 14 2 Knowing the Parts Bottom Side Refer to the diagram below to identify the components on this side of the Notebook PC can get very hot. NOTE: The battery pack size will vary depending on...
... PC ON YOUR LAP OR OTHER PARTS OF THE BODY TO AVOID INJURY FROM THE HEAT. 14 2 Knowing the Parts Bottom Side Refer to the diagram below to identify the components on this side of the Notebook PC can get very hot. NOTE: The battery pack size will vary depending on...
User Manual
Page 16
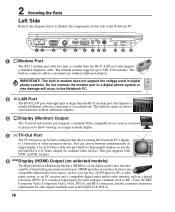
...). IMPORTANT! Use an S-Video cable (not provided) for older analogue standards such as DVI (DVI-D & DVI-I). 16 2 Knowing the Parts Left Side Refer to the diagram below to identify the components on this side of transmitting uncompressed streams. HDMI provides an interface between simultaneously or single display. You can choose between...
...). IMPORTANT! Use an S-Video cable (not provided) for older analogue standards such as DVI (DVI-D & DVI-I). 16 2 Knowing the Parts Left Side Refer to the diagram below to identify the components on this side of transmitting uncompressed streams. HDMI provides an interface between simultaneously or single display. You can choose between...
User Manual
Page 18
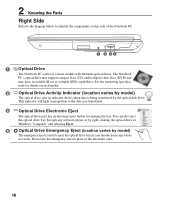
... The optical drive eject has an electronic eject button for opening the tray. See the marketing specifica- 2 Knowing the Parts Right Side Refer to the diagram below to identify the components on each model. 2 Optical Drive Activity Indicator (location varies by the optical disk drive.
... The optical drive eject has an electronic eject button for opening the tray. See the marketing specifica- 2 Knowing the Parts Right Side Refer to the diagram below to identify the components on each model. 2 Optical Drive Activity Indicator (location varies by the optical disk drive.
User Manual
Page 19
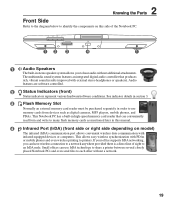
... from and write to many flash memory cards as digital cameras, MP3 players, mobile phones, and PDAs. 2 Knowing the Parts Front Side Refer to the diagram below to identify the components on model) The infrared (IrDA) communication port allows convenient wireless data communication with infrared-equipped devices or computers. Audio features...
... from and write to many flash memory cards as digital cameras, MP3 players, mobile phones, and PDAs. 2 Knowing the Parts Front Side Refer to the diagram below to identify the components on model) The infrared (IrDA) communication port allows convenient wireless data communication with infrared-equipped devices or computers. Audio features...

User Manual
Page 20
... acting as keyboards, pointing devices, cameras, hard disk drives, printers, and scanners connected in sites or hubs. 2 Knowing the Parts Rear Side Refer to the diagram below to identify the components on this side of the Notebook PC. 1 2 3 4 1 Kensington® Lock Port The Kensington® lock port allows the Notebook PC...
... acting as keyboards, pointing devices, cameras, hard disk drives, printers, and scanners connected in sites or hubs. 2 Knowing the Parts Rear Side Refer to the diagram below to identify the components on this side of the Notebook PC. 1 2 3 4 1 Kensington® Lock Port The Kensington® lock port allows the Notebook PC...
User Manual
Page 51
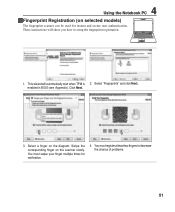
... TPM is 2. enabled in BIOS (see Appendix). You must register at least two fingers to setup the fingerprint registration. 1. Swipe the corresponding finger on the diagram. Click Next. 3. Select "Fingerprints" and click Next. Select a finger on the scanner slowly. You must swipe your finger multiple times for instant and secure user...
... TPM is 2. enabled in BIOS (see Appendix). You must register at least two fingers to setup the fingerprint registration. 1. Swipe the corresponding finger on the diagram. Click Next. 3. Select "Fingerprints" and click Next. Select a finger on the scanner slowly. You must swipe your finger multiple times for instant and secure user...

User Manual
Page 52
Click Finish when done. 7. Right-click the icon on the scanner slowly. You must swipe your preferences. 52 Select "General Options" and "Single Sign On" and configure your finger multiple times for verification. You must register at least two fingers to decrease the chance of any problems. 6. Select a finger on the diagram and swipe the corresponding finger on the taskbar and select "Settings and Options". 8. 4 Using the Notebook PC Fingerprint Registration (on selected models) cont. 5.
Click Finish when done. 7. Right-click the icon on the scanner slowly. You must swipe your preferences. 52 Select "General Options" and "Single Sign On" and configure your finger multiple times for verification. You must register at least two fingers to decrease the chance of any problems. 6. Select a finger on the diagram and swipe the corresponding finger on the taskbar and select "Settings and Options". 8. 4 Using the Notebook PC Fingerprint Registration (on selected models) cont. 5.


