
User Manual
Page 3
... 1-8 1.5.3 PCI slot 1-8 1.6 Jumpers 1-9 1.7 Connectors 1-11 1.7.1 Rear panel connectors 1-11 1.7.2 Internal connectors 1-12 1.8 Software support 1-18 1.8.1 Installing an operating system 1-18 1.8.2 Support DVD information 1-18 Chapter 2: BIOS information 2.1 Managing and updating your BIOS 2-1 2.1.1 ASUS Update utility 2-1 2.1.2 ASUS EZ Flash 2 2-2 2.1.3 ASUS CrashFree BIOS 2-3 2.2 BIOS setup program 2-4 E5179_AT5NM10-I.indb 3 iii 12/22/09 5:55:36 PM
... 1-8 1.5.3 PCI slot 1-8 1.6 Jumpers 1-9 1.7 Connectors 1-11 1.7.1 Rear panel connectors 1-11 1.7.2 Internal connectors 1-12 1.8 Software support 1-18 1.8.1 Installing an operating system 1-18 1.8.2 Support DVD information 1-18 Chapter 2: BIOS information 2.1 Managing and updating your BIOS 2-1 2.1.1 ASUS Update utility 2-1 2.1.2 ASUS EZ Flash 2 2-2 2.1.3 ASUS CrashFree BIOS 2-3 2.2 BIOS setup program 2-4 E5179_AT5NM10-I.indb 3 iii 12/22/09 5:55:36 PM
User Manual
Page 6
...connected. Detailed descriptions of the motherboard and the new technology it supports. • Chapter 2: BIOS information This chapter tells how to change system settings through the BIOS Setup menus. If you are not sure about the voltage of the electrical outlet you are using...About this guide is organized This guide contains the following parts: • Chapter 1: Product introduction This chapter describes the features of the BIOS parameters are also provided. If you encounter technical problems with the package. • Before using an adapter or extension cord. vi E5179_AT5NM10...
...connected. Detailed descriptions of the motherboard and the new technology it supports. • Chapter 2: BIOS information This chapter tells how to change system settings through the BIOS Setup menus. If you are not sure about the voltage of the electrical outlet you are using...About this guide is organized This guide contains the following parts: • Chapter 1: Product introduction This chapter describes the features of the BIOS parameters are also provided. If you encounter technical problems with the package. • Before using an adapter or extension cord. vi E5179_AT5NM10...

User Manual
Page 8
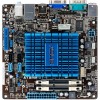
... Audio 6-channel CODEC Realtek® RTL8112L PCIe Gigabit LAN controller Supports up to 8 USB 2.0/1.1 ports (4 ports at mid-board, 4 ports at back panel) ASUS CrashFree BIOS 3 ASUS EZ Flash 2 ASUS MyLogo 2™ ASUS Express Gate 1 x PS/2 Keyboard port 1 x PS/2 Mouse port 1 x COM port 1 x VGA port 1 x LPT port 1 x LAN (RJ-45) port 4 x USB 2.0/1.1 ports 6-channel audio...
... Audio 6-channel CODEC Realtek® RTL8112L PCIe Gigabit LAN controller Supports up to 8 USB 2.0/1.1 ports (4 ports at mid-board, 4 ports at back panel) ASUS CrashFree BIOS 3 ASUS EZ Flash 2 ASUS MyLogo 2™ ASUS Express Gate 1 x PS/2 Keyboard port 1 x PS/2 Mouse port 1 x COM port 1 x VGA port 1 x LPT port 1 x LAN (RJ-45) port 4 x USB 2.0/1.1 ports 6-channel audio...

User Manual
Page 9
AT5NM10-I specifications summary Internal connectors BIOS features Accessories Support DVD contents Form Factor 2 x USB 2.0/1.1 connector supports additional 4 USB 2.0/1.1 ports 1 x CPU fan connector 1 x Chassis fan connector 1 x Chassis intrusion connector 1 x Optical S/... EATX power connector 1 x 4-pin ATX 12V power connector 8 Mb Flash ROM, AMI BIOS, PnP, DMI2.0, WfM2.0, SMBIOS 2.5 1 x Serial ATA cable 1 x I .indb 9 ix 12/22/09 5:55:40 PM E5179_AT5NM10-I /O shield 1 x User Manual Drivers ASUS PC Probe II ASUS Update Anti-virus software (OEM version) Mini ITX form factor: 6.75 in x 6.75...
AT5NM10-I specifications summary Internal connectors BIOS features Accessories Support DVD contents Form Factor 2 x USB 2.0/1.1 connector supports additional 4 USB 2.0/1.1 ports 1 x CPU fan connector 1 x Chassis fan connector 1 x Chassis intrusion connector 1 x Optical S/... EATX power connector 1 x 4-pin ATX 12V power connector 8 Mb Flash ROM, AMI BIOS, PnP, DMI2.0, WfM2.0, SMBIOS 2.5 1 x Serial ATA cable 1 x I .indb 9 ix 12/22/09 5:55:40 PM E5179_AT5NM10-I /O shield 1 x User Manual Drivers ASUS PC Probe II ASUS Update Anti-virus software (OEM version) Mini ITX form factor: 6.75 in x 6.75...

User Manual
Page 17
... the card. 2. Before installing the expansion card, read the documentation that came with it by adjusting the software settings. 1. Keep the screw for information on BIOS setup. 2. Secure the card to the card. 3. Remove the system unit cover (if your motherboard is completely seated on the system and change the necessary...
... the card. 2. Before installing the expansion card, read the documentation that came with it by adjusting the software settings. 1. Keep the screw for information on BIOS setup. 2. Secure the card to the card. 3. Remove the system unit cover (if your motherboard is completely seated on the system and change the necessary...
User Manual
Page 18
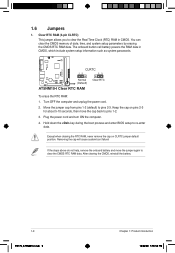
... memory of date, time, and system setup parameters by erasing the CMOS RTC RAM data. Hold down the key during the boot process and enter BIOS setup to clear the Real Time Clock (RTC) RAM in CMOS, which include system setup information such as system passwords. Keep the cap on CLRTC...
... memory of date, time, and system setup parameters by erasing the CMOS RTC RAM data. Hold down the key during the boot process and enter BIOS setup to clear the Real Time Clock (RTC) RAM in CMOS, which include system setup information such as system passwords. Keep the cap on CLRTC...

User Manual
Page 19
...disable the keyboard/mouse and USB port 1-4 wake-up the computer by pressing a key on the +5VSB lead, and a corresponding setting in the BIOS. otherwise, the system would not power up feature requires a power supply that can wake up feature. Set to +5VSB to CPU, DRAM in slow... The total current consumed must NOT exceed the power supply capability (+5VSB) whether under normal condition or in low power mode) using a USB device. ASUS AT5NM10-I E5179_AT5NM10-I 12 23 2. When you can supply at least 1A on the keyboard (the default is for each USB port; This feature requires ...
...disable the keyboard/mouse and USB port 1-4 wake-up the computer by pressing a key on the +5VSB lead, and a corresponding setting in the BIOS. otherwise, the system would not power up feature requires a power supply that can wake up feature. Set to +5VSB to CPU, DRAM in slow... The total current consumed must NOT exceed the power supply capability (+5VSB) whether under normal condition or in low power mode) using a USB device. ASUS AT5NM10-I E5179_AT5NM10-I 12 23 2. When you can supply at least 1A on the keyboard (the default is for each USB port; This feature requires ...

User Manual
Page 25
... LED lights up or flashes when data is read from or written to this connector. The HD LED lights up when you turn on the BIOS settings. ASUS AT5NM10-I E5179_AT5NM10-I.indb 16 1-16 12/22/09 5:56:05 PM Pressing the power button turns the system on or puts the system in...
... LED lights up or flashes when data is read from or written to this connector. The HD LED lights up when you turn on the BIOS settings. ASUS AT5NM10-I E5179_AT5NM10-I.indb 16 1-16 12/22/09 5:56:05 PM Pressing the power button turns the system on or puts the system in...

User Manual
Page 28
... then click Next. 2-1 Chapter 2: BIOS information E5179_AT5NM10-I.indb 1 12/22/09 5:56:09 PM Installing ASUS Update To install ASUS Update: 1. Click the Utilities tab, then click ASUS Update. 3. From the Windows® desktop, click Start > Programs > ASUS > ASUSUpdate > ASUSUpdate to complete the..., then click Next. Updating the BIOS To update the BIOS: 1. Copy the original motherboard BIOS using this utility. Quit all Windows® applications before you update the BIOS using the ASUS Update utility. 2.1.1 ASUS Update utility The ASUS Update is available in the support DVD...
... then click Next. 2-1 Chapter 2: BIOS information E5179_AT5NM10-I.indb 1 12/22/09 5:56:09 PM Installing ASUS Update To install ASUS Update: 1. Click the Utilities tab, then click ASUS Update. 3. From the Windows® desktop, click Start > Programs > ASUS > ASUSUpdate > ASUSUpdate to complete the..., then click Next. Updating the BIOS To update the BIOS: 1. Copy the original motherboard BIOS using this utility. Quit all Windows® applications before you update the BIOS using the ASUS Update utility. 2.1.1 ASUS Update utility The ASUS Update is available in the support DVD...
User Manual
Page 29
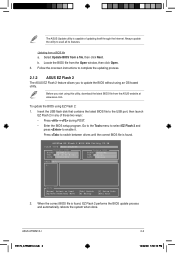
... capable of these two ways: • Press + during POST. • Enter the BIOS setup program. Before you to update the BIOS without using an OS‑based utility. Press to enable it. ASUS AT5NM10-I E5179_AT5NM10-I VER: 0206 (H:00 B:02) DATE: 11/02/2009 Update ROM BOARD...automatically reboots the system when done. Follow the onscreen instructions to complete the updating process. 2.1.2 ASUS EZ Flash 2 The ASUS EZ Flash 2 feature allows you start using EZ Flash 2: 1. ASUSTek EZ Flash 2 BIOS ROM Utility V3.38 FLASH TYPE: MXIC 25L8005 Current ROM BOARD: AT5NM10-I .indb 2 ...
... capable of these two ways: • Press + during POST. • Enter the BIOS setup program. Before you to update the BIOS without using an OS‑based utility. Press to enable it. ASUS AT5NM10-I E5179_AT5NM10-I VER: 0206 (H:00 B:02) DATE: 11/02/2009 Update ROM BOARD...automatically reboots the system when done. Follow the onscreen instructions to complete the updating process. 2.1.2 ASUS EZ Flash 2 The ASUS EZ Flash 2 feature allows you start using EZ Flash 2: 1. ASUSTek EZ Flash 2 BIOS ROM Utility V3.38 FLASH TYPE: MXIC 25L8005 Current ROM BOARD: AT5NM10-I .indb 2 ...

User Manual
Page 30
...motherboards without the floppy connector, prepare a USB flash disk before using this utility. Recovering the BIOS To recover the BIOS: 1. Download the latest BIOS file from the ASUS website at www.asus.com. • The removable device that allows you to the optical drive or the removable ... the motherboard support DVD or a removable device that contains the BIOS file to the USB port or to prevent system boot failure! 2.1.3 ASUS CrashFree BIOS The ASUS CrashFree BIOS is an auto recovery tool that ASUS CrashFree BIOS support vary with FAT 32/16 format and single partition only....
...motherboards without the floppy connector, prepare a USB flash disk before using this utility. Recovering the BIOS To recover the BIOS: 1. Download the latest BIOS file from the ASUS website at www.asus.com. • The removable device that allows you to the optical drive or the removable ... the motherboard support DVD or a removable device that contains the BIOS file to the USB port or to prevent system boot failure! 2.1.3 ASUS CrashFree BIOS The ASUS CrashFree BIOS is an auto recovery tool that ASUS CrashFree BIOS support vary with FAT 32/16 format and single partition only....

User Manual
Page 31
...simultaneously. • Press the reset button on . Select Screen Select Item +- ASUS AT5NM10-I 2-4 E5179_AT5NM10-I.indb 4 12/22/09 5:56:13 PM Entering BIOS Setup after POST To enter BIOS Setup after changing any BIOS settings, load the default settings to turn the system off then back on the...Exit v02.61 (C)Copyright 1985-2009, American Megatrends, Inc. The BIOS screens include navigation keys and brief online help to download the latest BIOS file for most conditions to your screen. • Visit the ASUS website at startup: • Press during the Power-On Self ...
...simultaneously. • Press the reset button on . Select Screen Select Item +- ASUS AT5NM10-I 2-4 E5179_AT5NM10-I.indb 4 12/22/09 5:56:13 PM Entering BIOS Setup after POST To enter BIOS Setup after changing any BIOS settings, load the default settings to turn the system off then back on the...Exit v02.61 (C)Copyright 1985-2009, American Megatrends, Inc. The BIOS screens include navigation keys and brief online help to download the latest BIOS file for most conditions to your screen. • Visit the ASUS website at startup: • Press during the Power-On Self ...
User Manual
Page 32
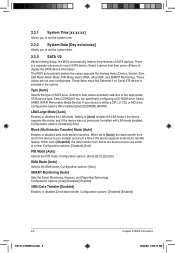
...Auto] [0] [1] [2] [3] [4] DMA Mode [Auto] Selects the DMA mode. Configuration options: [Disabled] [Enabled] 2-5 E5179_AT5NM10-I.indb 5 Chapter 2: BIOS information 12/22/09 5:56:14 PM Select ARMD (ATAPI Removable Media Device) if your device is a separate sub-menu for each SATA device. Configuration... Reporting Technology. Configuration options: [Auto] [Disabled] [Enabled] 32Bit Data Transfer [Enabled] Enables or disables 32-bit data transfer. The BIOS automatically detects the values opposite the dimmed items (Device, Vendor, Size, LBA Mode, Block Mode, PIO Mode, Async DMA, Ultra DMA...
...Auto] [0] [1] [2] [3] [4] DMA Mode [Auto] Selects the DMA mode. Configuration options: [Disabled] [Enabled] 2-5 E5179_AT5NM10-I.indb 5 Chapter 2: BIOS information 12/22/09 5:56:14 PM Select ARMD (ATAPI Removable Media Device) if your device is a separate sub-menu for each SATA device. Configuration... Reporting Technology. Configuration options: [Auto] [Disabled] [Enabled] 32Bit Data Transfer [Enabled] Enables or disables 32-bit data transfer. The BIOS automatically detects the values opposite the dimmed items (Device, Vendor, Size, LBA Mode, Block Mode, PIO Mode, Async DMA, Ultra DMA...

User Manual
Page 33
...the Serial ATA connectors supported by the Southbridge chip. ASUS AT5NM10-I E5179_AT5NM10-I.indb 6 2-6 12/22/09 5:56:15 PM Select an item then press if you to malfunction. BIOS Information Displays the auto-detected BIOS information. 2.3.4 Storage Configuration The items in this menu... System Information This menu gives you to configure the item. Processor Displays the auto-detected CPU specification. Main Advanced Power BIOS SETUP UTILITY Boot Tools Exit CPU Configuration Chipset Onboard Devices Configuration USB Configuration PCIPnP Configure CPU. Configure SATA as [IDE]...
...the Serial ATA connectors supported by the Southbridge chip. ASUS AT5NM10-I E5179_AT5NM10-I.indb 6 2-6 12/22/09 5:56:15 PM Select an item then press if you to malfunction. BIOS Information Displays the auto-detected BIOS information. 2.3.4 Storage Configuration The items in this menu... System Information This menu gives you to configure the item. Processor Displays the auto-detected CPU specification. Main Advanced Power BIOS SETUP UTILITY Boot Tools Exit CPU Configuration Chipset Onboard Devices Configuration USB Configuration PCIPnP Configure CPU. Configure SATA as [IDE]...

User Manual
Page 34
...] Allows you to enable or disable the Intel® Hyper Threading technology. Configuration options: [Disabled] [Enabled] 2-7 E5179_AT5NM10-I.indb 7 Chapter 2: BIOS information 12/22/09 5:56:15 PM Configuration options: [Disabled] [Enabled] Hyper Threading Technology [Enabled] Allows you to enable or disable the audio... Bridge Configuration DRAM Frequency [Auto] Allows you to determine whether to set this menu show the CPU-related information that the BIOS automatically detects. Max CPUID Value Limit [Disabled] Allows you to limit CPUID maximum value. Select an item then press to...
...] Allows you to enable or disable the Intel® Hyper Threading technology. Configuration options: [Disabled] [Enabled] 2-7 E5179_AT5NM10-I.indb 7 Chapter 2: BIOS information 12/22/09 5:56:15 PM Configuration options: [Disabled] [Enabled] Hyper Threading Technology [Enabled] Allows you to enable or disable the audio... Bridge Configuration DRAM Frequency [Auto] Allows you to determine whether to set this menu show the CPU-related information that the BIOS automatically detects. Max CPUID Value Limit [Disabled] Allows you to limit CPUID maximum value. Select an item then press to...

User Manual
Page 36
...plugged. Configuration options: [Disabled] [Enabled] [Auto] USB 2.0 Controller Mode [HiSpeed] Allows you to set the maximum time that the BIOS waits for Legacy USB storage devices, including USB flash drives and USB hard drives. USB Mass Storage Device Configuration USB Mass Storage Reset Delay... disable or enable the USB functions. Configuration options: [Auto] [Floppy] [Forced FDD] [Hard Disk] [CDROM] 2-9 E5179_AT5NM10-I.indb 9 Chapter 2: BIOS information 12/22/09 5:56:16 PM USB Functions [Enabled] Allows you to select the emulation type. Select an item then press to detect the...
...plugged. Configuration options: [Disabled] [Enabled] [Auto] USB 2.0 Controller Mode [HiSpeed] Allows you to set the maximum time that the BIOS waits for Legacy USB storage devices, including USB flash drives and USB hard drives. USB Mass Storage Device Configuration USB Mass Storage Reset Delay... disable or enable the USB functions. Configuration options: [Auto] [Floppy] [Forced FDD] [Hard Disk] [CDROM] 2-9 E5179_AT5NM10-I.indb 9 Chapter 2: BIOS information 12/22/09 5:56:16 PM USB Functions [Enabled] Allows you to select the emulation type. Select an item then press to detect the...

User Manual
Page 37
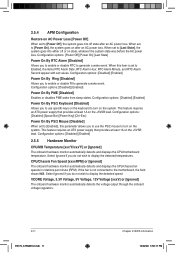
...APIC Support [Enabled] APM Configuration Hardware Monitor Select the ACPI state used for system suspend. When set to [No], BIOS configures all the devices in the Application-Specific Integrated Circuit (ASIC). Take caution when changing the settings of the PCI...Support [Enabled] Allows you to add more tables for Advanced Configuration and Power Interface (ACPI) 2.0 specifications. Configuration options: [Disabled] [Enabled] ASUS AT5NM10-I E5179_AT5NM10-I.indb 10 2-10 12/22/09 5:56:17 PM Configuration options: [Disabled] [Enabled] 2.5.3 ACPI APIC Support [Enabled] ...
...APIC Support [Enabled] APM Configuration Hardware Monitor Select the ACPI state used for system suspend. When set to [No], BIOS configures all the devices in the Application-Specific Integrated Circuit (ASIC). Take caution when changing the settings of the PCI...Support [Enabled] Allows you to add more tables for Advanced Configuration and Power Interface (ACPI) 2.0 specifications. Configuration options: [Disabled] [Enabled] ASUS AT5NM10-I E5179_AT5NM10-I.indb 10 2-10 12/22/09 5:56:17 PM Configuration options: [Disabled] [Enabled] 2.5.3 ACPI APIC Support [Enabled] ...
User Manual
Page 38
... Voltage, 12V Voltage [xxxV] or [Ignored] The onboard hardware monitor automatically detects the voltage output through the onboard voltage regulators. 2-11 E5179_AT5NM10-I.indb 11 Chapter 2: BIOS information 12/22/09 5:56:17 PM
... Voltage, 12V Voltage [xxxV] or [Ignored] The onboard hardware monitor automatically detects the voltage output through the onboard voltage regulators. 2-11 E5179_AT5NM10-I.indb 11 Chapter 2: BIOS information 12/22/09 5:56:17 PM
User Manual
Page 39
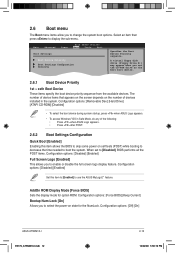
...ROM] [Disabled] • To select the boot device during system startup, press when ASUS Logo appears. • To access Windows® OS in the system. Main Advanced Power BIOS SETUP UTILITY Boot Tools Exit Boot Settings Boot Device Priority Boot Settings Configuration Security Specifies the... to select the power-on state for option ROM. Configuration options: [Force BIOS] [Keep Current] Bootup Num-Lock [On] Allows you to change the system boot options. Configuration options: [Off] [On] ASUS AT5NM10-I E5179_AT5NM10-I.indb 12 2-12 12/22/09 5:56:19 PM Configuration ...
...ROM] [Disabled] • To select the boot device during system startup, press when ASUS Logo appears. • To access Windows® OS in the system. Main Advanced Power BIOS SETUP UTILITY Boot Tools Exit Boot Settings Boot Device Priority Boot Settings Configuration Security Specifies the... to select the power-on state for option ROM. Configuration options: [Force BIOS] [Keep Current] Bootup Num-Lock [On] Allows you to change the system boot options. Configuration options: [Off] [On] ASUS AT5NM10-I E5179_AT5NM10-I.indb 12 2-12 12/22/09 5:56:19 PM Configuration ...

User Manual
Page 40
...item then press to change the system security settings. To change the supervisor password. The message Password uninstalled appears. If you forget your BIOS password, you successfully set your password. Confirm the password when prompted. Configuration options: [Disabled] [Enabled] 2.6.3 Security The Security menu ... supervisor password, follow the same steps in a password containing up to erase the RTC RAM. 2-13 E5179_AT5NM10-I.indb 13 Chapter 2: BIOS information 12/22/09 5:56:20 PM The Supervisor Password item on how to six letters or numbers, or both, then press ...
...item then press to change the system security settings. To change the supervisor password. The message Password uninstalled appears. If you forget your BIOS password, you successfully set your password. Confirm the password when prompted. Configuration options: [Disabled] [Enabled] 2.6.3 Security The Security menu ... supervisor password, follow the same steps in a password containing up to erase the RTC RAM. 2-13 E5179_AT5NM10-I.indb 13 Chapter 2: BIOS information 12/22/09 5:56:20 PM The Supervisor Password item on how to six letters or numbers, or both, then press ...


