User Manual
Page 3
... this guide is organized ix Where to find more information ix Conventions used in this guide x Typography x A8N-SLI Deluxe specifications summary xi Chapter 1: Product introduction 1.1 Welcome 1-1 1.2 Package contents 1-1 1.3 Special features 1-2 1.3.1 Product highlights 1-2 1.3.2 ASUS Proactive features 1-5 1.3.3 Innovative ASUS features 1-6 Chapter 2: Hardware information 2.1 Before you proceed 2-1 2.2 Motherboard overview 2-2 2.2.1 Placement direction 2-2 2.2.2 Screw holes 2-2 2.2.3 Motherboard layout 2-3 2.2.4 Layout Contents...
... this guide is organized ix Where to find more information ix Conventions used in this guide x Typography x A8N-SLI Deluxe specifications summary xi Chapter 1: Product introduction 1.1 Welcome 1-1 1.2 Package contents 1-1 1.3 Special features 1-2 1.3.1 Product highlights 1-2 1.3.2 ASUS Proactive features 1-5 1.3.3 Innovative ASUS features 1-6 Chapter 2: Hardware information 2.1 Before you proceed 2-1 2.2 Motherboard overview 2-2 2.2.1 Placement direction 2-2 2.2.2 Screw holes 2-2 2.2.3 Motherboard layout 2-3 2.2.4 Layout Contents...
User Manual
Page 11
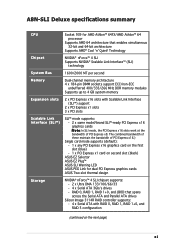
...Express x16 slots with RAID 0, RAID 1, RAID 1+0, and RAID 5 configuration (continued on second slot (black) ASUS EZ Selector ASUS EZ Plug™ ASUS SLI Warning LED ASUS PEG Link for AMD Athlon™ 64FX/AMD Athlon™ 64 processor Supports AMD 64 architecture that spans across the...'n' Quiet! The combined bandwidth of these maintain the bandwidth of PCI Express x8. A8N-SLI Deluxe specifications summary CPU Socket 939 for dual PCI Express graphics cards ASUS Two-slot thermal design Storage NVIDIA® nForce™ 4 SLI chipset supports: - 2 x Ultra DMA 133/100/66/33 - 4 x ...
...Express x16 slots with RAID 0, RAID 1, RAID 1+0, and RAID 5 configuration (continued on second slot (black) ASUS EZ Selector ASUS EZ Plug™ ASUS SLI Warning LED ASUS PEG Link for AMD Athlon™ 64FX/AMD Athlon™ 64 processor Supports AMD 64 architecture that spans across the...'n' Quiet! The combined bandwidth of these maintain the bandwidth of PCI Express x8. A8N-SLI Deluxe specifications summary CPU Socket 939 for dual PCI Express graphics cards ASUS Two-slot thermal design Storage NVIDIA® nForce™ 4 SLI chipset supports: - 2 x Ultra DMA 133/100/66/33 - 4 x ...
User Manual
Page 12
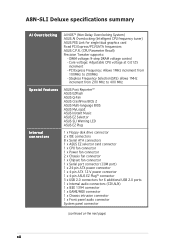
PCI Express Frequency: Allows 1MHz increment from 200 MHz to 200MHz - A8N-SLI Deluxe specifications summary AI Overclocking Special features Internal connectors AI NOS™ (Non-Delay Overclocking System) ASUS AI Overclocking (Intelligent CPU frequency tuner) ASUS PEG Link for 6 additional USB 2.0 ports 1 x Internal audio connectors (CD\AUX) 1 x IEEE 1394 connector 1 x GAME/MIDI connector 1 x Chassis intrusion...
PCI Express Frequency: Allows 1MHz increment from 200 MHz to 200MHz - A8N-SLI Deluxe specifications summary AI Overclocking Special features Internal connectors AI NOS™ (Non-Delay Overclocking System) ASUS AI Overclocking (Intelligent CPU frequency tuner) ASUS PEG Link for 6 additional USB 2.0 ports 1 x Internal audio connectors (CD\AUX) 1 x IEEE 1394 connector 1 x GAME/MIDI connector 1 x Chassis intrusion...
User Manual
Page 13
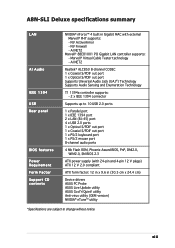
...A8N-SLI Deluxe specifications summary LAN AI Audio IEEE 1394 USB Rear panel BIOS features Power Requirement Form Factor Support CD contents NVIDIA® nForce™ 4 built-in Gigabit MAC with 24-pin and 4-pin 12 V plugs) ATX 12 V 2.0 compliant ATX form factor: 12 in x 9.6 in (30.5 cm x 24.4 cm) Device drivers ASUS... PC Probe ASUS Live Update utility ASUS Cool'n'Quiet! AI NET2 Realtek® ALC850 8-channel CODEC 1 x Coaxial S/PDIF out port 1 x Optical S/PDIF out port Supports Universal...
...A8N-SLI Deluxe specifications summary LAN AI Audio IEEE 1394 USB Rear panel BIOS features Power Requirement Form Factor Support CD contents NVIDIA® nForce™ 4 built-in Gigabit MAC with 24-pin and 4-pin 12 V plugs) ATX 12 V 2.0 compliant ATX form factor: 12 in x 9.6 in (30.5 cm x 24.4 cm) Device drivers ASUS... PC Probe ASUS Live Update utility ASUS Cool'n'Quiet! AI NET2 Realtek® ALC850 8-channel CODEC 1 x Coaxial S/PDIF out port 1 x Optical S/PDIF out port Supports Universal...
User Manual
Page 17
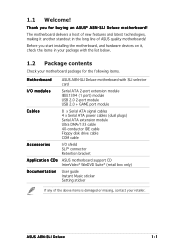
ASUS A8N-SLI Deluxe 1-1 The motherboard delivers a host of new features and latest technologies, making it , check the items in the long line of the above items is damaged ... on it another standout in your package with the list below. 1.2 Package contents Check your motherboard package for buying an ASUS® A8N-SLI Deluxe motherboard! Before you for the following items. Motherboard ASUS A8N-SLI Deluxe motherboard with SLI selector card I/O modules Serial ATA 2-port extension module IEEE1394 (1 port) module USB 2.0 2-port module USB 2.0 + GAME port module Cables...
ASUS A8N-SLI Deluxe 1-1 The motherboard delivers a host of new features and latest technologies, making it , check the items in the long line of the above items is damaged ... on it another standout in your package with the list below. 1.2 Package contents Check your motherboard package for buying an ASUS® A8N-SLI Deluxe motherboard! Before you for the following items. Motherboard ASUS A8N-SLI Deluxe motherboard with SLI selector card I/O modules Serial ATA 2-port extension module IEEE1394 (1 port) module USB 2.0 2-port module USB 2.0 + GAME port module Cables...
User Manual
Page 19
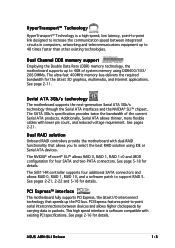
... 3Gb/s technology The motherboard supports the next-generation Serial ATA 3Gb/s technology through the Serial ATA interfaces and the NVIDIA® SLI™ chipset. See pages 2-21. PCI Express features point-to 4GB of the current Serial ATA products. Dual Channel DDR memory... four additional SATA connectors and allows RAID 0, RAID 1, RAID 10, and a software patch to 48 times faster than other existing technologies. ASUS A8N-SLI Deluxe 1-3 The SATA 3Gb/s specification provides twice the bandwidth of system memory using IDE or Serial ATA devices. See page 2-16 for details. ...
... 3Gb/s technology The motherboard supports the next-generation Serial ATA 3Gb/s technology through the Serial ATA interfaces and the NVIDIA® SLI™ chipset. See pages 2-21. PCI Express features point-to 4GB of the current Serial ATA products. Dual Channel DDR memory... four additional SATA connectors and allows RAID 0, RAID 1, RAID 10, and a software patch to 48 times faster than other existing technologies. ASUS A8N-SLI Deluxe 1-3 The SATA 3Gb/s specification provides twice the bandwidth of system memory using IDE or Serial ATA devices. See page 2-16 for details. ...
User Manual
Page 21
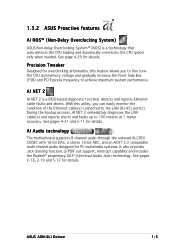
... AI NOS™ (Non-Delay Overclocking System) ASUS Non-delay Overclocking System™ (NOS) is a BIOS-based diagnostic tool that auto-detects the CPU loading and dynamically overclocks the CPU speed only when ... and shorts. During the bootup process, AI NET 2 immediately diagnoses the LAN cable(s) and reports shorts and faults up to the LAN (RJ-45) port(s). ASUS A8N-SLI Deluxe 1-5 With this feature allows you can easily monitor the condition of the Ethernet cable(s) connected to 100 meters at 1 meter accuracy. AI Audio technology The...
... AI NOS™ (Non-Delay Overclocking System) ASUS Non-delay Overclocking System™ (NOS) is a BIOS-based diagnostic tool that auto-detects the CPU loading and dynamically overclocks the CPU speed only when ... and shorts. During the bootup process, AI NET 2 immediately diagnoses the LAN cable(s) and reports shorts and faults up to the LAN (RJ-45) port(s). ASUS A8N-SLI Deluxe 1-5 With this feature allows you can easily monitor the condition of the Ethernet cable(s) connected to 100 meters at 1 meter accuracy. AI Audio technology The...
User Manual
Page 23
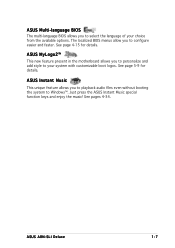
... allows you to Windows™. The localized BIOS menus allow you to playback audio files even without booting the system to configure easier and faster. ASUS A8N-SLI Deluxe 1-7 Just press the ASUS Instant Music special function keys and enjoy the music! See page 5-9 for details. See page 4-15 for details.
... allows you to Windows™. The localized BIOS menus allow you to playback audio files even without booting the system to configure easier and faster. ASUS A8N-SLI Deluxe 1-7 Just press the ASUS Instant Music special function keys and enjoy the music! See page 5-9 for details. See page 4-15 for details.
User Manual
Page 26
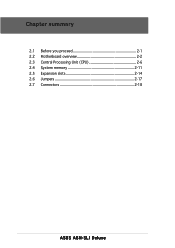
Chapter summary 2.1 Before you proceed 2-1 2.2 Motherboard overview 2-2 2.3 Central Processing Unit (CPU 2-6 2.4 System memory 2-11 2.5 Expansion slots 2-14 2.6 Jumpers 2-17 2.7 Connectors 2-18 ASUS A8N-SLI Deluxe
Chapter summary 2.1 Before you proceed 2-1 2.2 Motherboard overview 2-2 2.3 Central Processing Unit (CPU 2-6 2.4 System memory 2-11 2.5 Expansion slots 2-14 2.6 Jumpers 2-17 2.7 Connectors 2-18 ASUS A8N-SLI Deluxe

User Manual
Page 27
... LEDs The motherboard comes with the component. • Before you install or remove any motherboard component. SLI_WARN_LED A8N-SLI DELUXE ® ON When use 2 Graphics but did not connect the ASUS EZ Plug™. ATX power connectors" on a grounded antistatic pad or in the bag that came with ...two graphics card but do not plug EZ-PLUG OFF When use 2 Graphics but do plug EZ-PLUG SB_PWR A8N-SLI DELUXE Onboard LED ON Standby Power OFF Powered Off ASUS A8N-SLI Deluxe 2-1 See "8. This is ON, in sleep mode, or in any component, ensure that you should shut down...
... LEDs The motherboard comes with the component. • Before you install or remove any motherboard component. SLI_WARN_LED A8N-SLI DELUXE ® ON When use 2 Graphics but did not connect the ASUS EZ Plug™. ATX power connectors" on a grounded antistatic pad or in the bag that came with ...two graphics card but do not plug EZ-PLUG OFF When use 2 Graphics but do plug EZ-PLUG SB_PWR A8N-SLI DELUXE Onboard LED ON Standby Power OFF Powered Off ASUS A8N-SLI Deluxe 2-1 See "8. This is ON, in sleep mode, or in any component, ensure that you should shut down...
User Manual
Page 28
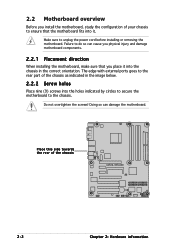
Place this side towards the rear of the chassis as indicated in the correct orientation. Make sure to the rear part of the chassis A8N-SLI DELUXE 2-2 Chapter 2: Hardware information 2.2 Motherboard overview Before you install the motherboard, study the configuration of your chassis to ensure that you physical injury and damage motherboard ...
Place this side towards the rear of the chassis as indicated in the correct orientation. Make sure to the rear part of the chassis A8N-SLI DELUXE 2-2 Chapter 2: Hardware information 2.2 Motherboard overview Before you install the motherboard, study the configuration of your chassis to ensure that you physical injury and damage motherboard ...
User Manual
Page 31
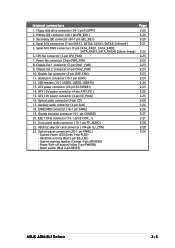
Power fan connector (3-pin PWR_FAN) 8. ATX power connector (24-pin EATXPWR1) 14. Chassis intrusion connector (4-1 pin CHASSIS) 20. ASUS EZ selector card connector (144-pin SLI_CON) 22. System Power LED (Green 3-pin PLED) - Floppy disk drive connector (34-1 pin FLOPPY) 2....20 2-20 2-20 2-21 2-22 2-23 2-23 2-23 2-23 2-23 2-24 2-24 2-25 2-25 2-25 2-26 2-26 2-26 2-27 2-27 2-28 2-28 2-29 ASUS A8N-SLI Deluxe 2-5 Serial ATA connectors (7-pin SATA1, SATA2, SATA3, SATA4) [nForce4] 5. CPU fan connector (3-pin CPU_FAN) 7. System panel connectors (20-1 pin PANEL) - Hard Disk activity (...
Power fan connector (3-pin PWR_FAN) 8. ATX power connector (24-pin EATXPWR1) 14. Chassis intrusion connector (4-1 pin CHASSIS) 20. ASUS EZ selector card connector (144-pin SLI_CON) 22. System Power LED (Green 3-pin PLED) - Floppy disk drive connector (34-1 pin FLOPPY) 2....20 2-20 2-20 2-21 2-22 2-23 2-23 2-23 2-23 2-23 2-24 2-24 2-25 2-25 2-25 2-26 2-26 2-26 2-27 2-27 2-28 2-28 2-29 ASUS A8N-SLI Deluxe 2-5 Serial ATA connectors (7-pin SATA1, SATA2, SATA3, SATA4) [nForce4] 5. CPU fan connector (3-pin CPU_FAN) 7. System panel connectors (20-1 pin PANEL) - Hard Disk activity (...
User Manual
Page 32
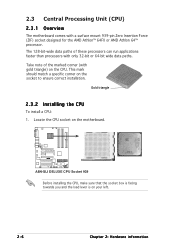
... the CPU To install a CPU: 1. Locate the CPU socket on the CPU. This mark should match a specific corner on your left. 2-6 Chapter 2: Hardware information A8N-SLI DELUXE ® A8N-SLI DELUXE CPU Socket 939 Before installing the CPU, make sure that the socket box is facing towards you and the load lever is on the socket...
... the CPU To install a CPU: 1. Locate the CPU socket on the CPU. This mark should match a specific corner on your left. 2-6 Chapter 2: Hardware information A8N-SLI DELUXE ® A8N-SLI DELUXE CPU Socket 939 Before installing the CPU, make sure that the socket box is facing towards you and the load lever is on the socket...
User Manual
Page 33
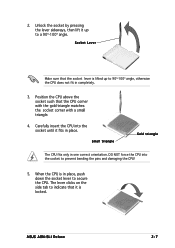
... by pressing the lever sideways, then lift it up to 90°-100° angle, otherwise the CPU does not fit in one correct orientation. ASUS A8N-SLI Deluxe 2-7 Small triangle Gold triangle The CPU fits only in completely. 3.
... by pressing the lever sideways, then lift it up to 90°-100° angle, otherwise the CPU does not fit in one correct orientation. ASUS A8N-SLI Deluxe 2-7 Small triangle Gold triangle The CPU fits only in completely. 3.
User Manual
Page 35
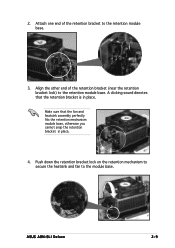
ASUS A8N-SLI Deluxe 2-9 Attach one end of the retention bracket (near the retention bracket lock) to the retention module base. 3. 2. A clicking sound denotes that the fan and heatsink assembly perfectly fits the retention mechanism module base, otherwise you cannot snap the retention bracket in place. Align the other end of the retention bracket to the retention module base. Make sure that the retention bracket is in place. 4. Push down the retention bracket lock on the retention mechanism to secure the heatsink and fan to the module base.
ASUS A8N-SLI Deluxe 2-9 Attach one end of the retention bracket (near the retention bracket lock) to the retention module base. 3. 2. A clicking sound denotes that the fan and heatsink assembly perfectly fits the retention mechanism module base, otherwise you cannot snap the retention bracket in place. Align the other end of the retention bracket to the retention module base. Make sure that the retention bracket is in place. 4. Push down the retention bracket lock on the retention mechanism to secure the heatsink and fan to the module base.
User Manual
Page 36
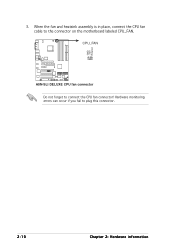
GND +12V Rotation 3. CPU_FAN A8N-SLI DELUXE ® A8N-SLI DELUXE CPU fan connector Do not forget to plug this connector. 2-10 Chapter 2: Hardware information Hardware monitoring errors can occur if you fail to connect the CPU fan connector! When the fan and heatsink assembly is in place, connect the CPU fan cable to the connector on the motherboard labeled CPU_FAN.
GND +12V Rotation 3. CPU_FAN A8N-SLI DELUXE ® A8N-SLI DELUXE CPU fan connector Do not forget to plug this connector. 2-10 Chapter 2: Hardware information Hardware monitoring errors can occur if you fail to connect the CPU fan connector! When the fan and heatsink assembly is in place, connect the CPU fan cable to the connector on the motherboard labeled CPU_FAN.
User Manual
Page 37
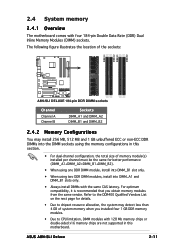
...8226; For dual-channel configuration, the total size of system memory when you obtain memory modules from the same vendor. ASUS A8N-SLI Deluxe 2-11 Refer to the DDR400 Qualified Vendors List on the next page for better performance (DIMM_A1+DIMM_A2=DIMM_B1+DIMM_B2). &#...) Dual Inline Memory Modules (DIMM) sockets. The following figure illustrates the location of the sockets: DIMM_A1 DIMM_A2 DIMM_B1 DIMM_B2 A8N-SLI DELUXE ® A8N-SLI DELUXE 184-pin DDR DIMM sockets Channel Channel A Channel B Sockets DIMM_A1 and DIMM_A2 DIMM_B1 and DIMM_B2 2.4.2 Memory Configurations You may...
...8226; For dual-channel configuration, the total size of system memory when you obtain memory modules from the same vendor. ASUS A8N-SLI Deluxe 2-11 Refer to the DDR400 Qualified Vendors List on the next page for better performance (DIMM_A1+DIMM_A2=DIMM_B1+DIMM_B2). &#...) Dual Inline Memory Modules (DIMM) sockets. The following figure illustrates the location of the sockets: DIMM_A1 DIMM_A2 DIMM_B1 DIMM_B2 A8N-SLI DELUXE ® A8N-SLI DELUXE 184-pin DDR DIMM sockets Channel Channel A Channel B Sockets DIMM_A1 and DIMM_A2 DIMM_B1 and DIMM_B2 2.4.2 Memory Configurations You may...
User Manual
Page 39
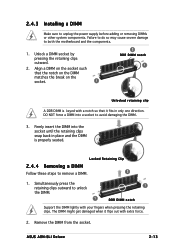
... clips outward to both the motherboard and the components. 1. 2.4.3 Installing a DIMM Make sure to remove a DIMM. 2 1. Unlock a DIMM socket by pressing the retaining clips outward. 2. ASUS A8N-SLI Deluxe 2-13 Locked Retaining Clip 2.4.4 Removing a DIMM Follow these steps to unplug the power supply before adding or removing DIMMs or other system components. Failure to...
... clips outward to both the motherboard and the components. 1. 2.4.3 Installing a DIMM Make sure to remove a DIMM. 2 1. Unlock a DIMM socket by pressing the retaining clips outward. 2. ASUS A8N-SLI Deluxe 2-13 Locked Retaining Clip 2.4.4 Removing a DIMM Follow these steps to unplug the power supply before adding or removing DIMMs or other system components. Failure to...
User Manual
Page 41
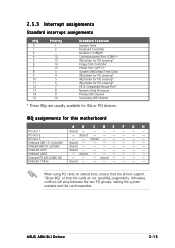
shared - - - - - Onboard LAN1 shared - - -- - - - Onboard PCI SATA RAID (SI) -- - ASUS A8N-SLI Deluxe 2-15 Onboard USB 2.0 controller shared - - -- - - - PCI slot 2 - Otherwise, conflicts will arise between the two PCI groups, making the system unstable and the card inoperable. Onboard ...
shared - - - - - Onboard LAN1 shared - - -- - - - Onboard PCI SATA RAID (SI) -- - ASUS A8N-SLI Deluxe 2-15 Onboard USB 2.0 controller shared - - -- - - - PCI slot 2 - Otherwise, conflicts will arise between the two PCI groups, making the system unstable and the card inoperable. Onboard ...
User Manual
Page 43
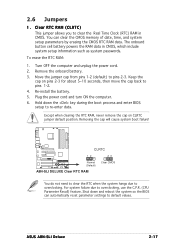
... pins 2-3 for about 5~10 seconds, then move the cap back to overclocking. A8N-SLI DELUXE ® CLRTC 12 23 Normal (Default) Clear CMOS A8N-SLI DELUXE Clear RTC RAM You do not need to clear the RTC when the system hangs due to pins 1-2. 4. ASUS A8N-SLI Deluxe 2-17 The onboard button cell battery powers the RAM data in CMOS...
... pins 2-3 for about 5~10 seconds, then move the cap back to overclocking. A8N-SLI DELUXE ® CLRTC 12 23 Normal (Default) Clear CMOS A8N-SLI DELUXE Clear RTC RAM You do not need to clear the RTC when the system hangs due to pins 1-2. 4. ASUS A8N-SLI Deluxe 2-17 The onboard button cell battery powers the RAM data in CMOS...


