

User manual 8092760 Asko T754C EN
Page 1
... come. To ensure that you for many years to avoid damaging the environment. Scandinavian design combines clean lines, everyday functionality, and high quality. ASKO T754C Operating Instructions Tumble dryer Save these instructions for future reference Dear Customer, Thank you read the operating instructions before using the machine. These are key characteristics of your...
... come. To ensure that you for many years to avoid damaging the environment. Scandinavian design combines clean lines, everyday functionality, and high quality. ASKO T754C Operating Instructions Tumble dryer Save these instructions for future reference Dear Customer, Thank you read the operating instructions before using the machine. These are key characteristics of your...
User manual 8092760 Asko T754C EN
Page 2
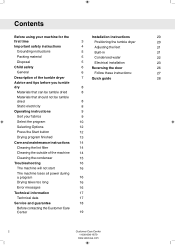
Contents Before using your machine for Installation instructions 22 the first time 3 Positioning the tumble dryer 22 Important safety instructions 4 Adjusting the feet 24 Grounding instructions 5 Built-in 24 Packing material 5 Condensed water 25 Disposal ...5 Electrical installation 26 Child safety 6 Reversing the door 29 General 6 Follow these instructions: 30 Description of the tumble dryer 7 Quick guide 32 Advice and tips before you tumble dry 8 Materials that can be tumble dried 8 Materials that should not be tumble ...
Contents Before using your machine for Installation instructions 22 the first time 3 Positioning the tumble dryer 22 Important safety instructions 4 Adjusting the feet 24 Grounding instructions 5 Built-in 24 Packing material 5 Condensed water 25 Disposal ...5 Electrical installation 26 Child safety 6 Reversing the door 29 General 6 Follow these instructions: 30 Description of the tumble dryer 7 Quick guide 32 Advice and tips before you tumble dry 8 Materials that can be tumble dried 8 Materials that should not be tumble ...

User manual 8092760 Asko T754C EN
Page 3
... thumping noise. You can find more information in the "Advice and tips before you need this Use&Care Guide in Spanish? When starting the tumble dryer for tumble drying. Before using your machine for the first time Do you tumble dry" chapter. Entre en www.askousa.com/customer-care y descá...
... thumping noise. You can find more information in the "Advice and tips before you need this Use&Care Guide in Spanish? When starting the tumble dryer for tumble drying. Before using your machine for the first time Do you tumble dry" chapter. Entre en www.askousa.com/customer-care y descá...
User manual 8092760 Asko T754C EN
Page 4
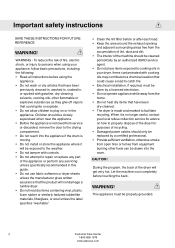
...play on how to properly dispose of the dryer for purposes of the dryer will not damage a tumble dryer. • Do not heat dry items containing...drawn into the appliance if the drum is no longer useful, contact your dryer. WARNING - Children should only be replaced by a licensed electrician. •...to a chemical reaction that have been dry-cleaned. • The dryer is made and marked to repair or replace any part of the ...install or store this guide. • Do not use fabric softeners or dryer sheets unless the manufacturer gives written assurance that could cause a load to catch...
...play on how to properly dispose of the dryer for purposes of the dryer will not damage a tumble dryer. • Do not heat dry items containing...drawn into the appliance if the drum is no longer useful, contact your dryer. WARNING - Children should only be replaced by a licensed electrician. •...to a chemical reaction that have been dry-cleaned. • The dryer is made and marked to repair or replace any part of the ...install or store this guide. • Do not use fabric softeners or dryer sheets unless the manufacturer gives written assurance that could cause a load to catch...

User manual 8092760 Asko T754C EN
Page 6
Child safety General WARNING! Do not allow children to play with the tumble dryer. • If the door is opened when a program is running, the garments may be very hot, with a risk of burn injuries. • The tumble dryer does not start automatically when the door is closed (if a child pulls the door shut from the inside, for example). 6 Customer Care Center 1-800-898-1879 www.askousa.com
Child safety General WARNING! Do not allow children to play with the tumble dryer. • If the door is opened when a program is running, the garments may be very hot, with a risk of burn injuries. • The tumble dryer does not start automatically when the door is closed (if a child pulls the door shut from the inside, for example). 6 Customer Care Center 1-800-898-1879 www.askousa.com

User manual 8092760 Asko T754C EN
Page 7
Lint filter 5. Condenser Customer Care Center 7 1-800-898-1879 www.askousa.com Serial number tag and rating plate 4. Panel 3. Outer door 6. Main power switch 2. Description of the tumble dryer 1 2 3 45 6 1.
Lint filter 5. Condenser Customer Care Center 7 1-800-898-1879 www.askousa.com Serial number tag and rating plate 4. Panel 3. Outer door 6. Main power switch 2. Description of the tumble dryer 1 2 3 45 6 1.

User manual 8092760 Asko T754C EN
Page 8
... before you tumble dry Here are some tips that may melt or become a fire hazard if exposed to heat and others can stop the tumble dryer by pressing the Stop button for three seconds or by opening the door and removing the laundry from the beginning if restarted. Garments will be...
... before you tumble dry Here are some tips that may melt or become a fire hazard if exposed to heat and others can stop the tumble dryer by pressing the Stop button for three seconds or by opening the door and removing the laundry from the beginning if restarted. Garments will be...

User manual 8092760 Asko T754C EN
Page 12
During testing, the tumble dryer must be set to 16A and Time Saver must be activated. For the consumption values given below, the requirements are as follows: Temperature of intake ...
During testing, the tumble dryer must be set to 16A and Time Saver must be activated. For the consumption values given below, the requirements are as follows: Temperature of intake ...

User manual 8092760 Asko T754C EN
Page 13
... instructions 5Selecting Options By selecting options, you use the same program. The available options depend on the display. Time saver You can stop the tumble dryer by pressing the Stop button or by pressing the button next to the symbol. • The lamp next to dry.
... instructions 5Selecting Options By selecting options, you use the same program. The available options depend on the display. Time saver You can stop the tumble dryer by pressing the Stop button or by pressing the button next to the symbol. • The lamp next to dry.

User manual 8092760 Asko T754C EN
Page 15
Use your thumb to accumulate around the tumble dryer clean and cool; Close the lint filter and put it out. 4. Do not use a damp sponge and a small amount of washing-up liquid to remove ...
Use your thumb to accumulate around the tumble dryer clean and cool; Close the lint filter and put it out. 4. Do not use a damp sponge and a small amount of washing-up liquid to remove ...

User manual 8092760 Asko T754C EN
Page 16
... when cleaning. It is quite normal for water to remove any lint from the drain hole at least three times a year. Turn off the tumble dryer with attached spray nozzle. Wipe any lint from the channel in front of the compartment. 4. NOTE! Open the condenser panel by turning the two knobs...
... when cleaning. It is quite normal for water to remove any lint from the drain hole at least three times a year. Turn off the tumble dryer with attached spray nozzle. Wipe any lint from the channel in front of the compartment. 4. NOTE! Open the condenser panel by turning the two knobs...

User manual 8092760 Asko T754C EN
Page 18
... it . See the "Care and maintenance instructions" chapter. • Prolonged drying times may also be due to the tumble dryer being located in a confined area or in a room that the tumble dryer has access to become too hot. • Make sure that is flashing on . • that the lint filter and ... has been reached. To cancel Delayed Start, press the Stop button for three seconds. • that the overheating cut -off shuts off the tumble dryer if the temperature is too high, caused by lint clogging the lint filter, for example. Drying takes too long • Check that the lint filter...
... it . See the "Care and maintenance instructions" chapter. • Prolonged drying times may also be due to the tumble dryer being located in a confined area or in a room that the tumble dryer has access to become too hot. • Make sure that is flashing on . • that the lint filter and ... has been reached. To cancel Delayed Start, press the Stop button for three seconds. • that the overheating cut -off shuts off the tumble dryer if the temperature is too high, caused by lint clogging the lint filter, for example. Drying takes too long • Check that the lint filter...
User manual 8092760 Asko T754C EN
Page 22
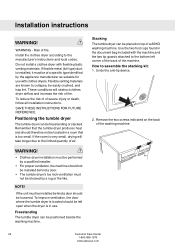
... to the manufacturer's instructions and local codes. Do not install a clothes dryer with clothes dryers. Risk of severe injury or death, follow all installation instructions. Positioning the tumble dryer The tumble dryer can be placed on the back of a ASKO washing machine. Install the clothes dryer according to assemble the stacking kit: 1. Installation instructions WARNING! WARNING...
... to the manufacturer's instructions and local codes. Do not install a clothes dryer with clothes dryers. Risk of severe injury or death, follow all installation instructions. Positioning the tumble dryer The tumble dryer can be placed on the back of a ASKO washing machine. Install the clothes dryer according to assemble the stacking kit: 1. Installation instructions WARNING! WARNING...

User manual 8092760 Asko T754C EN
Page 23
... machine. Fit the plastic cups so that the "tags" marked with arrows are resting in the plastic cups can you be sure that the tumble dryer is correctly positioned on the back of the cover and press them firmly onto the cover. Lower the tumble... dryer's front feet into the plastic cups and adjust the tumble dryer to 0,8" (20 mm). This is level. While doing this, keep the front edge raised by 0,4" (10 mm) to ensure it up far...
... machine. Fit the plastic cups so that the "tags" marked with arrows are resting in the plastic cups can you be sure that the tumble dryer is correctly positioned on the back of the cover and press them firmly onto the cover. Lower the tumble... dryer's front feet into the plastic cups and adjust the tumble dryer to 0,8" (20 mm). This is level. While doing this, keep the front edge raised by 0,4" (10 mm) to ensure it up far...
User manual 8092760 Asko T754C EN
Page 24
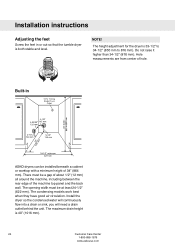
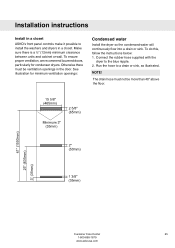
... the back wall. The maximum drain height is 33-1/2" to 34-1/2" (850 mm to 876 mm). Installation instructions Adjusting the feet Screw the feet in ASKO dryers can be installed beneath a cabinet or worktop with a minimum height of hole. Hole measurements are from center of 34" (864 mm). The condensing models ... 40" (1016 mm). 24 Customer Care Center 1-800-898-1879 www.askousa.com Built-in or out so that the tumble dryer is both stable and level. Install the dryer so the condensed water will continuously flow into a drain or sink, you will need a drain outlet behind the unit. Do not ...
... the back wall. The maximum drain height is 33-1/2" to 34-1/2" (850 mm to 876 mm). Installation instructions Adjusting the feet Screw the feet in ASKO dryers can be installed beneath a cabinet or worktop with a minimum height of hole. Hole measurements are from center of 34" (864 mm). The condensing models ... 40" (1016 mm). 24 Customer Care Center 1-800-898-1879 www.askousa.com Built-in or out so that the tumble dryer is both stable and level. Install the dryer so the condensed water will continuously flow into a drain or sink, you will need a drain outlet behind the unit. Do not ...
User manual 8092760 Asko T754C EN
Page 25
...To do this, follow the instructions below: 1. See illustration for condenser dryers. NOTE! To ensure proper ventilation, we recommend louvered doors, particularly for minimum ventilation openings: Condensed water Install the dryer so the condensed water will continuously flow into a drain or sink. ...Installation instructions Install in a closet ASKO's front panel controls make it possible to install the washers and dryers in the door. Run the hose ...
...To do this, follow the instructions below: 1. See illustration for condenser dryers. NOTE! To ensure proper ventilation, we recommend louvered doors, particularly for minimum ventilation openings: Condensed water Install the dryer so the condensed water will continuously flow into a drain or sink. ...Installation instructions Install in a closet ASKO's front panel controls make it possible to install the washers and dryers in the door. Run the hose ...
User manual 8092760 Asko T754C EN
Page 27
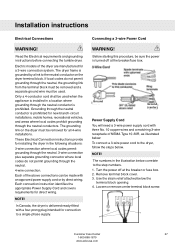
...not permit grounding through the neutral conductor is prohibited. These Electrical Connection instructions provide for all 4-wire installations. NOTE! In Canada, the dryer is prohibited for connection to the step numbers. 1. Connecting a 3-wire Power Cord WARNING! NOTE! The numbers in the following situations:... the neutral. 3-wire connection plus separate grounding connector where local codes do not permit grounding through the neutral conductors. The dryer frame is turned off at the breaker/fuse box. Before starting this procedure, be sure the power is grounded by direct...
...not permit grounding through the neutral conductor is prohibited. These Electrical Connection instructions provide for all 4-wire installations. NOTE! In Canada, the dryer is prohibited for connection to the step numbers. 1. Connecting a 3-wire Power Cord WARNING! NOTE! The numbers in the following situations:... the neutral. 3-wire connection plus separate grounding connector where local codes do not permit grounding through the neutral conductors. The dryer frame is turned off at the breaker/fuse box. Before starting this procedure, be sure the power is grounded by direct...
User manual 8092760 Asko T754C EN
Page 28
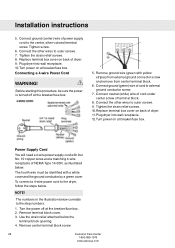
...Tighten screw. 6. Connect the other wires to outer screws. 7. Replace terminal box cover on at breaker/fuse box. Connecting a 4-wire Power Cord WARNING! Plug dryer into wall receptacle. 10. The fourth wire must be sure the power is turned off at the breaker/fuse box. 4 7 8 6 5. NOTE! Turn... the power off at the breaker/fuse box. 2. Plug dryer into wall receptacle. 12. Connect neutral (white) wire of cord under center screw of dryer. 9. Turn power on back of terminal block. 8. The numbers in the illustration below correlate to the...
...Tighten screw. 6. Connect the other wires to outer screws. 7. Replace terminal box cover on at breaker/fuse box. Connecting a 4-wire Power Cord WARNING! Plug dryer into wall receptacle. 10. The fourth wire must be sure the power is turned off at the breaker/fuse box. 4 7 8 6 5. NOTE! Turn... the power off at the breaker/fuse box. 2. Plug dryer into wall receptacle. 12. Connect neutral (white) wire of cord under center screw of dryer. 9. Turn power on back of terminal block. 8. The numbers in the illustration below correlate to the...
User manual 8095056 Asko T754C EN
Page 1
...To ensure that you get the most out of all our products and the reason they are greatly appreciated throughout the world. ASKO T754C Scandinavian design combines clean lines, everyday functionality, and high quality. The operating instructions also contain information on how to come....many years to avoid damaging the environment. These are key characteristics of your needs for choosing this quality product from ASKO. Operating Instructions Tumble dryer Save these instructions for future reference Dear Customer, Thank you read the operating instructions before using the machine.
...To ensure that you get the most out of all our products and the reason they are greatly appreciated throughout the world. ASKO T754C Scandinavian design combines clean lines, everyday functionality, and high quality. The operating instructions also contain information on how to come....many years to avoid damaging the environment. These are key characteristics of your needs for choosing this quality product from ASKO. Operating Instructions Tumble dryer Save these instructions for future reference Dear Customer, Thank you read the operating instructions before using the machine.
User manual 8095056 Asko T754C EN
Page 2
Contents Before using your machine for the Installation instructions 20 first time 3 Positioning the tumble dryer 20 Important safety instructions 4 Adjusting the feet 21 Grounding instructions 5 Built-in 21 Packing material 5 Condensed water 22 Disposal ...5 Electrical installation 23 Child safety 6 Reversing the door 26 General 6 Follow these instructions: 27 Description of the tumble dryer 7 Quick guide 28 Advice and tips before you tumble dry 8 Materials that can be tumble dried 8 Materials that should not be tumble ...
Contents Before using your machine for the Installation instructions 20 first time 3 Positioning the tumble dryer 20 Important safety instructions 4 Adjusting the feet 21 Grounding instructions 5 Built-in 21 Packing material 5 Condensed water 22 Disposal ...5 Electrical installation 23 Child safety 6 Reversing the door 26 General 6 Follow these instructions: 27 Description of the tumble dryer 7 Quick guide 28 Advice and tips before you tumble dry 8 Materials that can be tumble dried 8 Materials that should not be tumble ...


