
User manual 8092760 Asko T754C EN
Page 2
... 5 Electrical installation 26 Child safety 6 Reversing the door 29 General 6 Follow these instructions: 30 Description of the tumble dryer 7 Quick guide 32 Advice and tips before you tumble dry 8 Materials that can be tumble dried 8 Materials that should not be tumble dried 8 Static electricity 8 Operating instructions 9 Sort your fabrics 9 Select the program 10 Selecting Options 13 Press the Start button 13 Drying program finished 14 Care and maintenance instructions 15 Cleaning the lint filter...
... 5 Electrical installation 26 Child safety 6 Reversing the door 29 General 6 Follow these instructions: 30 Description of the tumble dryer 7 Quick guide 32 Advice and tips before you tumble dry 8 Materials that can be tumble dried 8 Materials that should not be tumble dried 8 Static electricity 8 Operating instructions 9 Sort your fabrics 9 Select the program 10 Selecting Options 13 Press the Start button 13 Drying program finished 14 Care and maintenance instructions 15 Cleaning the lint filter...
User manual 8092760 Asko T754C EN
Page 4
...; Clean the lint filter before or after each load. • Keep the area around the exhaust opening and adjacent surrounding areas free from the accumulation of lint, dust and dirt. • The interior of the appliance or perform any part of the machine should be closely supervised when near the appliance. • Before the appliance is removed from service or discarded, remove...
...; Clean the lint filter before or after each load. • Keep the area around the exhaust opening and adjacent surrounding areas free from the accumulation of lint, dust and dirt. • The interior of the appliance or perform any part of the machine should be closely supervised when near the appliance. • Before the appliance is removed from service or discarded, remove...

User manual 8092760 Asko T754C EN
Page 8
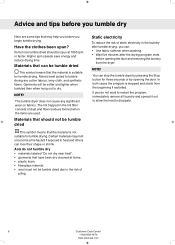
... suitable for three seconds or by opening the door and removing the laundry from the beginning if restarted. Materials that should be tumble dried This symbol means that the material is not suitable for tumble drying. NOTE! Higher spin speeds save energy and reduce drying time. Fabrics best suited to tumble drying are used. Have the clothes been spun? Advice and tips...
... suitable for three seconds or by opening the door and removing the laundry from the beginning if restarted. Materials that should be tumble dried This symbol means that the material is not suitable for tumble drying. NOTE! Higher spin speeds save energy and reduce drying time. Fabrics best suited to tumble drying are used. Have the clothes been spun? Advice and tips...

User manual 8092760 Asko T754C EN
Page 16
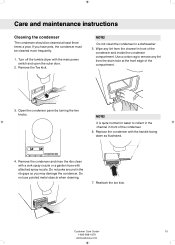
... main power switch and open the outer door. 2. If you may damage the condenser. Wipe any lint from the channel in a dishwasher. 5. Do not use pointed metal objects when cleaning. Turn off the tumble dryer with the handle facing down as illustrated. 16 Customer Care Center 1-800-898-1879 www.askousa.com Open the condenser panel by turning the two knobs. NOTE! Remove the...
... main power switch and open the outer door. 2. If you may damage the condenser. Wipe any lint from the channel in a dishwasher. 5. Do not use pointed metal objects when cleaning. Turn off the tumble dryer with the handle facing down as illustrated. 16 Customer Care Center 1-800-898-1879 www.askousa.com Open the condenser panel by turning the two knobs. NOTE! Remove the...

User manual 8092760 Asko T754C EN
Page 18
... cooled, then try starting it if necessary. Check that the condenser is not blocked. Clean it . See the "Care and maintenance instructions" chapter. • Prolonged drying times may also be due to the tumble dryer being located in a confined area or in a room that is too small, causing the air to more cold air, open doors and/or windows, for three seconds. • that any plug is connected...
... cooled, then try starting it if necessary. Check that the condenser is not blocked. Clean it . See the "Care and maintenance instructions" chapter. • Prolonged drying times may also be due to the tumble dryer being located in a confined area or in a room that is too small, causing the air to more cold air, open doors and/or windows, for three seconds. • that any plug is connected...
User manual 8092760 Asko T754C EN
Page 21
..., misuse, abuse, improper installation, or installation not in the home. P.O. Correct the installation of the model, type name, and serial number. Repair damage due to use . • Damage resulting from state to us at 1-800-898-1879 www.askousa.com Customer Care Center 21 1-800-898-1879 www.askousa.com Clean or service air device in drain line. • Repair and/or replacement parts for failure of...
..., misuse, abuse, improper installation, or installation not in the home. P.O. Correct the installation of the model, type name, and serial number. Repair damage due to use . • Damage resulting from state to us at 1-800-898-1879 www.askousa.com Customer Care Center 21 1-800-898-1879 www.askousa.com Clean or service air device in drain line. • Repair and/or replacement parts for failure of...
User manual 8092760 Asko T754C EN
Page 24
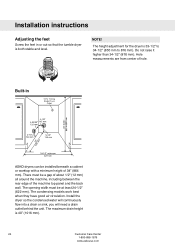
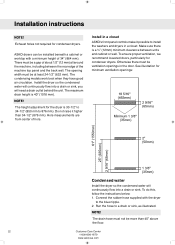
...opening width must be at least 24-1/2" (622 mm). The condensing models work best when they have good air circulation. Installation instructions Adjusting the feet Screw the feet in ASKO dryers can be installed beneath a cabinet or worktop with a minimum height of 34" (864 mm). Install the dryer so the condensed water will continuously flow into a drain or sink, you will need a drain outlet... top panel and the back wall. Built-in or out so that the tumble dryer is 40" (1016 mm). 24 Customer Care Center 1-800-898-1879 www.askousa.com NOTE! The height adjustment for the dryer is ...
...opening width must be at least 24-1/2" (622 mm). The condensing models work best when they have good air circulation. Installation instructions Adjusting the feet Screw the feet in ASKO dryers can be installed beneath a cabinet or worktop with a minimum height of 34" (864 mm). Install the dryer so the condensed water will continuously flow into a drain or sink, you will need a drain outlet... top panel and the back wall. Built-in or out so that the tumble dryer is 40" (1016 mm). 24 Customer Care Center 1-800-898-1879 www.askousa.com NOTE! The height adjustment for the dryer is ...
User manual 8092760 Asko T754C EN
Page 26
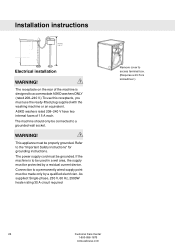
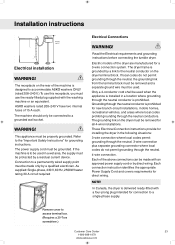
... grounded. WARNING! Installation instructions 2 1 Maximum height 40" 2a Electrical installation WARNING! The power supply cord must be connected to accommodate ASKO washers ONLY (rated 208-240 V.) To use this receptacle, you must be used in a wet area, the supply must use the ready-fitted plug supplied with the washing machine or an equivalent. As supplied: Single-phase, 230 V, 60 Hz, 2500W heater rating 30 A circuit required Remove cover to the...
... grounded. WARNING! Installation instructions 2 1 Maximum height 40" 2a Electrical installation WARNING! The power supply cord must be connected to accommodate ASKO washers ONLY (rated 208-240 V.) To use this receptacle, you must be used in a wet area, the supply must use the ready-fitted plug supplied with the washing machine or an equivalent. As supplied: Single-phase, 230 V, 60 Hz, 2500W heater rating 30 A circuit required Remove cover to the...
User manual 8092760 Asko T754C EN
Page 27
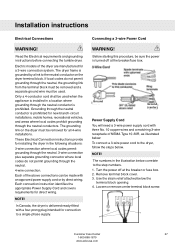
... with three No. 10 copper wires and a matching 3-wire receptacle of the dryer are manufactured for new branch-circuit installations, mobile homes, recreational vehicles, and areas where local codes prohibit grounding through the neutral. 4-wire connection. These Electrical Connection instructions provide for direct wiring. Each connection instruction identifies the appropriate Power Supply Cord and covers requirements for installing the dryer in the illustration below the terminal block opening. 4. Turn the power off at the breaker or fuse box. 2.
... with three No. 10 copper wires and a matching 3-wire receptacle of the dryer are manufactured for new branch-circuit installations, mobile homes, recreational vehicles, and areas where local codes prohibit grounding through the neutral. 4-wire connection. These Electrical Connection instructions provide for direct wiring. Each connection instruction identifies the appropriate Power Supply Cord and covers requirements for installing the dryer in the illustration below the terminal block opening. 4. Turn the power off at the breaker or fuse box. 2.
User manual 8092760 Asko T754C EN
Page 28
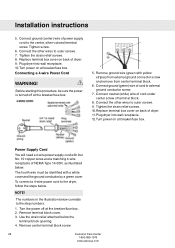
... numbers. 1. Connecting a 4-wire Power Cord WARNING! Plug dryer into wall receptacle. 12. Plug dryer into wall receptacle. 10. Connect neutral (white) wire of cord under center screw of NEMA Type 14-30R, as illustrated below correlate to outer screws. 7. Installation instructions 5. Before starting this procedure, be identified with yellow stripes) from external ground connector screw and remove from center terminal block. 6. The numbers in the illustration below . NOTE! Turn power on at the breaker/fuse...
... numbers. 1. Connecting a 4-wire Power Cord WARNING! Plug dryer into wall receptacle. 12. Plug dryer into wall receptacle. 10. Connect neutral (white) wire of cord under center screw of NEMA Type 14-30R, as illustrated below correlate to outer screws. 7. Installation instructions 5. Before starting this procedure, be identified with yellow stripes) from external ground connector screw and remove from center terminal block. 6. The numbers in the illustration below . NOTE! Turn power on at the breaker/fuse...
User manual 8095056 Asko T754C EN
Page 2
... 5 Electrical installation 23 Child safety 6 Reversing the door 26 General 6 Follow these instructions: 27 Description of the tumble dryer 7 Quick guide 28 Advice and tips before you tumble dry 8 Materials that can be tumble dried 8 Materials that should not be tumble dried 8 Static electricity 8 Operating instructions 9 Sort your fabrics 9 Select the program 10 Selecting Options 12 Press the Start button 12 Drying program finished 13 Care and maintenance instructions 14 Cleaning the lint filter...
... 5 Electrical installation 23 Child safety 6 Reversing the door 26 General 6 Follow these instructions: 27 Description of the tumble dryer 7 Quick guide 28 Advice and tips before you tumble dry 8 Materials that can be tumble dried 8 Materials that should not be tumble dried 8 Static electricity 8 Operating instructions 9 Sort your fabrics 9 Select the program 10 Selecting Options 12 Press the Start button 12 Drying program finished 13 Care and maintenance instructions 14 Cleaning the lint filter...
User manual 8095056 Asko T754C EN
Page 4
... "washable". • Clean the lint filter before or after each load. • Keep the area around the exhaust opening and adjacent surrounding areas free from service or discarded, remove the door to persons when using your appliance, follow basic precautions, including the following: • Read all instructions before touching the back. CAUTION! WARNING - When it is moving. • Do not install or store...
... "washable". • Clean the lint filter before or after each load. • Keep the area around the exhaust opening and adjacent surrounding areas free from service or discarded, remove the door to persons when using your appliance, follow basic precautions, including the following: • Read all instructions before touching the back. CAUTION! WARNING - When it is moving. • Do not install or store...
User manual 8095056 Asko T754C EN
Page 8
... drying program ends before opening the door. Items to be tumble dried should not be tumble dried This symbol means that the material is not suitable for tumble drying. NOTE! The lint trapped in the laundry after tumble drying, you can stop the tumble dryer by pressing the Stop button for tumble drying. Static electricity To reduce the risk of static electricity in the lint filter...
... drying program ends before opening the door. Items to be tumble dried should not be tumble dried This symbol means that the material is not suitable for tumble drying. NOTE! The lint trapped in the laundry after tumble drying, you can stop the tumble dryer by pressing the Stop button for tumble drying. Static electricity To reduce the risk of static electricity in the lint filter...
User manual 8095056 Asko T754C EN
Page 15
... condenser. 6. Customer Care Center 15 1-800-898-1879 www.askousa.com NOTE! Remove the condenser and rinse the ribs clean with a sink spray nozzle or a garden hose with the main power switch and open the outer door. 2. UPP UP OBEN 7. Use a cotton rag to collect in the channel in the rib gaps as illustrated. 4. Open the condenser panel by turning the two...
... condenser. 6. Customer Care Center 15 1-800-898-1879 www.askousa.com NOTE! Remove the condenser and rinse the ribs clean with a sink spray nozzle or a garden hose with the main power switch and open the outer door. 2. UPP UP OBEN 7. Use a cotton rag to collect in the channel in the rib gaps as illustrated. 4. Open the condenser panel by turning the two...
User manual 8095056 Asko T754C EN
Page 18
... installation instructions. 10. Replacement parts or repair labor on how to use your appliance is inconsistent to published user or operator instructions and or/or installation instructions. 2. This warranty gives you specific legal rights, and you also may not apply to you on appliances with ASKO within One (1) year from state to state or province to the finish of products not approved by an ASKO designated service...
... installation instructions. 10. Replacement parts or repair labor on how to use your appliance is inconsistent to published user or operator instructions and or/or installation instructions. 2. This warranty gives you specific legal rights, and you also may not apply to you on appliances with ASKO within One (1) year from state to state or province to the finish of products not approved by an ASKO designated service...

User manual 8095056 Asko T754C EN
Page 19
.... Service and guarantee If you think you need further assistance, you can be found on the type plate, which is found on the machine panel. The model designation (1) can be found on the first page of the operating instructions and on the front of the tumble dryer inside the outer door. 1 Should you need repair service, first see the "Trouble Shooting" section of the Use & Care Guide.
.... Service and guarantee If you think you need further assistance, you can be found on the type plate, which is found on the machine panel. The model designation (1) can be found on the first page of the operating instructions and on the front of the tumble dryer inside the outer door. 1 Should you need repair service, first see the "Trouble Shooting" section of the Use & Care Guide.
User manual 8095056 Asko T754C EN
Page 22
... drain hose must be more than 34-1/2" (876 mm). To do this, follow the instructions below: 1. There must be installed beneath a cabinet or worktop with the dryer to install the washers and dryers in a closet ASKO's front panel controls make it higher than 40" above the floor. 22 Customer Care Center 1-800-898-1879 www.askousa.com Exhaust holes not required for the dryer...
... drain hose must be more than 34-1/2" (876 mm). To do this, follow the instructions below: 1. There must be installed beneath a cabinet or worktop with the dryer to install the washers and dryers in a closet ASKO's front panel controls make it higher than 40" above the floor. 22 Customer Care Center 1-800-898-1879 www.askousa.com Exhaust holes not required for the dryer...
User manual 8095056 Asko T754C EN
Page 23
... ASKO washers ONLY (rated 208-240 V.) To use this receptacle, you must be used when the appliance is delivered ready-fitted with the washing machine or an equivalent. The grounding link on the dryer terminal block. These Electrical Connection instructions provide for direct wiring. Each connection instruction identifies the appropriate Power Supply Cord and covers requirements for installing the dryer in the following situations: 3-wire connection where local codes permit grounding through the neutral. 3-wire connection...
... ASKO washers ONLY (rated 208-240 V.) To use this receptacle, you must be used when the appliance is delivered ready-fitted with the washing machine or an equivalent. The grounding link on the dryer terminal block. These Electrical Connection instructions provide for direct wiring. Each connection instruction identifies the appropriate Power Supply Cord and covers requirements for installing the dryer in the following situations: 3-wire connection where local codes permit grounding through the neutral. 3-wire connection...

User manual 8095056 Asko T754C EN
Page 24
... below the terminal block opening . 4. Replace terminal box cover on at the breaker or fuse box. 2. Connecting a 4-wire Power Cord WARNING! Power Supply Cord You will need a 3-wire power supply cord with three No. 10 copper wires and a matching 3-wire receptacle of power supply cord to the step numbers. 1. Turn the power off at the breaker/fuse box. Remove terminal block cover. 3. Tighten the strain relief screws. 8. Turn power on back of NEMA Type 14-30R, as illustrated below: To connect a 3-wire power cord to the dryer, follow the...
... below the terminal block opening . 4. Replace terminal box cover on at the breaker or fuse box. 2. Connecting a 4-wire Power Cord WARNING! Power Supply Cord You will need a 3-wire power supply cord with three No. 10 copper wires and a matching 3-wire receptacle of power supply cord to the step numbers. 1. Turn the power off at the breaker/fuse box. Remove terminal block cover. 3. Tighten the strain relief screws. 8. Turn power on back of NEMA Type 14-30R, as illustrated below: To connect a 3-wire power cord to the dryer, follow the...

User manual 8095057 Asko T754C FR
Page 24
... direct wiring. Each connection instruction identifies the appropriate Power Supply Cord and covers requirements for installing the dryer in the following situations: 3-wire connection where local codes permit grounding through the neutral. 3-wire connection plus separate grounding connector where local codes do not permit grounding through the neutral. 4-wire connection. If local codes do not permit grounding through the neutral, the grounding link from the terminal block must be removed and a separate ground wire...
... direct wiring. Each connection instruction identifies the appropriate Power Supply Cord and covers requirements for installing the dryer in the following situations: 3-wire connection where local codes permit grounding through the neutral. 3-wire connection plus separate grounding connector where local codes do not permit grounding through the neutral. 4-wire connection. If local codes do not permit grounding through the neutral, the grounding link from the terminal block must be removed and a separate ground wire...


