
User manual 8092760 Asko T754C EN
Page 2
... machine for Installation instructions 22 the first time 3 Positioning the tumble dryer 22 Important safety instructions 4 Adjusting the feet 24 Grounding instructions 5 Built-in 24 Packing material 5 Condensed water 25 Disposal 5 Electrical installation 26 Child safety 6 Reversing the... door 29 General 6 Follow these instructions: 30 Description of the tumble dryer 7 Quick guide 32 Advice and tips before you...
... machine for Installation instructions 22 the first time 3 Positioning the tumble dryer 22 Important safety instructions 4 Adjusting the feet 24 Grounding instructions 5 Built-in 24 Packing material 5 Condensed water 25 Disposal 5 Electrical installation 26 Child safety 6 Reversing the... door 29 General 6 Follow these instructions: 30 Description of the tumble dryer 7 Quick guide 32 Advice and tips before you...

User manual 8092760 Asko T754C EN
Page 7
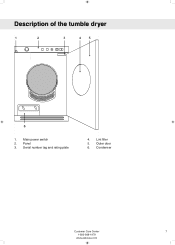
Main power switch 2. Outer door 6. Condenser Customer Care Center 7 1-800-898-1879 www.askousa.com Description of the tumble dryer 1 2 3 45 6 1. Panel 3. Lint filter 5. Serial number tag and rating plate 4.
Main power switch 2. Outer door 6. Condenser Customer Care Center 7 1-800-898-1879 www.askousa.com Description of the tumble dryer 1 2 3 45 6 1. Panel 3. Lint filter 5. Serial number tag and rating plate 4.

User manual 8092760 Asko T754C EN
Page 16
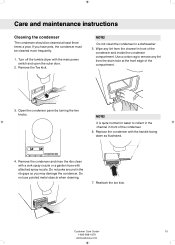
Use a cotton bud or rag to collect in the channel in front of the condenser and inside the condenser compartment. Turn off the tumble dryer with attached spray nozzle. Remove the condenser and rinse the ribs clean, such as with a with a sink spray nozzle or a garden hose with...the Toe kick. 3. Do not use pointed metal objects when cleaning. Care and maintenance instructions Cleaning the condenser The condenser should be cleaned more frequently. 1. Do not clean the condenser in the rib gaps as illustrated. 16 Customer Care Center 1-800-898-1879 www.askousa.com Open the...
Use a cotton bud or rag to collect in the channel in front of the condenser and inside the condenser compartment. Turn off the tumble dryer with attached spray nozzle. Remove the condenser and rinse the ribs clean, such as with a with a sink spray nozzle or a garden hose with...the Toe kick. 3. Do not use pointed metal objects when cleaning. Care and maintenance instructions Cleaning the condenser The condenser should be cleaned more frequently. 1. Do not clean the condenser in the rib gaps as illustrated. 16 Customer Care Center 1-800-898-1879 www.askousa.com Open the...

User manual 8092760 Asko T754C EN
Page 18
... closed. • that the main power switch is on. • that the condenser is flashing on the display, the maximum permitted program time has been reached. If it if necessary. Check that the tumble dryer has access to become too hot. • Make sure that the lint filter and... the condenser are not blocked. See the "Care and maintenance instructions" chapter. • Wait until the machine has...
... closed. • that the main power switch is on. • that the condenser is flashing on the display, the maximum permitted program time has been reached. If it if necessary. Check that the tumble dryer has access to become too hot. • Make sure that the lint filter and... the condenser are not blocked. See the "Care and maintenance instructions" chapter. • Wait until the machine has...
User manual 8092760 Asko T754C EN
Page 24
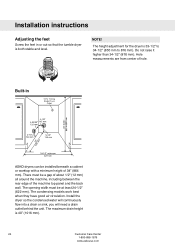
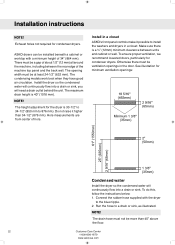
...-1/2" to 34-1/2" (850 mm to 876 mm). NOTE! The condensing models work best when they have good air circulation. Hole measurements are from center of 34" (864 mm). Installation instructions Adjusting the feet Screw the feet in ASKO dryers can be at least 24-1/2" (622 mm). The opening width .... Built-in or out so that the tumble dryer is both stable and level. Do not raise it higher than 34-1/2" (876 mm). There must be installed beneath a cabinet or worktop with a minimum height of hole. Install the dryer so the condensed water will continuously flow into a drain or sink...
...-1/2" to 34-1/2" (850 mm to 876 mm). NOTE! The condensing models work best when they have good air circulation. Hole measurements are from center of 34" (864 mm). Installation instructions Adjusting the feet Screw the feet in ASKO dryers can be at least 24-1/2" (622 mm). The opening width .... Built-in or out so that the tumble dryer is both stable and level. Do not raise it higher than 34-1/2" (876 mm). There must be installed beneath a cabinet or worktop with a minimum height of hole. Install the dryer so the condensed water will continuously flow into a drain or sink...
User manual 8092760 Asko T754C EN
Page 25
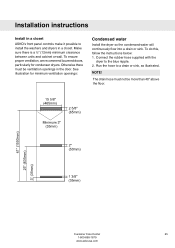
Installation instructions Install in a closet ASKO's front panel controls make it possible to install the washers and dryers in the door. See illustration for condenser dryers. To do this, follow the instructions below: 1. To ensure proper ventilation, we recommend louvered doors, particularly for minimum ventilation openings: Condensed water Install the dryer so the condensed water will continuously flow...
Installation instructions Install in a closet ASKO's front panel controls make it possible to install the washers and dryers in the door. See illustration for condenser dryers. To do this, follow the instructions below: 1. To ensure proper ventilation, we recommend louvered doors, particularly for minimum ventilation openings: Condensed water Install the dryer so the condensed water will continuously flow...
User manual 8095056 Asko T754C EN
Page 2
... machine for the Installation instructions 20 first time 3 Positioning the tumble dryer 20 Important safety instructions 4 Adjusting the feet 21 Grounding instructions 5 Built-in 21 Packing material 5 Condensed water 22 Disposal 5 Electrical installation 23 Child safety 6 Reversing the... door 26 General 6 Follow these instructions: 27 Description of the tumble dryer 7 Quick guide 28 Advice and tips before you...
... machine for the Installation instructions 20 first time 3 Positioning the tumble dryer 20 Important safety instructions 4 Adjusting the feet 21 Grounding instructions 5 Built-in 21 Packing material 5 Condensed water 22 Disposal 5 Electrical installation 23 Child safety 6 Reversing the... door 26 General 6 Follow these instructions: 27 Description of the tumble dryer 7 Quick guide 28 Advice and tips before you...
User manual 8095056 Asko T754C EN
Page 7
Description of the tumble dryer 1 2 3 45 6 1. Panel 3. Condenser Customer Care Center 7 1-800-898-1879 www.askousa.com Lint filter 5. Serial number tag and rating plate 4. Main power switch 2. Outer door 6.
Description of the tumble dryer 1 2 3 45 6 1. Panel 3. Condenser Customer Care Center 7 1-800-898-1879 www.askousa.com Lint filter 5. Serial number tag and rating plate 4. Main power switch 2. Outer door 6.
User manual 8095056 Asko T754C EN
Page 15
...not clean the condenser in front of the condenser and inside the condenser compartment. NOTE! Reattach the toe kick. Turn off the tumble dryer with attached spray nozzle. NOTE! UPP UP OBEN 7. Replace the condenser with the handle facing down as you have pets, the condenser must be cleaned... at the front edge of the condenser. 6. Do not use pointed metal objects when...
...not clean the condenser in front of the condenser and inside the condenser compartment. NOTE! Reattach the toe kick. Turn off the tumble dryer with attached spray nozzle. NOTE! UPP UP OBEN 7. Replace the condenser with the handle facing down as you have pets, the condenser must be cleaned... at the front edge of the condenser. 6. Do not use pointed metal objects when...

User manual 8095056 Asko T754C EN
Page 16
... chapter. • Check that any plug is not blocked. To cancel Delayed Start, press the Stop button for three seconds. • that the condenser is clean. Drying takes too long • Check that the lint filter is connected. • that the house fuses or circuit breaker have not... been tripped. • that the condenser is not blocked. See the Care and maintenance instructions chapter. • Prolonged drying times may also be due to the tumble dryer being located in a confined area or in a room that is too small, causing ...
... chapter. • Check that any plug is not blocked. To cancel Delayed Start, press the Stop button for three seconds. • that the condenser is clean. Drying takes too long • Check that the lint filter is connected. • that the house fuses or circuit breaker have not... been tripped. • that the condenser is not blocked. See the Care and maintenance instructions chapter. • Prolonged drying times may also be due to the tumble dryer being located in a confined area or in a room that is too small, causing ...
User manual 8095056 Asko T754C EN
Page 22
... be installed beneath a cabinet or worktop with the dryer to 876 mm). The height adjustment for minimum ventilation openings: Condensed water Install the dryer so the condensed water will need a drain outlet behind the unit. Install in a closet ASKO's front panel controls make it higher than 40" ... from center of 34" (864 mm). To ensure proper ventilation, we recommend louvered doors, particularly for condenser dryers. Run the hose to install the washers and dryers in the door. ASKO dryers can be more than 34-1/2" (876 mm). The opening width must be at least 24-1/2" (622 ...
... be installed beneath a cabinet or worktop with the dryer to 876 mm). The height adjustment for minimum ventilation openings: Condensed water Install the dryer so the condensed water will need a drain outlet behind the unit. Install in a closet ASKO's front panel controls make it higher than 40" ... from center of 34" (864 mm). To ensure proper ventilation, we recommend louvered doors, particularly for condenser dryers. Run the hose to install the washers and dryers in the door. ASKO dryers can be more than 34-1/2" (876 mm). The opening width must be at least 24-1/2" (622 ...


