
Service Guide
Page 16
... to the images shown in the table). Do not use a foot that only the hard plastic plug is clean. This ensures a balanced and level fitting. MacBook Pro 17-inch (original, Core 2 Duo, 2.4/2.6GHz, 2008) Take Apart - Columbus, OH. 43215-3799 www.krazyglue.com 1. Verify that the case plug and case foot... down on the bottom case is visible. If any portion of the soft rubber foot remains, remove it so that does not match. 3. Foot 16 Important: When positioning the foot, make sure the indents and bumps of this procedure can bond instantly to skin. Procedure Warning: The glue used in...
... to the images shown in the table). Do not use a foot that only the hard plastic plug is clean. This ensures a balanced and level fitting. MacBook Pro 17-inch (original, Core 2 Duo, 2.4/2.6GHz, 2008) Take Apart - Columbus, OH. 43215-3799 www.krazyglue.com 1. Verify that the case plug and case foot... down on the bottom case is visible. If any portion of the soft rubber foot remains, remove it so that does not match. 3. Foot 16 Important: When positioning the foot, make sure the indents and bumps of this procedure can bond instantly to skin. Procedure Warning: The glue used in...
Service Guide
Page 34
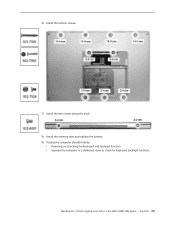
16. Testing the computer should include: • Powering on, checking the keyboard and trackpad function. • Operate the computer in a darkened room to check for keyboard backlight function. Top Case 34 Install the bottom screws. 17. Install the memory door and replace the battery. 19. MacBook Pro 17-inch (original, Core 2 Duo, 2.4/2.6GHz, 2008) Take Apart - Install the two screws along the back. . 18.
16. Testing the computer should include: • Powering on, checking the keyboard and trackpad function. • Operate the computer in a darkened room to check for keyboard backlight function. Top Case 34 Install the bottom screws. 17. Install the memory door and replace the battery. 19. MacBook Pro 17-inch (original, Core 2 Duo, 2.4/2.6GHz, 2008) Take Apart - Install the two screws along the back. . 18.

Service Guide
Page 44
MacBook Pro 17-inch (original, Core 2 Duo, 2.4/2.6GHz, 2008) Take Apart - Note: Since the MacBook Pro 17-inch (2.4GHz & Early 2008) keyboards have no side tabs like previous models, the keyboard will more easily fall out of the keyboard well. To prevent the keyboard from falling out, support it with your hand, and raise the top case up vertically. 16. Keyboard 44 Carefully peel back the film as needed to access the screws. 17.
MacBook Pro 17-inch (original, Core 2 Duo, 2.4/2.6GHz, 2008) Take Apart - Note: Since the MacBook Pro 17-inch (2.4GHz & Early 2008) keyboards have no side tabs like previous models, the keyboard will more easily fall out of the keyboard well. To prevent the keyboard from falling out, support it with your hand, and raise the top case up vertically. 16. Keyboard 44 Carefully peel back the film as needed to access the screws. 17.

Service Guide
Page 57
Keyboard 57 Support the cable with a black stick to prevent it straight and fully into the open connector. Press the cable flat to the top case and insert it from sticking to secure its adhesive. MacBook Pro 17-inch (original, Core 2 Duo, 2.4/2.6GHz, 2008) Take Apart - If installing a replacement keyboard, peel the adhesive protector off of the back of the large flex cable. 17. Secure the locking tab. 18. 16.
Keyboard 57 Support the cable with a black stick to prevent it straight and fully into the open connector. Press the cable flat to the top case and insert it from sticking to secure its adhesive. MacBook Pro 17-inch (original, Core 2 Duo, 2.4/2.6GHz, 2008) Take Apart - If installing a replacement keyboard, peel the adhesive protector off of the back of the large flex cable. 17. Secure the locking tab. 18. 16.

Service Guide
Page 134
16. Reassemble and test all along the connector. Logic Board 134 Verify that the ExpressCard cage flex connector, from the heatsink, it is acceptable to retain ... can occur. 18. If the connector on the flex is on the logic board, a bad connection with the connector on the camera cable connector. 17. MacBook Pro 17-inch (original, Core 2 Duo, 2.4/2.6GHz, 2008) Take Apart - Note: After installing new thermal grease, if you must briefly re-separate the logic board from...
16. Reassemble and test all along the connector. Logic Board 134 Verify that the ExpressCard cage flex connector, from the heatsink, it is acceptable to retain ... can occur. 18. If the connector on the flex is on the logic board, a bad connection with the connector on the camera cable connector. 17. MacBook Pro 17-inch (original, Core 2 Duo, 2.4/2.6GHz, 2008) Take Apart - Note: After installing new thermal grease, if you must briefly re-separate the logic board from...

Service Guide
Page 159
...10. Click on the USB hard drive named "ASD OS 3S121." 9. Note: Image ASD EFI 3S1121.dmg should be unmounted before restoring it by clicking on the Image button. The pads are two pads on the logic board that can be unmounted before restoring it by clicking on the Image... MacBook Pro ...17-inch (original, Core 2 Duo, 2.4/2.6GHz, 2008) Troubleshooting - In Disk Utility, select the volume on the Restore tab 15. Click on the USB hard drive named ASD EFI 3S121. 14. Click the Restore button to the hard drive. 16. These pads are located ...
...10. Click on the USB hard drive named "ASD OS 3S121." 9. Note: Image ASD EFI 3S1121.dmg should be unmounted before restoring it by clicking on the Image button. The pads are two pads on the logic board that can be unmounted before restoring it by clicking on the Image... MacBook Pro ...17-inch (original, Core 2 Duo, 2.4/2.6GHz, 2008) Troubleshooting - In Disk Utility, select the volume on the Restore tab 15. Click on the USB hard drive named ASD EFI 3S121. 14. Click the Restore button to the hard drive. 16. These pads are located ...

Service Guide
Page 195
...The DMA controller is based on the Intel Core 2 Duo microprocessor and two ICs, the North Bridge memory controller and the South Bridge I /O space. MacBook Pro 17-inch (original, Core 2 Duo, 2.4/2.6GHz, 2008) Troubleshooting - The North Bridge provides the bridging functionality among the processor, the memory system, the...bus, and the 16-lane PCI Express bus to the graphics controller. Figure 1 (see following page) provides a simplified block diagram of the North Bridge and South Bridge ICs and the buses that are fixed in the lower 64 KB of the 17-inch MacBook Pro is configured using ...
...The DMA controller is based on the Intel Core 2 Duo microprocessor and two ICs, the North Bridge memory controller and the South Bridge I /O space. MacBook Pro 17-inch (original, Core 2 Duo, 2.4/2.6GHz, 2008) Troubleshooting - The North Bridge provides the bridging functionality among the processor, the memory system, the...bus, and the 16-lane PCI Express bus to the graphics controller. Figure 1 (see following page) provides a simplified block diagram of the North Bridge and South Bridge ICs and the buses that are fixed in the lower 64 KB of the 17-inch MacBook Pro is configured using ...

User Guide
Page 3
Contents 7 Chapter 1: Getting Started 8 Setting Up Your MacBook Pro 16 Basic Components of Your MacBook Pro 18 Features of Your MacBook Pro Keyboard 20 Additional Components of Your MacBook Pro 22 Putting Your MacBook Pro to Sleep or Shutting It Down 24 Calibrating Your Battery 25 Getting More Information 26 Getting Answers Using Mac Help 27 Chapter 2: Getting to Know Your MacBook Pro 28 Adjusting Your Display 30 Using Your Power Adapter 32 Using the Trackpad 33 Using the Keyboard 35 Using a Mouse 35 Using the Apple Remote and Front Row 40 Using the Built-in iSight Camera 3
Contents 7 Chapter 1: Getting Started 8 Setting Up Your MacBook Pro 16 Basic Components of Your MacBook Pro 18 Features of Your MacBook Pro Keyboard 20 Additional Components of Your MacBook Pro 22 Putting Your MacBook Pro to Sleep or Shutting It Down 24 Calibrating Your Battery 25 Getting More Information 26 Getting Answers Using Mac Help 27 Chapter 2: Getting to Know Your MacBook Pro 28 Adjusting Your Display 30 Using Your Power Adapter 32 Using the Trackpad 33 Using the Keyboard 35 Using a Mouse 35 Using the Apple Remote and Front Row 40 Using the Built-in iSight Camera 3

User Guide
Page 16
Basic Components of Your MacBook Pro iSight camera Camera indicator light Built-in stereo speakers Microphone ® Infrared (IR) receiver Sleep indicator light Display release button Trackpad button Trackpad Slot-loading SuperDrive ® Power button 16 Chapter 1 Getting Started
Basic Components of Your MacBook Pro iSight camera Camera indicator light Built-in stereo speakers Microphone ® Infrared (IR) receiver Sleep indicator light Display release button Trackpad button Trackpad Slot-loading SuperDrive ® Power button 16 Chapter 1 Getting Started

User Guide
Page 102
Operating Environment  Operating temperature: 50° F to 95° F (10° C to 35° C)  Altitude: 3048 m (10,000 ft.) maximum  Relative humidity: 0% to 90% noncondensing Power Adapter  Input: AC 100-240 volts (V), 50/60 hertz (Hz)  Output: DC 18.5 V @ 4.6 A; 16.5 V @ 3.6 A Battery  Output: DC 10.8 V More information is available on the Apple website at www.apple.com/macbookpro and www.apple.com/support. 102 Appendix A Specifications
Operating Environment  Operating temperature: 50° F to 95° F (10° C to 35° C)  Altitude: 3048 m (10,000 ft.) maximum  Relative humidity: 0% to 90% noncondensing Power Adapter  Input: AC 100-240 volts (V), 50/60 hertz (Hz)  Output: DC 18.5 V @ 4.6 A; 16.5 V @ 3.6 A Battery  Output: DC 10.8 V More information is available on the Apple website at www.apple.com/macbookpro and www.apple.com/support. 102 Appendix A Specifications