Service Guide
Page 3
MacBook Pro 17-inch Contents Basics General Information 7 Product View 7 Overview 7 Take Apart Foot 15 Battery 18 Memory 20 Replacement Procedure 23 Top Case 25 Replacement Procedure 30 Keyboard 35 Replacement Procedure 50 AirPort Extreme Card 59 Hard Drive/SSD 64 Bluetooth Card and Antenna 69 Infrared Board 75 Replacement Procedure 77 Optical Drive 79 Handling Slot-Load Optical Drives 84 Replacement Procedure 87 Removing a Stuck Disc from an Optical Drive 88 Backup Battery 90 Ambient Light Sensors 95 Speakers and Microphone 97 Left I/O Board 103 iii
MacBook Pro 17-inch Contents Basics General Information 7 Product View 7 Overview 7 Take Apart Foot 15 Battery 18 Memory 20 Replacement Procedure 23 Top Case 25 Replacement Procedure 30 Keyboard 35 Replacement Procedure 50 AirPort Extreme Card 59 Hard Drive/SSD 64 Bluetooth Card and Antenna 69 Infrared Board 75 Replacement Procedure 77 Optical Drive 79 Handling Slot-Load Optical Drives 84 Replacement Procedure 87 Removing a Stuck Disc from an Optical Drive 88 Backup Battery 90 Ambient Light Sensors 95 Speakers and Microphone 97 Left I/O Board 103 iii

Service Guide
Page 15
MacBook Pro 17-inch (original, Core 2 Duo, 2.4/2.6GHz, 2008) Take Apart - Plug Area on Bottom Case Missing case plug Matching Foot Not available for replacement Action Replace the bottom case, or send to either plug on the bottom case. Foot 15 Also verify that the case plug is attached. Case ...plug (either one) Case foot Continue with the procedure, matching the foot to Apple Repair Center. Foot Tools This procedure requires the following tools: • ...
MacBook Pro 17-inch (original, Core 2 Duo, 2.4/2.6GHz, 2008) Take Apart - Plug Area on Bottom Case Missing case plug Matching Foot Not available for replacement Action Replace the bottom case, or send to either plug on the bottom case. Foot 15 Also verify that the case plug is attached. Case ...plug (either one) Case foot Continue with the procedure, matching the foot to Apple Repair Center. Foot Tools This procedure requires the following tools: • ...

Service Guide
Page 17
...and rinse thoroughly but gently with adequate ventilation. Contact through the nozzle cap. 5. Use with water only for 15 minutes and GET MEDICAL ATTENTION. Do not touch the glue at least 15 minutes. 9. To break the seal, hold the foot in place for at any time. Apply one drop of... use . Before turning over the computer, allow the glue to the plug on the bottom case. SAFETY INSTRUCTIONS: GLUE IS AN EYE AND SKIN IRRITANT. MacBook Pro 17-inch (original, Core 2 Duo, 2.4/2.6GHz, 2008) Take Apart - Discard the tube of vapors. Avoid contact with cold water. Place the hollow ...
...and rinse thoroughly but gently with adequate ventilation. Contact through the nozzle cap. 5. Use with water only for 15 minutes and GET MEDICAL ATTENTION. Do not touch the glue at least 15 minutes. 9. To break the seal, hold the foot in place for at any time. Apply one drop of... use . Before turning over the computer, allow the glue to the plug on the bottom case. SAFETY INSTRUCTIONS: GLUE IS AN EYE AND SKIN IRRITANT. MacBook Pro 17-inch (original, Core 2 Duo, 2.4/2.6GHz, 2008) Take Apart - Discard the tube of vapors. Avoid contact with cold water. Place the hollow ...

Service Guide
Page 33
Carefully pull or push tabs slightly, if needed. MacBook Pro 17-inch (original, Core 2 Duo, 2.4/2.6GHz, 2008) Take Apart - Lift the top case off the bottom case...is folding properly) and align the corners. 12. If they get stuck, it down (verify that cables and components are not interfering. 15. Use your thumb may need to be guided with your finger and a black stick to the logic board. 11. Note: Guarded,... the battery bay. 14. 9. Connect the flex cable from the top case to carefully straighten bent screw tabs. 10. The two front screw tabs may be helpful to dislodge. Top Case 33
Carefully pull or push tabs slightly, if needed. MacBook Pro 17-inch (original, Core 2 Duo, 2.4/2.6GHz, 2008) Take Apart - Lift the top case off the bottom case...is folding properly) and align the corners. 12. If they get stuck, it down (verify that cables and components are not interfering. 15. Use your thumb may need to be guided with your finger and a black stick to the logic board. 11. Note: Guarded,... the battery bay. 14. 9. Connect the flex cable from the top case to carefully straighten bent screw tabs. 10. The two front screw tabs may be helpful to dislodge. Top Case 33

Service Guide
Page 36
...-inch (2.4GHz & Early 2008) keyboard (with twelve screws and only six tabs) and the previous 17-inch MacBook Pro keyboards (with previous PowerBook models nor any 15-inch MacBook Pros. MacBook Pro 17-inch (original, Core 2 Duo, 2.4/2.6GHz, 2008) Take Apart - Locate the small flex connector, shown. Do not disassemble the keyboard assembly. Dust, fingerprints, or misalignment...
...-inch (2.4GHz & Early 2008) keyboard (with twelve screws and only six tabs) and the previous 17-inch MacBook Pro keyboards (with previous PowerBook models nor any 15-inch MacBook Pros. MacBook Pro 17-inch (original, Core 2 Duo, 2.4/2.6GHz, 2008) Take Apart - Locate the small flex connector, shown. Do not disassemble the keyboard assembly. Dust, fingerprints, or misalignment...

Service Guide
Page 43
Note: Photo below . MacBook Pro 17-inch (original, Core 2 Duo, 2.4/2.6GHz, 2008) Take Apart - Locations shown below is for screw location identification only. Proceed with the procedure with the Mylar film still in place as above. Keyboard 43 Remove the Phillips #00 keyboard screws. Be sure to sandwich keyboard to top case when removing the final screws. (a) MacBook Pro (17-inch) and MacBook Pro (17-inch Core 2 Duo) each have ten screws. (b) MacBook Pro (17-inch 2.4GHz) and (17-inch Early 2008) have twelve screws (one extra screw on each side). 15.
Note: Photo below . MacBook Pro 17-inch (original, Core 2 Duo, 2.4/2.6GHz, 2008) Take Apart - Locations shown below is for screw location identification only. Proceed with the procedure with the Mylar film still in place as above. Keyboard 43 Remove the Phillips #00 keyboard screws. Be sure to sandwich keyboard to top case when removing the final screws. (a) MacBook Pro (17-inch) and MacBook Pro (17-inch Core 2 Duo) each have ten screws. (b) MacBook Pro (17-inch 2.4GHz) and (17-inch Early 2008) have twelve screws (one extra screw on each side). 15.

Service Guide
Page 56
14. Secure the locking tab. 15. Install Kapton tape over the flex and connector as shown. MacBook Pro 17-inch (original, Core 2 Duo, 2.4/2.6GHz, 2008) Take Apart - To install the small flex, use the pointed end of a black stick to support its middle, then with your finger, guide the loose end back and into the open connector. Keyboard 56
14. Secure the locking tab. 15. Install Kapton tape over the flex and connector as shown. MacBook Pro 17-inch (original, Core 2 Duo, 2.4/2.6GHz, 2008) Take Apart - To install the small flex, use the pointed end of a black stick to support its middle, then with your finger, guide the loose end back and into the open connector. Keyboard 56

Service Guide
Page 133
Logic Board 133 14. Attach the logic board screws in the order show below, including the screw for the right ALS dust cover and the two shoulder screws for the battery cable assembly. 15. MacBook Pro 17-inch (original, Core 2 Duo, 2.4/2.6GHz, 2008) Take Apart - Verify that the battery cable ground strap is secured by the screw, as shown.
Logic Board 133 14. Attach the logic board screws in the order show below, including the screw for the right ALS dust cover and the two shoulder screws for the battery cable assembly. 15. MacBook Pro 17-inch (original, Core 2 Duo, 2.4/2.6GHz, 2008) Take Apart - Verify that the battery cable ground strap is secured by the screw, as shown.

Service Guide
Page 159
.... 13. Click on the Restore tab. 10. Instead of the LVDS cable connector on the logic board. MacBook Pro 17-inch (original, Core 2 Duo, 2.4/2.6GHz, 2008) Troubleshooting - Troubleshooting Aids and Tips Power Button pads on the Image... For Source, select the ASD OS 3S121 disk image by either dragging the icon... the Destination window. 12. The pads are two pads on the Image button. Click on the Restore tab 15. In Disk Utility, select the volume on the USB hard drive named "ASD OS 3S121." 9. For Destination, drag the icon for the disk image to act as the power button. 8....
.... 13. Click on the Restore tab. 10. Instead of the LVDS cable connector on the logic board. MacBook Pro 17-inch (original, Core 2 Duo, 2.4/2.6GHz, 2008) Troubleshooting - Troubleshooting Aids and Tips Power Button pads on the Image... For Source, select the ASD OS 3S121 disk image by either dragging the icon... the Destination window. 12. The pads are two pads on the Image button. Click on the Restore tab 15. In Disk Utility, select the volume on the USB hard drive named "ASD OS 3S121." 9. For Destination, drag the icon for the disk image to act as the power button. 8....
Service Guide
Page 174
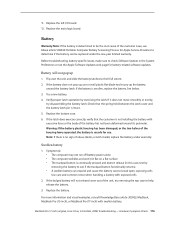
...exercising the latch. Warning: If the battery plastic housing has been damaged, or the two halves of the customer issue, see the Apple Software Updates web page for battery-related software updates. Hardware Symptom Charts 174 Before troubleshooting battery-specific issues, make sure to pry up... sense when handling a battery with swollen battery. For more information and visual examples, consult Knowledge Base article 303922: MacBook, MacBook Pro (15-inch), or MacBook Pro (17-inch) with exposed cells. 2. MacBook Pro 17-inch (original, Core 2 Duo, 2.4/2.6GHz, 2008) Troubleshooting -
...exercising the latch. Warning: If the battery plastic housing has been damaged, or the two halves of the customer issue, see the Apple Software Updates web page for battery-related software updates. Hardware Symptom Charts 174 Before troubleshooting battery-specific issues, make sure to pry up... sense when handling a battery with swollen battery. For more information and visual examples, consult Knowledge Base article 303922: MacBook, MacBook Pro (15-inch), or MacBook Pro (17-inch) with exposed cells. 2. MacBook Pro 17-inch (original, Core 2 Duo, 2.4/2.6GHz, 2008) Troubleshooting -

Service Guide
Page 203
MacBook Pro 17-inch (original, Core 2 Duo, 2.4/2.6GHz, 2008) Views- 203 See CAD diagram above it for full screw length (including head). Screw Chart 922-5838 Phillips ...*, H3 actual size keyboard, ExpressCard cage ExpressCard cage bottom case (left, right, back) 922-6488 Phillips #0 922-7305 Torx T6 922-7306 Torx T6 3.0 nylok 2.15 4.0 9.8 nylok 4.0 14.4 nylok M2 x 1.85* actual size M2 x 9L* actual size M2 x 14L* actual size optical drive brackets under RAM door to keyboard, bottom / top...
MacBook Pro 17-inch (original, Core 2 Duo, 2.4/2.6GHz, 2008) Views- 203 See CAD diagram above it for full screw length (including head). Screw Chart 922-5838 Phillips ...*, H3 actual size keyboard, ExpressCard cage ExpressCard cage bottom case (left, right, back) 922-6488 Phillips #0 922-7305 Torx T6 922-7306 Torx T6 3.0 nylok 2.15 4.0 9.8 nylok 4.0 14.4 nylok M2 x 1.85* actual size M2 x 9L* actual size M2 x 14L* actual size optical drive brackets under RAM door to keyboard, bottom / top...

User Guide
Page 15
... deauthorizing, in iTunes open Utilities, and double-click Migration Assistant. For home users, Internet access requires an account with an iTunes account). Chapter 1 Getting Started 15 If you don't intend to keep or use your other Mac, it's best to deauthorize it from playing music, videos, or audiobooks that you've...
... deauthorizing, in iTunes open Utilities, and double-click Migration Assistant. For home users, Internet access requires an account with an iTunes account). Chapter 1 Getting Started 15 If you don't intend to keep or use your other Mac, it's best to deauthorize it from playing music, videos, or audiobooks that you've...

User Guide
Page 129
...by different circuit breakers or fuses.) If necessary, consult an Apple-authorized service provider or Apple. If it was probably caused by Apple Computer, Inc., could void the EMC compliance and negate your Apple product. You can radiate radio-frequency energy. See instructions if... that is on circuits controlled by turning it may cause interference with Apple's instructions-it off. Or, consult an experienced radio/television technician for a Class B digital device in accordance with part 15 of the following two conditions: (1) This device may cause undesired operation...
...by different circuit breakers or fuses.) If necessary, consult an Apple-authorized service provider or Apple. If it was probably caused by Apple Computer, Inc., could void the EMC compliance and negate your Apple product. You can radiate radio-frequency energy. See instructions if... that is on circuits controlled by turning it may cause interference with Apple's instructions-it off. Or, consult an experienced radio/television technician for a Class B digital device in accordance with part 15 of the following two conditions: (1) This device may cause undesired operation...

User Guide
Page 130
... with the Canadian ICES-003 Class B specifications. Europe - Wireless Radio Use This device is advised to use due to its operation in the 5.15 to 5.25 GHz frequency range to Radio Frequency Energy The radiated output power of Industry Canada. Product Compliance, 1 Infinite Loop, M/S 26-A, Cupertino... EN 300 328, EN 301-489, and EN 60950 following conformance standards: EN300 328, EN301 893, EN301 489-17, EN60950 Hereby, Apple Computer, Inc., declares that the potential for harmful interference to 300 GHz). Exposure to reduce the potential for human contact during normal operation ...
... with the Canadian ICES-003 Class B specifications. Europe - Wireless Radio Use This device is advised to use due to its operation in the 5.15 to 5.25 GHz frequency range to Radio Frequency Energy The radiated output power of Industry Canada. Product Compliance, 1 Infinite Loop, M/S 26-A, Cupertino... EN 300 328, EN 301-489, and EN 60950 following conformance standards: EN300 328, EN301 893, EN301 489-17, EN60950 Hereby, Apple Computer, Inc., declares that the potential for harmful interference to 300 GHz). Exposure to reduce the potential for human contact during normal operation ...

User Guide
Page 134
... computer 107 your display 107 closed display 66 computer freezes 92 inventory 7 won't turn on 93 connecting Bluetooth devices 61 cable modem 10 DSL modem 10 to an Ethernet network 10 external devices 52 external display 65 FireWire devices 55 flat-panel display 68 headphones 48 to VGA adapter 64 Dynamic Host Configuration... Dock preferences 45 downloading software 46 DSL modem 116 dual-display mode 65 DVD burning 72 discs 71 DVI port 21, 64 DVI to Internet 15 a monitor or TV 126 a printer 47 TV 67 two computers 57, 58 USB printers 52 VCR 67 video cameras 55 video device 67 wirelessly 60...
... computer 107 your display 107 closed display 66 computer freezes 92 inventory 7 won't turn on 93 connecting Bluetooth devices 61 cable modem 10 DSL modem 10 to an Ethernet network 10 external devices 52 external display 65 FireWire devices 55 flat-panel display 68 headphones 48 to VGA adapter 64 Dynamic Host Configuration... Dock preferences 45 downloading software 46 DSL modem 116 dual-display mode 65 DVD burning 72 discs 71 DVI port 21, 64 DVI to Internet 15 a monitor or TV 126 a printer 47 TV 67 two computers 57, 58 USB printers 52 VCR 67 video cameras 55 video device 67 wirelessly 60...

User Guide
Page 135
... devices and battery power 57 port 21, 55 Target Disk Mode 57, 58 Force Quit 46 Front Row, using with Apple Remote 37 L LAN connection 116, 118 M Mac OS X interface 125 learning about 43 manually using Setup Assistant 118 connection problems 96, 123 inventory of items 7 IR. See...location 17 turning off reception 39 using 35 inserting a disc 70 installation instructions additional RAM 82 applications 98 Mac OS X 98 memory 82 overview 7 Internet connecting to 15 connecting using DHCP router option 116 Media Eject key 19 memory checking 89 installing 82 screwdriver required 84 specifications 82...
... devices and battery power 57 port 21, 55 Target Disk Mode 57, 58 Force Quit 46 Front Row, using with Apple Remote 37 L LAN connection 116, 118 M Mac OS X interface 125 learning about 43 manually using Setup Assistant 118 connection problems 96, 123 inventory of items 7 IR. See...location 17 turning off reception 39 using 35 inserting a disc 70 installation instructions additional RAM 82 applications 98 Mac OS X 98 memory 82 overview 7 Internet connecting to 15 connecting using DHCP router option 116 Media Eject key 19 memory checking 89 installing 82 screwdriver required 84 specifications 82...

