Service Guide
Page 3
MacBook Pro 17-inch Contents Basics General Information 7 Product View 7 Overview 7 Take Apart Foot 15 Battery 18 Memory 20 Replacement Procedure 23 Top Case 25 Replacement Procedure 30 Keyboard 35 Replacement Procedure 50 AirPort Extreme Card 59 Hard Drive/SSD 64 Bluetooth Card and Antenna 69 Infrared Board 75 Replacement Procedure 77 Optical Drive 79 Handling Slot-Load Optical Drives 84 Replacement Procedure 87 Removing a Stuck Disc from an Optical Drive 88 Backup Battery 90 Ambient Light Sensors 95 Speakers and Microphone 97 Left I/O Board 103 iii
MacBook Pro 17-inch Contents Basics General Information 7 Product View 7 Overview 7 Take Apart Foot 15 Battery 18 Memory 20 Replacement Procedure 23 Top Case 25 Replacement Procedure 30 Keyboard 35 Replacement Procedure 50 AirPort Extreme Card 59 Hard Drive/SSD 64 Bluetooth Card and Antenna 69 Infrared Board 75 Replacement Procedure 77 Optical Drive 79 Handling Slot-Load Optical Drives 84 Replacement Procedure 87 Removing a Stuck Disc from an Optical Drive 88 Backup Battery 90 Ambient Light Sensors 95 Speakers and Microphone 97 Left I/O Board 103 iii
Service Guide
Page 4
...Bottom Case 143 Display Assembly 145 Replacement Procedure 148 Adjustments Latch Adjustment 152 Troubleshooting General Information 156 Wire and Flex Cables 156 Microphone and Camera wires 157 Hardware Diagnostics 157 Troubleshooting Aids and Tips 159 MacBook Pro Firmware Updates 161 Software Troubleshooting ...Tips and Tools 162 Troubleshooting Steps 164 Hardware Symptoms 167 How to Use the Symptom Charts 167 Startup 167 AirPort Extreme 173 Battery 174 Bluetooth 176 Display 177 ExpressCard/34 178 Hard Drive 179 Apple...
...Bottom Case 143 Display Assembly 145 Replacement Procedure 148 Adjustments Latch Adjustment 152 Troubleshooting General Information 156 Wire and Flex Cables 156 Microphone and Camera wires 157 Hardware Diagnostics 157 Troubleshooting Aids and Tips 159 MacBook Pro Firmware Updates 161 Software Troubleshooting ...Tips and Tools 162 Troubleshooting Steps 164 Hardware Symptoms 167 How to Use the Symptom Charts 167 Startup 167 AirPort Extreme 173 Battery 174 Bluetooth 176 Display 177 ExpressCard/34 178 Hard Drive 179 Apple...

Service Guide
Page 13
... you can compare a customer's computer to Knowledge Base article 30612: Apple Portables: Operating Temperature. Do not over components when they should route into lower positions or channels. Cable Routing Note With the MacBook Pro's one-inch enclosure height, the placement of parts and wiring is ...reapply in the same manner. space tolerances are the specified full length. Display Takeapart The MacBook Pro (17-inch Early 2008) continues the whole display clamshell solution as the replacement part for any Kapton tape use of tape may vary. Actual measured lengths may cause ...
... you can compare a customer's computer to Knowledge Base article 30612: Apple Portables: Operating Temperature. Do not over components when they should route into lower positions or channels. Cable Routing Note With the MacBook Pro's one-inch enclosure height, the placement of parts and wiring is ...reapply in the same manner. space tolerances are the specified full length. Display Takeapart The MacBook Pro (17-inch Early 2008) continues the whole display clamshell solution as the replacement part for any Kapton tape use of tape may vary. Actual measured lengths may cause ...

Service Guide
Page 15
... either plug on Bottom Case Missing case plug Matching Foot Not available for replacement Action Replace the bottom case, or send to Apple Repair Center. Also verify that the case plug is attached. Plug Area on the bottom case. Foot 15 MacBook Pro 17-inch (original, Core 2 Duo, 2.4/2.6GHz, 2008) Take Apart - Foot Tools This...
... either plug on Bottom Case Missing case plug Matching Foot Not available for replacement Action Replace the bottom case, or send to Apple Repair Center. Also verify that the case plug is attached. Plug Area on the bottom case. Foot 15 MacBook Pro 17-inch (original, Core 2 Duo, 2.4/2.6GHz, 2008) Take Apart - Foot Tools This...

Service Guide
Page 23
... the card straight into the slot until the tabs click onto both sides of the card, locking it into the slot. 3. MacBook Pro 17-inch (original, Core 2 Duo, 2.4/2.6GHz, 2008) Take Apart - Replacement Procedure Notes: • DDR memory cards do not fit in this slot, only DDR2 (different notch location). • If installing...
... the card straight into the slot until the tabs click onto both sides of the card, locking it into the slot. 3. MacBook Pro 17-inch (original, Core 2 Duo, 2.4/2.6GHz, 2008) Take Apart - Replacement Procedure Notes: • DDR memory cards do not fit in this slot, only DDR2 (different notch location). • If installing...

Service Guide
Page 24
...installed memory-the system will have a perfectly bootable system with your thumbs. 5. Check that the memory is recognized. (Choose the menu bar Apple logo () > About This Mac, click More Info..., select the System Profile tab, open the Memory Overview.) NOTE: The maximum ...MacBook Pro (17-inch original) is 2GB, in the MacBook Pro (17-inch Core 2 Duo) is 3GB, and in the MacBook Pro (17-inch 2.4GHz and Early 2008) is fully seated by the brackets on both sides. 6. Install the memory door. 7. 4. MacBook Pro 17-inch (original, Core 2 Duo, 2.4/2.6GHz, 2008) Take Apart - Replace ...
...installed memory-the system will have a perfectly bootable system with your thumbs. 5. Check that the memory is recognized. (Choose the menu bar Apple logo () > About This Mac, click More Info..., select the System Profile tab, open the Memory Overview.) NOTE: The maximum ...MacBook Pro (17-inch original) is 2GB, in the MacBook Pro (17-inch Core 2 Duo) is 3GB, and in the MacBook Pro (17-inch 2.4GHz and Early 2008) is fully seated by the brackets on both sides. 6. Install the memory door. 7. 4. MacBook Pro 17-inch (original, Core 2 Duo, 2.4/2.6GHz, 2008) Take Apart - Replace ...

Service Guide
Page 30
... up or incorrectly over a component. 2. MacBook Pro 17-inch (original, Core 2 Duo, 2.4/2.6GHz, 2008) Take Apart - Visually check to the replacement top case. 1. Top Case 30 On the top case, check cable connections and routing. Replacement Procedure Note: If replacing the top case, remove the Keyboard and ...transfer to verify that they will not be caught or pinched by the top case during replacement. 3. On the computer, verify that all cables are ...
... up or incorrectly over a component. 2. MacBook Pro 17-inch (original, Core 2 Duo, 2.4/2.6GHz, 2008) Take Apart - Visually check to the replacement top case. 1. Top Case 30 On the top case, check cable connections and routing. Replacement Procedure Note: If replacing the top case, remove the Keyboard and ...transfer to verify that they will not be caught or pinched by the top case during replacement. 3. On the computer, verify that all cables are ...
Service Guide
Page 34
Testing the computer should include: • Powering on, checking the keyboard and trackpad function. • Operate the computer in a darkened room to check for keyboard backlight function. Install the two screws along the back. . 18. Install the memory door and replace the battery. 19. MacBook Pro 17-inch (original, Core 2 Duo, 2.4/2.6GHz, 2008) Take Apart - Install the bottom screws. 17. Top Case 34 16.
Testing the computer should include: • Powering on, checking the keyboard and trackpad function. • Operate the computer in a darkened room to check for keyboard backlight function. Install the two screws along the back. . 18. Install the memory door and replace the battery. 19. MacBook Pro 17-inch (original, Core 2 Duo, 2.4/2.6GHz, 2008) Take Apart - Install the bottom screws. 17. Top Case 34 16.

Service Guide
Page 36
...cause improper function and damage. • Some photo details below may differ slightly from the model of 17-inch MacBook Pro you are repairing; Do not disassemble the keyboard assembly. Locate the small flex connector, shown. Procedure Important Notes: • All 17-... and the previous 17-inch MacBook Pro keyboards (with ten screws but ten tabs), the steps will be differentiated accordingly. 1. MacBook Pro 17-inch (original, Core 2 Duo, 2.4/2.6GHz, 2008) Take Apart - Verify that the correct replacement keyboard is ordered, and/or top case if replacing. • In addition, ...
...cause improper function and damage. • Some photo details below may differ slightly from the model of 17-inch MacBook Pro you are repairing; Do not disassemble the keyboard assembly. Locate the small flex connector, shown. Procedure Important Notes: • All 17-... and the previous 17-inch MacBook Pro keyboards (with ten screws but ten tabs), the steps will be differentiated accordingly. 1. MacBook Pro 17-inch (original, Core 2 Duo, 2.4/2.6GHz, 2008) Take Apart - Verify that the correct replacement keyboard is ordered, and/or top case if replacing. • In addition, ...

Service Guide
Page 39
The direction that the connector lock bars release is shown removed here, for clarity only. 9. Note: The clear cover is shown in the illustration below , and slide out their flex cables. If damaged, the top case must be replaced. 8. Carefully disconnect the two connectors, shown below . Release the adhesive under the large flex cable. Keyboard 39 MacBook Pro 17-inch (original, Core 2 Duo, 2.4/2.6GHz, 2008) Take Apart - Important: The connectors are delicate.
The direction that the connector lock bars release is shown removed here, for clarity only. 9. Note: The clear cover is shown in the illustration below , and slide out their flex cables. If damaged, the top case must be replaced. 8. Carefully disconnect the two connectors, shown below . Release the adhesive under the large flex cable. Keyboard 39 MacBook Pro 17-inch (original, Core 2 Duo, 2.4/2.6GHz, 2008) Take Apart - Important: The connectors are delicate.

Service Guide
Page 50
...: • Prevention of scratches to the cosmetics of the keyboard are straight and parallel with the bottom edge (two are secure • Kapton tape is applied as before • Insulator film is correctly installed 1. Keyboard 50 Before replacing or installing a replacement keyboard, verify that the bend-tabs along the bottom. Other tabs hold... are not damaged • Screw holes align • Cables are not caught • Cable connectors are not damaged and cables are shown close-up, below). MacBook Pro 17-inch (original, Core 2 Duo, 2.4/2.6GHz, 2008) Take Apart -
...: • Prevention of scratches to the cosmetics of the keyboard are straight and parallel with the bottom edge (two are secure • Kapton tape is applied as before • Insulator film is correctly installed 1. Keyboard 50 Before replacing or installing a replacement keyboard, verify that the bend-tabs along the bottom. Other tabs hold... are not damaged • Screw holes align • Cables are not caught • Cable connectors are not damaged and cables are shown close-up, below). MacBook Pro 17-inch (original, Core 2 Duo, 2.4/2.6GHz, 2008) Take Apart -

Service Guide
Page 57
Keyboard 57 Secure the locking tab. 18. 16. MacBook Pro 17-inch (original, Core 2 Duo, 2.4/2.6GHz, 2008) Take Apart - Press the cable flat to the top case and insert it from sticking to secure its adhesive. If installing a replacement keyboard, peel the adhesive protector off of the back of the large flex cable. 17. Support the cable with a black stick to prevent it straight and fully into the open connector.
Keyboard 57 Secure the locking tab. 18. 16. MacBook Pro 17-inch (original, Core 2 Duo, 2.4/2.6GHz, 2008) Take Apart - Press the cable flat to the top case and insert it from sticking to secure its adhesive. If installing a replacement keyboard, peel the adhesive protector off of the back of the large flex cable. 17. Support the cable with a black stick to prevent it straight and fully into the open connector.

Service Guide
Page 60
Transfer this clip to the left of the card. AirPort Extreme Card 60 Lift straight up . 2. (b) MacBook Pro 17-inch (Core 2 Duo and 2.4GHz) models: Remove three antenna connectors. Note: The Airport cards in the 17-inch (Core 2 Duo, 2.4GHz and Early 2008) have an EMI clip attached to the replacement card, if need be. Procedure 1. (a) MacBook Pro 17-inch (original and Early 2008) models: Remove two antenna connectors. Lift straight up . MacBook Pro 17-inch (original, Core 2 Duo, 2.4/2.6GHz, 2008) Take Apart -
Transfer this clip to the left of the card. AirPort Extreme Card 60 Lift straight up . 2. (b) MacBook Pro 17-inch (Core 2 Duo and 2.4GHz) models: Remove three antenna connectors. Note: The Airport cards in the 17-inch (Core 2 Duo, 2.4GHz and Early 2008) have an EMI clip attached to the replacement card, if need be. Procedure 1. (a) MacBook Pro 17-inch (original and Early 2008) models: Remove two antenna connectors. Lift straight up . MacBook Pro 17-inch (original, Core 2 Duo, 2.4/2.6GHz, 2008) Take Apart -

Service Guide
Page 62
Replacement Notes: • Verify that the antenna cables lay flat within the channel along the edge of the speaker. • If not, use Kapton tape to secure, as shown. • Also verify that the cables for the antennas, camera and inverter route to the left of the pin and screw hole at the top right corner of the speaker. 5. MacBook Pro 17-inch (original, Core 2 Duo, 2.4/2.6GHz, 2008) Take Apart - AirPort Extreme Card 62
Replacement Notes: • Verify that the antenna cables lay flat within the channel along the edge of the speaker. • If not, use Kapton tape to secure, as shown. • Also verify that the cables for the antennas, camera and inverter route to the left of the pin and screw hole at the top right corner of the speaker. 5. MacBook Pro 17-inch (original, Core 2 Duo, 2.4/2.6GHz, 2008) Take Apart - AirPort Extreme Card 62

Service Guide
Page 68
Important Note: All older MacBook Pro 17-inch models should have any white hard drive grommets replaced by newer black grommets (same part number: 922-7941). 10. Verify that the two screw heads installed on its left side, fit securely into the two grommets on the bottom case frame 11. MacBook Pro 17-inch (original, Core 2 Duo, 2.4/2.6GHz, 2008) Take Apart - Hard Drive 68 Replacement Note: When installing the hard drive, verify that the two rubber grommets are installed on the frame. 9. Transfer the hard drive screws and two grommets on the right side to the replacement drive.
Important Note: All older MacBook Pro 17-inch models should have any white hard drive grommets replaced by newer black grommets (same part number: 922-7941). 10. Verify that the two screw heads installed on its left side, fit securely into the two grommets on the bottom case frame 11. MacBook Pro 17-inch (original, Core 2 Duo, 2.4/2.6GHz, 2008) Take Apart - Hard Drive 68 Replacement Note: When installing the hard drive, verify that the two rubber grommets are installed on the frame. 9. Transfer the hard drive screws and two grommets on the right side to the replacement drive.

Service Guide
Page 72
MacBook Pro 17-inch (original, Core 2 Duo, 2.4/2.6GHz, 2008) Take Apart - If replacing the bluetooth card, disconnect the flex cable by releasing the sliding lock. Lift the antenna cable connector straight off to disconnect. 6. Bluetooth Card 72 5.
MacBook Pro 17-inch (original, Core 2 Duo, 2.4/2.6GHz, 2008) Take Apart - If replacing the bluetooth card, disconnect the flex cable by releasing the sliding lock. Lift the antenna cable connector straight off to disconnect. 6. Bluetooth Card 72 5.

Service Guide
Page 73
The adhesive must be in good condition and perfectly level for proper antenna alignment. To replace the antenna, pry the antenna board off the plastic bracket. Bluetooth Card 73 Important: If the bracket adhesive is damaged or missing, order a replacement bracket. MacBook Pro 17-inch (original, Core 2 Duo, 2.4/2.6GHz, 2008) Take Apart - 7. Make sure that the adhesive strip stays on the bracket, and keep it clean. 8.
The adhesive must be in good condition and perfectly level for proper antenna alignment. To replace the antenna, pry the antenna board off the plastic bracket. Bluetooth Card 73 Important: If the bracket adhesive is damaged or missing, order a replacement bracket. MacBook Pro 17-inch (original, Core 2 Duo, 2.4/2.6GHz, 2008) Take Apart - 7. Make sure that the adhesive strip stays on the bracket, and keep it clean. 8.

Service Guide
Page 74
Note: The antenna cable is attached on the bottom of the bracket. Bluetooth Card 74 If present, re-install the foil EMI shield, using a reverse order of the antenna board, and routes in a channel in place on the bottom of step 3 (see previous) starting with the top. Order a new bracket, if needed. 10. Install a replacement antenna as a separate part (922-7969). Verify that the rubber pad is available to order as shown below. 9. If need be, the EMI shield is in the bracket. 11. MacBook Pro 17-inch (original, Core 2 Duo, 2.4/2.6GHz, 2008) Take Apart -
Note: The antenna cable is attached on the bottom of the bracket. Bluetooth Card 74 If present, re-install the foil EMI shield, using a reverse order of the antenna board, and routes in a channel in place on the bottom of step 3 (see previous) starting with the top. Order a new bracket, if needed. 10. Install a replacement antenna as a separate part (922-7969). Verify that the rubber pad is available to order as shown below. 9. If need be, the EMI shield is in the bracket. 11. MacBook Pro 17-inch (original, Core 2 Duo, 2.4/2.6GHz, 2008) Take Apart -

Service Guide
Page 76
Remove the Torx T6 screw. 2. Procedure Note: The infrared board cable (which is combined with the sleep LED light cable) is part of the bottom case assembly and is not replaceable separately. 1. Infrared Board 76 Lift out the infrared board. MacBook Pro 17-inch (original, Core 2 Duo, 2.4/2.6GHz, 2008) Take Apart -
Remove the Torx T6 screw. 2. Procedure Note: The infrared board cable (which is combined with the sleep LED light cable) is part of the bottom case assembly and is not replaceable separately. 1. Infrared Board 76 Lift out the infrared board. MacBook Pro 17-inch (original, Core 2 Duo, 2.4/2.6GHz, 2008) Take Apart -

Service Guide
Page 77
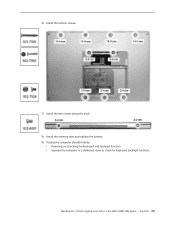
Insert the card into the channel and verify that the notch in the board rests over the rounded bead, shown. MacBook Pro 17-inch (original, Core 2 Duo, 2.4/2.6GHz, 2008) Take Apart - Infrared Board 77 Disconnect the infrared board cable. Install the cable onto the infrared board. 2. Replacement Procedure 1. 3.
Insert the card into the channel and verify that the notch in the board rests over the rounded bead, shown. MacBook Pro 17-inch (original, Core 2 Duo, 2.4/2.6GHz, 2008) Take Apart - Infrared Board 77 Disconnect the infrared board cable. Install the cable onto the infrared board. 2. Replacement Procedure 1. 3.


