

Use and Care
Page 1
IMPORTANT : LIRE ET CONSERVER CES INSTRUCTIONS. LI3Z5B/W10400323D FOR RESIDENTIAL USE ONLY. POUR UTILISATION RÉSIDENTIELLE UNIQUEMENT. 30" (76.2 CM) AND 36" (91.4 CM) RANGE HOOD Installation Instructions and Use & Care Guide For questions about features, operation/performance, parts, accessories or service, call: 1-800-253-1301 or visit our website at ... 1-800-807-6777 ou visiter notre site Web à www.whirlpool.ca Table of Contents/Table des matières 2 Models/Modèles: UXT5230AY/UXT5236AY IMPORTANT: READ AND SAVE THESE INSTRUCTIONS.
IMPORTANT : LIRE ET CONSERVER CES INSTRUCTIONS. LI3Z5B/W10400323D FOR RESIDENTIAL USE ONLY. POUR UTILISATION RÉSIDENTIELLE UNIQUEMENT. 30" (76.2 CM) AND 36" (91.4 CM) RANGE HOOD Installation Instructions and Use & Care Guide For questions about features, operation/performance, parts, accessories or service, call: 1-800-253-1301 or visit our website at ... 1-800-807-6777 ou visiter notre site Web à www.whirlpool.ca Table of Contents/Table des matières 2 Models/Modèles: UXT5230AY/UXT5236AY IMPORTANT: READ AND SAVE THESE INSTRUCTIONS.

Use and Care
Page 2
...4 Location Requirements 4 Venting Requirements 5 Electrical Requirements 6 INSTALLATION INSTRUCTIONS 7 Prepare Location 7 Install Range Hood 9 Make Electrical Connection 11 Complete Installation 11 RANGE HOOD USE 12 Range Hood Controls 12 RANGE HOOD CARE 12 Cleaning 12 WIRING DIAGRAM 14 ASSISTANCE OR SERVICE 15 In the U.S.A 15 In Canada 15...Nettoyage 28 SCHÉMA DE CÂBLAGE 30 ASSISTANCE OU SERVICE 31 Au Canada 31 Accessoires 31 GARANTIE 31 RANGE HOOD SAFETY Your safety and the safety of injury, and tell you what the potential hazard is the safety alert symbol. ...
...4 Location Requirements 4 Venting Requirements 5 Electrical Requirements 6 INSTALLATION INSTRUCTIONS 7 Prepare Location 7 Install Range Hood 9 Make Electrical Connection 11 Complete Installation 11 RANGE HOOD USE 12 Range Hood Controls 12 RANGE HOOD CARE 12 Cleaning 12 WIRING DIAGRAM 14 ASSISTANCE OR SERVICE 15 In the U.S.A 15 In Canada 15...Nettoyage 28 SCHÉMA DE CÂBLAGE 30 ASSISTANCE OU SERVICE 31 Au Canada 31 Accessoires 31 GARANTIE 31 RANGE HOOD SAFETY Your safety and the safety of injury, and tell you what the potential hazard is the safety alert symbol. ...

Use and Care
Page 3
..., OR INJURY TO PERSONS, OBSERVE THE FOLLOWING: ■ Use this fan with any fan with a close fitting lid, cookie sheet, or metal tray, then turn hood ON when cooking at high settings. When the service disconnecting means cannot be done by the manufacturer. Discard fan or return to an authorized service...
..., OR INJURY TO PERSONS, OBSERVE THE FOLLOWING: ■ Use this fan with any fan with a close fitting lid, cookie sheet, or metal tray, then turn hood ON when cooking at high settings. When the service disconnecting means cannot be done by the manufacturer. Discard fan or return to an authorized service...

Use and Care
Page 4
...cm) round metal vent system ■ 7" (17.8 cm) round damper. The model/serial rating plate is located inside the range hood on the left wall. ■ Range hood location should be away from package. See the "Accessories" section to match vent system ■ 3 - Tools needed ■ Wall... with local codes. For information on ordering, see the "Accessories" section. For Mobile Home Installations The installation of this range hood must conform to attach filler strips). Check that are factory set for Manufactured Home Installation 1982 (Manufactured Home Sites, Communities and ...
...cm) round metal vent system ■ 7" (17.8 cm) round damper. The model/serial rating plate is located inside the range hood on the left wall. ■ Range hood location should be away from package. See the "Accessories" section to match vent system ■ 3 - Tools needed ■ Wall... with local codes. For information on ordering, see the "Accessories" section. For Mobile Home Installations The installation of this range hood must conform to attach filler strips). Check that are factory set for Manufactured Home Installation 1982 (Manufactured Home Sites, Communities and ...

Use and Care
Page 5
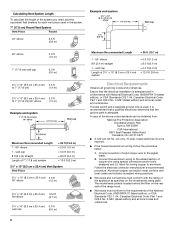
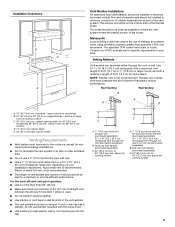
...through roof (purchased separately). 3¹⁄₄" x 10" (8.3 x 25.4 cm) rectangular vent through the roof or wall. Wall cap with the range hood. ■ Use caulking to seal exterior wall or roof opening width for nonvented (recirculating) installations. ■ Do not terminate the vent system in your ...9632; Make sure there is a minimum of 24" (61 cm) of straight vent between the elbows if more than specified CFM of range hood to provide efficient performance. If roof or wall cap has a damper, do not use of makeup air systems when using ventilation systems greater than ...
...through roof (purchased separately). 3¹⁄₄" x 10" (8.3 x 25.4 cm) rectangular vent through the roof or wall. Wall cap with the range hood. ■ Use caulking to seal exterior wall or roof opening width for nonvented (recirculating) installations. ■ Do not terminate the vent system in your ...9632; Make sure there is a minimum of 24" (61 cm) of straight vent between the elbows if more than specified CFM of range hood to provide efficient performance. If roof or wall cap has a damper, do not use of makeup air systems when using ventilation systems greater than ...
Use and Care
Page 6
... codes permit and a separate ground wire is used in conformance with the rating of the appliance as specified on the rear wall of the range hood. ■ Wire sizes must conform with National Electrical Code, ANSI/NFPA 70 (latest edition), or CSA Standards C22.1-94, Canadian Electrical Code, Part 1 and C22...
... codes permit and a separate ground wire is used in conformance with the rating of the appliance as specified on the rear wall of the range hood. ■ Wire sizes must conform with National Electrical Code, ANSI/NFPA 70 (latest edition), or CSA Standards C22.1-94, Canadian Electrical Code, Part 1 and C22...

Use and Care
Page 7
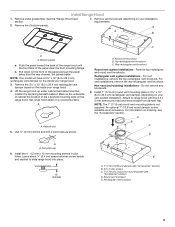
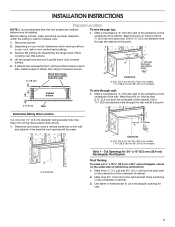
...x 25.4 cm) Rectangular Vent System Roof Venting To make sure there is proper clearance within the ceiling or wall for assembling the range hood. Mark a line distance "A" from the right of the centerline on the underside of cabinet top and bottom: 1. Lift the range...vent. 7 A ⁷⁄₈" (2.2 cm) from the back wall on your model, determine which venting method to cut a rectangular opening will be installed before hood is installed. Drill a 1¹⁄₄" (3.2 cm) diameter hole through the cabinet at this point. 2. Mark lines 5¼" (13.3 cm) to attach ...
...x 25.4 cm) Rectangular Vent System Roof Venting To make sure there is proper clearance within the ceiling or wall for assembling the range hood. Mark a line distance "A" from the right of the centerline on the underside of cabinet top and bottom: 1. Lift the range...vent. 7 A ⁷⁄₈" (2.2 cm) from the back wall on your model, determine which venting method to cut a rectangular opening will be installed before hood is installed. Drill a 1¹⁄₄" (3.2 cm) diameter hole through the cabinet at this point. 2. Mark lines 5¼" (13.3 cm) to attach ...
Use and Care
Page 9
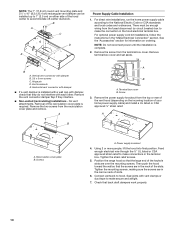
...- NOTE: The 7" (17.8 cm) round vent mounting plate is also available as shown. Rectangular vent system installations - Round vent knockout E. Install Range Hood 1. A B C A A. Bottom panels a. Keyhole slot 5. Top rectangular vent knockout C. Install 7" (17.8 cm) round vent mounting plate or 3&#..., see "Accessories" section) D. Use ¹⁄₈" (3 mm) drill bit and drill 4 pilot holes as an accessory. Attach to slide range hood into place. ¹⁄₄" (6.4 mm) E A. 7" (17.8 cm) Round damper (see "Accessories" section) B. 3.5 x 5 mm screws...
...- NOTE: The 7" (17.8 cm) round vent mounting plate is also available as shown. Rectangular vent system installations - Round vent knockout E. Install Range Hood 1. A B C A A. Bottom panels a. Keyhole slot 5. Top rectangular vent knockout C. Install 7" (17.8 cm) round vent mounting plate or 3&#..., see "Accessories" section) D. Use ¹⁄₈" (3 mm) drill bit and drill 4 pilot holes as an accessory. Attach to slide range hood into place. ¹⁄₄" (6.4 mm) E A. 7" (17.8 cm) Round damper (see "Accessories" section) B. 3.5 x 5 mm screws...
Use and Care
Page 10
... the installation is installed with a wall cap with each other. No vent attachments. Screw 3. Tighten the strain relief screws. 5. Then push the hood toward the wall so that the large end of your home power supply cable) and install a UL listed or CSA approved ¹⁄₂"... slots are over the mounting screws. Remove terminal box cover and set aside. Hinge pin D. A B A. Using 2 or more people, lift the hood into final position. Feed enough electrical wire through the ½" UL listed or CSA approved strain relief to make connections in the "Make Electrical Connection...
... the installation is installed with a wall cap with each other. No vent attachments. Screw 3. Tighten the strain relief screws. 5. Then push the hood toward the wall so that the large end of your home power supply cable) and install a UL listed or CSA approved ¹⁄₂"... slots are over the mounting screws. Remove terminal box cover and set aside. Hinge pin D. A B A. Using 2 or more people, lift the hood into final position. Feed enough electrical wire through the ½" UL listed or CSA approved strain relief to make connections in the "Make Electrical Connection...

Use and Care
Page 11
...blown. Push the front of the panel clear the front mounting flange. Replace grease filter. See the "Range Hood Care" section. 3. See "Range Hood Use" section. If range hood does not operate, check to do so can result in terminal box and securely tighten. 5. WARNING Electrical .... Use UL listed wire connectors and connect black wires (B) together. White wires B. Replace the 2 bottom panels. Check the operation of the range hood fan and light. Green (or bare) ground wire E. UL listed or CSA approved ½" strain relief G. Replace all parts and panels before servicing...
...blown. Push the front of the panel clear the front mounting flange. Replace grease filter. See the "Range Hood Care" section. 3. See "Range Hood Use" section. If range hood does not operate, check to do so can result in terminal box and securely tighten. 5. WARNING Electrical .... Use UL listed wire connectors and connect black wires (B) together. White wires B. Replace the 2 bottom panels. Check the operation of the range hood fan and light. Green (or bare) ground wire E. UL listed or CSA approved ½" strain relief G. Replace all parts and panels before servicing...

Use and Care
Page 12
...and control the blower speed and sound level for Off. Halogen lights B. Grease filter C. Filter retainer Range Hood Controls A B CD RANGE HOOD CARE Cleaning IMPORTANT: Clean the hood and grease filters frequently according to order. ■ Liquid detergent or all smoke and odors from the ... Filter To Clean the Filter: 1. Blower speed medium button D. Grease filter 3. A C B A. Remove screw from the kitchen. RANGE HOOD USE The range hood is not washable. Press once for On and again for quiet operation. Screw B. Replace the metal filters with soft, lint-free cloth. ...
...and control the blower speed and sound level for Off. Halogen lights B. Grease filter C. Filter retainer Range Hood Controls A B CD RANGE HOOD CARE Cleaning IMPORTANT: Clean the hood and grease filters frequently according to order. ■ Liquid detergent or all smoke and odors from the ... Filter To Clean the Filter: 1. Blower speed medium button D. Grease filter 3. A C B A. Remove screw from the kitchen. RANGE HOOD USE The range hood is not washable. Press once for On and again for quiet operation. Screw B. Replace the metal filters with soft, lint-free cloth. ...

Use and Care
Page 13
... into place to cool. Release the filter retainer. Replace lamp, using tissue or wearing cotton gloves to be toward the front of the range hood and push the front of the filter up on the long edge of the filter into the filter retainer. If new lamps do not touch... back edge of the filter is to handle lamp. Disconnect power. 2. Pull the filter retainer toward the front of the range hood. 2. Replacing the Halogen Lamp Turn off the range hood and allow the halogen lamp to secure the filter. 4. Repeat steps 2-3 for the other lamps if needed. 5. Replace the screw...
... into place to cool. Release the filter retainer. Replace lamp, using tissue or wearing cotton gloves to be toward the front of the range hood and push the front of the filter up on the long edge of the filter into the filter retainer. If new lamps do not touch... back edge of the filter is to handle lamp. Disconnect power. 2. Pull the filter retainer toward the front of the range hood. 2. Replacing the Halogen Lamp Turn off the range hood and allow the halogen lamp to secure the filter. 4. Repeat steps 2-3 for the other lamps if needed. 5. Replace the screw...
Installation Instruction
Page 1
LI3Z5B/W10400323D IMPORTANT : LIRE ET CONSERVER CES INSTRUCTIONS. POUR UTILISATION RÉSIDENTIELLE UNIQUEMENT. FOR RESIDENTIAL USE ONLY. 30" (76.2 CM) AND 36" (91.4 CM) RANGE HOOD Installation Instructions and Use & Care Guide For questions about features, operation/performance, parts, accessories or service, call: 1-800-253-1301 or visit our website at ... 1-800-807-6777 ou visiter notre site Web à www.whirlpool.ca Table of Contents/Table des matières 2 Models/Modèles: UXT5230AY/UXT5236AY IMPORTANT: READ AND SAVE THESE INSTRUCTIONS.
LI3Z5B/W10400323D IMPORTANT : LIRE ET CONSERVER CES INSTRUCTIONS. POUR UTILISATION RÉSIDENTIELLE UNIQUEMENT. FOR RESIDENTIAL USE ONLY. 30" (76.2 CM) AND 36" (91.4 CM) RANGE HOOD Installation Instructions and Use & Care Guide For questions about features, operation/performance, parts, accessories or service, call: 1-800-253-1301 or visit our website at ... 1-800-807-6777 ou visiter notre site Web à www.whirlpool.ca Table of Contents/Table des matières 2 Models/Modèles: UXT5230AY/UXT5236AY IMPORTANT: READ AND SAVE THESE INSTRUCTIONS.

Installation Instruction
Page 2
...4 Location Requirements 4 Venting Requirements 5 Electrical Requirements 6 INSTALLATION INSTRUCTIONS 7 Prepare Location 7 Install Range Hood 9 Make Electrical Connection 11 Complete Installation 11 RANGE HOOD USE 12 Range Hood Controls 12 RANGE HOOD CARE 12 Cleaning 12 WIRING DIAGRAM 14 ASSISTANCE OR SERVICE 15 In the U.S.A 15 In Canada 15... 28 SCHÉMA DE CÂBLAGE 30 ASSISTANCE OU SERVICE 31 Au Canada 31 Accessoires 31 GARANTIE 31 RANGE HOOD SAFETY Your safety and the safety of injury, and tell you don't follow the safety alert symbol and either the word...
...4 Location Requirements 4 Venting Requirements 5 Electrical Requirements 6 INSTALLATION INSTRUCTIONS 7 Prepare Location 7 Install Range Hood 9 Make Electrical Connection 11 Complete Installation 11 RANGE HOOD USE 12 Range Hood Controls 12 RANGE HOOD CARE 12 Cleaning 12 WIRING DIAGRAM 14 ASSISTANCE OR SERVICE 15 In the U.S.A 15 In Canada 15... 28 SCHÉMA DE CÂBLAGE 30 ASSISTANCE OU SERVICE 31 Au Canada 31 Accessoires 31 GARANTIE 31 RANGE HOOD SAFETY Your safety and the safety of injury, and tell you don't follow the safety alert symbol and either the word...
Installation Instruction
Page 3
... units unattended at high heat or when flambeing food (i.e. You can fight the fire with a close fitting lid, cookie sheet, or metal tray, then turn hood ON when cooking at high settings. Crepes Suzette, Cherries Jubilee, Peppercorn Beef Flambé). ■ Clean ventilating fans frequently. do not go out immediately, EVACUATE...
... units unattended at high heat or when flambeing food (i.e. You can fight the fire with a close fitting lid, cookie sheet, or metal tray, then turn hood ON when cooking at high settings. Crepes Suzette, Cherries Jubilee, Peppercorn Beef Flambé). ■ Clean ventilating fans frequently. do not go out immediately, EVACUATE...

Installation Instruction
Page 4
....9 cm) 1¹⁄₂" (3.8 cm) 18⁵⁄₈" (47.3 cm) †®TORX is located inside the range hood on the model/serial rating plate. Read and follow the instructions provided with washers and nuts (to the Manufactured Home Construction Safety Standards, Title...) require charcoal filters. Tools needed ■ Wall or roof cap with installation clearances specified on the left wall. ■ Range hood location should be away from package. For information on ordering, see the "Accessories" section. Length and thickness determined by recess dimensions....
....9 cm) 1¹⁄₂" (3.8 cm) 18⁵⁄₈" (47.3 cm) †®TORX is located inside the range hood on the model/serial rating plate. Read and follow the instructions provided with washers and nuts (to the Manufactured Home Construction Safety Standards, Title...) require charcoal filters. Tools needed ■ Wall or roof cap with installation clearances specified on the left wall. ■ Range hood location should be away from package. For information on ordering, see the "Accessories" section. Length and thickness determined by recess dimensions....
Installation Instruction
Page 5
...codes may require the use damper supplied with a maximum length of 35 ft (10.7 m) or 7" (17.8 cm) or larger round vent with the range hood. ■ Use caulking to the outdoors, except for vent system. Roof cap with damper (purchased separately) C. 24" (61.0 cm) min. The damper should... is recommended. B. Wall cap with damper (purchased separately) C. 24" (61.0 cm) min. The break should be as close as part of range hood to cooking surface C. 30" (76.2 cm) min. Roof Venting Wall Venting B A A B A. 18" (45.7 cm) min. cabinet opening around the cap.
...codes may require the use damper supplied with a maximum length of 35 ft (10.7 m) or 7" (17.8 cm) or larger round vent with the range hood. ■ Use caulking to the outdoors, except for vent system. Roof cap with damper (purchased separately) C. 24" (61.0 cm) min. The damper should... is recommended. B. Wall cap with damper (purchased separately) C. 24" (61.0 cm) min. The break should be as close as part of range hood to cooking surface C. 30" (76.2 cm) min. Roof Venting Wall Venting B A A B A. 18" (45.7 cm) min. cabinet opening around the cap.

Installation Instruction
Page 6
... electrician determine that the electrical installation is used in conformance with the rating of the appliance as specified on the rear wall of the range hood. ■ Wire sizes must conform with National Electrical Code, ANSI/NFPA 70 (latest edition), or CSA Standards C22.1-94, Canadian Electrical Code, Part 1 and C22...
... electrician determine that the electrical installation is used in conformance with the rating of the appliance as specified on the rear wall of the range hood. ■ Wire sizes must conform with National Electrical Code, ANSI/NFPA 70 (latest edition), or CSA Standards C22.1-94, Canadian Electrical Code, Part 1 and C22...
Installation Instruction
Page 7
... has recessed bottom, add wood filler strips on the wall and cabinet in locations shown. To wire through wall: 1. See Step 2 for assembling the range hood. Lift the range hood and set it upside down onto covered surface. 5. Install screws to cut a rectangular opening will be installed before... hood is installed. Mark the point on this line that is 2.2 cm) from the back wall on the underside of the cabinet. Determine Wiring Hole Location ...
... has recessed bottom, add wood filler strips on the wall and cabinet in locations shown. To wire through wall: 1. See Step 2 for assembling the range hood. Lift the range hood and set it upside down onto covered surface. 5. Install screws to cut a rectangular opening will be installed before... hood is installed. Mark the point on this line that is 2.2 cm) from the back wall on the underside of the cabinet. Determine Wiring Hole Location ...

Installation Instruction
Page 9
...a covered surface. Use ¹⁄₈" (3 mm) drill bit and drill 4 pilot holes as an accessory. Non-vent (recirculating) installations - Attach to slide range hood into place. ¹⁄₄" (6.4 mm) E A. 7" (17.8 cm) Round damper (see "Accessories" section) B. 3.5 x 5 mm screws C. 7" ... the 3¼" x 10" (8.3 x 25.4 cm) rectangular vent damper taped on ordering, see "Accessories" section) D. Lift the range hood up under cabinet and determine final location by centering beneath cabinet. A. For wall installations, remove the rear rectangular vent knockout. NOTE: The 7"...
...a covered surface. Use ¹⁄₈" (3 mm) drill bit and drill 4 pilot holes as an accessory. Non-vent (recirculating) installations - Attach to slide range hood into place. ¹⁄₄" (6.4 mm) E A. 7" (17.8 cm) Round damper (see "Accessories" section) B. 3.5 x 5 mm screws C. 7" ... the 3¼" x 10" (8.3 x 25.4 cm) rectangular vent damper taped on ordering, see "Accessories" section) D. Lift the range hood up under cabinet and determine final location by centering beneath cabinet. A. For wall installations, remove the rear rectangular vent knockout. NOTE: The 7"...

