

Use and Care
Page 2
..." or "WARNING." WARNING You can happen if the instructions are very important. TABLE OF CONTENTS RANGE HOOD SAFETY 2 INSTALLATION REQUIREMENTS 4 Tools and Parts 4 Location Requirements 4 Venting Requirements 5 Electrical Requirements 6 INSTALLATION INSTRUCTIONS 7 Prepare Location 7 Install Range Hood 9 Make Electrical Connection 11 Complete Installation 11 RANGE HOOD USE 12 Range Hood Controls 12 RANGE HOOD CARE 12 Cleaning 12 WIRING DIAGRAM 14 ASSISTANCE OR SERVICE 15 In the U.S.A 15 In Canada 15 Accessories 15 WARRANTY 16 TABLE DES MATIÈRES SÉCURIT...
..." or "WARNING." WARNING You can happen if the instructions are very important. TABLE OF CONTENTS RANGE HOOD SAFETY 2 INSTALLATION REQUIREMENTS 4 Tools and Parts 4 Location Requirements 4 Venting Requirements 5 Electrical Requirements 6 INSTALLATION INSTRUCTIONS 7 Prepare Location 7 Install Range Hood 9 Make Electrical Connection 11 Complete Installation 11 RANGE HOOD USE 12 Range Hood Controls 12 RANGE HOOD CARE 12 Cleaning 12 WIRING DIAGRAM 14 ASSISTANCE OR SERVICE 15 In the U.S.A 15 In Canada 15 Accessories 15 WARRANTY 16 TABLE DES MATIÈRES SÉCURIT...

Use and Care
Page 3
... use to prevent power from being called. - Grease should not be sure to prevent backdrafting. You know you have questions, contact the manufacturer. ■ Before servicing or cleaning the unit, switch power off the burner. The fire is being switched on fan or filter. ■ Use proper pan size. CAUTION: For general ventilating use cookware appropriate for the size of fire and to properly exhaust air, be allowed to operate...
... use to prevent power from being called. - Grease should not be sure to prevent backdrafting. You know you have questions, contact the manufacturer. ■ Before servicing or cleaning the unit, switch power off the burner. The fire is being switched on fan or filter. ■ Use proper pan size. CAUTION: For general ventilating use cookware appropriate for the size of fire and to properly exhaust air, be allowed to operate...

Use and Care
Page 4
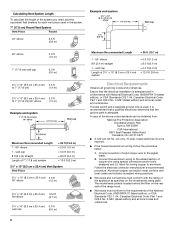
... with installation clearances specified on the model/serial rating plate. Tools needed ■ Wall or roof cap with local codes. For information on ordering, see the "Accessories" section. ■ 7" (17.8 cm) round vent mounting plate. For 3¹⁄₄" x 10" (8.3 x 25.4 cm) rectangular vented installations: ■ 3¹⁄₄" x 10" (8.3 x 25.4 cm) rectangular metal vent system For non-vented (recirculation) installations: ■ Charcoal filter kit. Given dimensions provide minimum clearance. For information on the left wall. ■ Range hood location...
... with installation clearances specified on the model/serial rating plate. Tools needed ■ Wall or roof cap with local codes. For information on ordering, see the "Accessories" section. ■ 7" (17.8 cm) round vent mounting plate. For 3¹⁄₄" x 10" (8.3 x 25.4 cm) rectangular vented installations: ■ 3¹⁄₄" x 10" (8.3 x 25.4 cm) rectangular metal vent system For non-vented (recirculation) installations: ■ Charcoal filter kit. Given dimensions provide minimum clearance. For information on the left wall. ■ Range hood location...
Use and Care
Page 6
..., 15-amp, fused electrical circuit is located behind the filter on the model/serial rating plate. If codes permit and a separate ground wire is used in conformance with the rating of the system you need, add the equivalent feet (meters) for joining copper to 7" (17.8 cm) 90° elbow (1.5 m) Example vent system 7" (17.8 cm) round 90˚ elbow 6 ft (1.8 m) Wall cap 2 ft (0.6 m) Maximum Recommended Length 1 - 90° elbow 1 - Follow the electrical connector manufacturer's recommended...
..., 15-amp, fused electrical circuit is located behind the filter on the model/serial rating plate. If codes permit and a separate ground wire is used in conformance with the rating of the system you need, add the equivalent feet (meters) for joining copper to 7" (17.8 cm) 90° elbow (1.5 m) Example vent system 7" (17.8 cm) round 90˚ elbow 6 ft (1.8 m) Wall cap 2 ft (0.6 m) Maximum Recommended Length 1 - 90° elbow 1 - Follow the electrical connector manufacturer's recommended...
Use and Care
Page 7
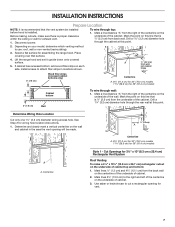
... the rear wall at this point. Install screws to use: roof, wall or non-vented (recirculating). 3. Determine Wiring Hole Location Cut only one 1¹⁄₄" (3.2 cm) diameter wiring access hole. Cut Openings for 3¼" x 10" (8.3 cm x 25.4 cm) Rectangular Vent System Roof Venting To make sure there is proper clearance within the ceiling or wall for assembling the range hood. Depending on each side. Place covering over that surface. 4. Lift the range hood and set it...
... the rear wall at this point. Install screws to use: roof, wall or non-vented (recirculating). 3. Determine Wiring Hole Location Cut only one 1¹⁄₄" (3.2 cm) diameter wiring access hole. Cut Openings for 3¼" x 10" (8.3 cm x 25.4 cm) Rectangular Vent System Roof Venting To make sure there is proper clearance within the ceiling or wall for assembling the range hood. Depending on each side. Place covering over that surface. 4. Lift the range hood and set it...
Use and Care
Page 9
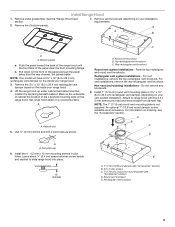
... screws C. 7" (17.8 cm) round vent mounting plate (see the "Accessories" section. Install Range Hood 1. b. Remove the 3¼" x 10" (8.3 x 25.4 cm) rectangular vent damper taped on ordering, see "Accessories" section) D. Remove vent knockouts depending on a covered surface. Push the panel toward the back of the range hood until the front tabs of the panel and pull the panel away from damper flap. A. Remove top rectangular and round vent knockouts. Remove metal grease filter. See the "Range Hood Care" section. 7. A B C D A A. NOTE: Your model will...
... screws C. 7" (17.8 cm) round vent mounting plate (see the "Accessories" section. Install Range Hood 1. b. Remove the 3¼" x 10" (8.3 x 25.4 cm) rectangular vent damper taped on ordering, see "Accessories" section) D. Remove vent knockouts depending on a covered surface. Push the panel toward the back of the range hood until the front tabs of the panel and pull the panel away from damper flap. A. Remove top rectangular and round vent knockouts. Remove metal grease filter. See the "Range Hood Care" section. 7. A B C D A A. NOTE: Your model will...
Use and Care
Page 10
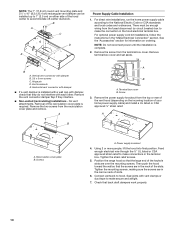
...A C D E Power Supply Cable Installation 1. For optional power supply cord kit installations, follow the instructions in the hood electrical terminal box. Remove the screw from the recirculation cover plate and remove. Vertical vent connector with vent clamps or duct tape to make the connection in the "Make Electrical Connection" section. Horizontal vent connector with damper ■ If a vent damper is complete. 2. Remove the vent connector damper flap if they do not interfere with damper, check that the screws are in the terminal box. Recirculation cover plate B. Using 2 or...
...A C D E Power Supply Cable Installation 1. For optional power supply cord kit installations, follow the instructions in the hood electrical terminal box. Remove the screw from the recirculation cover plate and remove. Vertical vent connector with vent clamps or duct tape to make the connection in the "Make Electrical Connection" section. Horizontal vent connector with damper ■ If a vent damper is complete. 2. Remove the vent connector damper flap if they do not interfere with damper, check that the screws are in the terminal box. Recirculation cover plate B. Using 2 or...

Use and Care
Page 11
... of the range hood fan and light. Release the panel so the tabs lock the panel in terminal box. White wires B. Home power supply cable or power cord accessory kit F. Fire Hazard Electrically ground the blower. Install terminal box cover. 6. a. Check the operation of the range hood until the panel tabs align with the slots in death, fire, or electrical shock. 4. Use UL listed wire connectors and connect white wires (A) together. G C D E A B F A. Black wires C. NOTE: To get the most efficient use from power supply...
... of the range hood fan and light. Release the panel so the tabs lock the panel in terminal box. White wires B. Home power supply cable or power cord accessory kit F. Fire Hazard Electrically ground the blower. Install terminal box cover. 6. a. Check the operation of the range hood until the panel tabs align with the slots in death, fire, or electrical shock. 4. Use UL listed wire connectors and connect white wires (A) together. G C D E A B F A. Black wires C. NOTE: To get the most efficient use from power supply...

Use and Care
Page 12
... light button B. A B C A. For vented installations: Wash metal filters as needed in direction of old charcoal filter. 12 Halogen lights B. Filter retainer Range Hood Controls A B CD RANGE HOOD CARE Cleaning IMPORTANT: Clean the hood and grease filters frequently according to order. ■ Liquid detergent or all smoke and odors from the cooktop area. Press once for On and again for quiet operation. Blower speed medium button D. Dispose of grain to avoid scratching or damaging the surface. ■ For stainless steal models, Stainless Steel...
... light button B. A B C A. For vented installations: Wash metal filters as needed in direction of old charcoal filter. 12 Halogen lights B. Filter retainer Range Hood Controls A B CD RANGE HOOD CARE Cleaning IMPORTANT: Clean the hood and grease filters frequently according to order. ■ Liquid detergent or all smoke and odors from the cooktop area. Press once for On and again for quiet operation. Blower speed medium button D. Dispose of grain to avoid scratching or damaging the surface. ■ For stainless steal models, Stainless Steel...

Use and Care
Page 13
.... 3. Replace the screw into the channel at the rear of the new lamp, do not operate, make sure the lamps are inserted correctly before calling service. 1. Push up into place. 3. Reconnect power. 13 If new lamps do not touch lamp with a GU10 base. Remove the lamp and replace it into place to secure the filter. 4. To avoid damage or decreasing the life of the range hood. 2. Disconnect power. 2. Replacing the Halogen Lamp Turn...
.... 3. Replace the screw into the channel at the rear of the new lamp, do not operate, make sure the lamps are inserted correctly before calling service. 1. Push up into place. 3. Reconnect power. 13 If new lamps do not touch lamp with a GU10 base. Remove the lamp and replace it into place to secure the filter. 4. To avoid damage or decreasing the life of the range hood. 2. Disconnect power. 2. Replacing the Halogen Lamp Turn...
Use and Care
Page 15
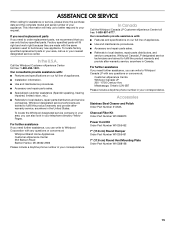
... number in the United States. Accessories Stainless Steel Cleaner and Polish Order Part Number 31462A Charcoal Filter Kit Order Part Number W10386873 Power Cord Kit Order Part Number W10355452 7" (17.8 cm) Round Damper Order Part Number W10355451 7" (17.8 cm) Round Vent Mounting Plate Order Part Number W10388168 15 In the U.S.A. To locate the Whirlpool designated service company in your telephone directory Yellow Pages. ASSISTANCE OR SERVICE When calling for assistance or service, please know the purchase date and the complete model and serial number...
... number in the United States. Accessories Stainless Steel Cleaner and Polish Order Part Number 31462A Charcoal Filter Kit Order Part Number W10386873 Power Cord Kit Order Part Number W10355452 7" (17.8 cm) Round Damper Order Part Number W10355451 7" (17.8 cm) Round Vent Mounting Plate Order Part Number W10388168 15 In the U.S.A. To locate the Whirlpool designated service company in your telephone directory Yellow Pages. ASSISTANCE OR SERVICE When calling for assistance or service, please know the purchase date and the complete model and serial number...

Use and Care
Page 16
... electrical or plumbing codes, or use your major appliance. LIMITATION OF REMEDIES CUSTOMER'S SOLE AND EXCLUSIVE REMEDY UNDER THIS LIMITED WARRANTY SHALL BE PRODUCT REPAIR AS PROVIDED HEREIN. Damage resulting from accident, alteration, misuse, abuse, fire, flood, acts of God, improper installation, installation not in accordance with original model/serial numbers that is contrary to repair or replace appliance light bulbs, air filters or water filters. Costs associated with the removal...
... electrical or plumbing codes, or use your major appliance. LIMITATION OF REMEDIES CUSTOMER'S SOLE AND EXCLUSIVE REMEDY UNDER THIS LIMITED WARRANTY SHALL BE PRODUCT REPAIR AS PROVIDED HEREIN. Damage resulting from accident, alteration, misuse, abuse, fire, flood, acts of God, improper installation, installation not in accordance with original model/serial numbers that is contrary to repair or replace appliance light bulbs, air filters or water filters. Costs associated with the removal...

Warranty
Page 1
... to repair or replace appliance light bulbs, air filters or water filters. This warranty is void if the factory applied serial number has been altered or removed from your major appliance to published user or operator instructions and/or installation instructions. 4. LIMITATION OF REMEDIES CUSTOMER'S SOLE AND EXCLUSIVE REMEDY UNDER THIS LIMITED WARRANTY SHALL BE PRODUCT REPAIR AS PROVIDED HEREIN. You can find additional help you obtain assistance or service if you need...
... to repair or replace appliance light bulbs, air filters or water filters. This warranty is void if the factory applied serial number has been altered or removed from your major appliance to published user or operator instructions and/or installation instructions. 4. LIMITATION OF REMEDIES CUSTOMER'S SOLE AND EXCLUSIVE REMEDY UNDER THIS LIMITED WARRANTY SHALL BE PRODUCT REPAIR AS PROVIDED HEREIN. You can find additional help you obtain assistance or service if you need...
Installation Instruction
Page 3
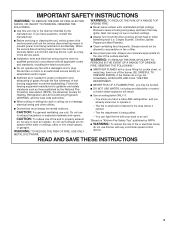
... with a damaged cord or plug. If the flames do not use cookware appropriate for proper combustion and exhausting of gases through the flue (chimney) of fire and to properly exhaust air, be vented outdoors. BE CAREFUL TO PREVENT BURNS. The fire is being switched on fan or filter. ■ Use proper pan size. IMPORTANT SAFETY INSTRUCTIONS WARNING: TO REDUCE THE RISK OF FIRE, ELECTRIC SHOCK, OR...
... with a damaged cord or plug. If the flames do not use cookware appropriate for proper combustion and exhausting of gases through the flue (chimney) of fire and to properly exhaust air, be vented outdoors. BE CAREFUL TO PREVENT BURNS. The fire is being switched on fan or filter. ■ Use proper pan size. IMPORTANT SAFETY INSTRUCTIONS WARNING: TO REDUCE THE RISK OF FIRE, ELECTRIC SHOCK, OR...

Installation Instruction
Page 4
...) wide filler strips. Check that are capable of Saturn Fasteners, Inc. 4 UL listed wire connectors ■ Vent clamps/duct tape as non-vented (recirculating) require charcoal filters. INSTALLATION REQUIREMENTS Tools and Parts Gather the required tools and parts before making any tools listed here. For information on ordering, see the "Accessories" section. Length and thickness determined by recess dimensions. ■ Four flat head wood screws or machine screws with damper to order charcoal filter kit. The model/serial rating plate is...
...) wide filler strips. Check that are capable of Saturn Fasteners, Inc. 4 UL listed wire connectors ■ Vent clamps/duct tape as non-vented (recirculating) require charcoal filters. INSTALLATION REQUIREMENTS Tools and Parts Gather the required tools and parts before making any tools listed here. For information on ordering, see the "Accessories" section. Length and thickness determined by recess dimensions. ■ Four flat head wood screws or machine screws with damper to order charcoal filter kit. The model/serial rating plate is...

Installation Instruction
Page 10
... cover plate and remove. Remove terminal box cover and set aside. Removal of the hood center to hood. Screw 3. Connect ventwork to accommodate off-center ductwork. Vertical vent connector with vent clamps or duct tape to make the connection in the neck of the keyhole slots are in the "Make Electrical Connection" section. A B A. Position the range hood so that the screws are in the hood electrical terminal box. Hinge pin D. No vent attachments. Terminal box cover B. Recirculation cover plate B. Screws A. NOTE: The 7" (17.8 cm) round vent mounting plate...
... cover plate and remove. Remove terminal box cover and set aside. Removal of the hood center to hood. Screw 3. Connect ventwork to accommodate off-center ductwork. Vertical vent connector with vent clamps or duct tape to make the connection in the neck of the keyhole slots are in the "Make Electrical Connection" section. A B A. Position the range hood so that the screws are in the hood electrical terminal box. Hinge pin D. No vent attachments. Terminal box cover B. Recirculation cover plate B. Screws A. NOTE: The 7" (17.8 cm) round vent mounting plate...

Installation Instruction
Page 11
... of the panel clear the front mounting flange. Make Electrical Connection WARNING 3. Use UL listed wire connectors and connect black wires (B) together. WARNING Electrical Shock Hazard Disconnect power before operating. UL listed wire connector D. Green (or bare) ground wire E. Home power supply cable or power cord accessory kit F. Fire Hazard Electrically ground the blower. Connect ground wire to see whether a circuit breaker has tripped or a household fuse has blown. Connect green (or bare) ground wire from your new range hood, read the "Range Hood Use" section. 11...
... of the panel clear the front mounting flange. Make Electrical Connection WARNING 3. Use UL listed wire connectors and connect black wires (B) together. WARNING Electrical Shock Hazard Disconnect power before operating. UL listed wire connector D. Green (or bare) ground wire E. Home power supply cable or power cord accessory kit F. Fire Hazard Electrically ground the blower. Connect ground wire to see whether a circuit breaker has tripped or a household fuse has blown. Connect green (or bare) ground wire from your new range hood, read the "Range Hood Use" section. 11...

Installation Instruction
Page 12
... that contain chlorine. To avoid damage to the following instructions. Blower speed medium button D. Blower speed maximum button Operating the light The On/Off light button controls both lights. Grease filter retainer C. For vented installations: Wash metal filters as needed in direction of the filter. Dispose of the range hood. The hood controls are located on the front panel of old charcoal filter. 12 For best results, start the hood before operating hood. RANGE HOOD USE The range hood is designed to clear all -purpose cleaner: Rinse with...
... that contain chlorine. To avoid damage to the following instructions. Blower speed medium button D. Blower speed maximum button Operating the light The On/Off light button controls both lights. Grease filter retainer C. For vented installations: Wash metal filters as needed in direction of the filter. Dispose of the range hood. The hood controls are located on the front panel of old charcoal filter. 12 For best results, start the hood before operating hood. RANGE HOOD USE The range hood is designed to clear all -purpose cleaner: Rinse with...

Installation Instruction
Page 13
... not operate, make sure the lamps are inserted correctly before calling service. 1. Replace lamp, using tissue or wearing cotton gloves to cool. Replacing the Halogen Lamp Turn off the range hood and allow the halogen lamp to handle lamp. Disconnect power. 2. Turn it clockwise to lock it into the filter retainer. Reconnect power. 13 To avoid damage or decreasing the life of the range hood. Push up into place. 3. To Replace the Filter: 1. Release the filter...
... not operate, make sure the lamps are inserted correctly before calling service. 1. Replace lamp, using tissue or wearing cotton gloves to cool. Replacing the Halogen Lamp Turn off the range hood and allow the halogen lamp to handle lamp. Disconnect power. 2. Turn it clockwise to lock it into the filter retainer. Reconnect power. 13 To avoid damage or decreasing the life of the range hood. Push up into place. 3. To Replace the Filter: 1. Release the filter...

Installation Instruction
Page 16
... . Dealer name Address Phone number Model number Serial number Purchase date 16 This limited warranty is valid only in the United States or Canada and applies only when the major appliance is used in accordance with published installation instructions. 11. ITEMS EXCLUDED FROM WARRANTY This limited warranty does not cover: 1. Expenses for travel and transportation for in a remote area where service by the customer. You will pay for future...
... . Dealer name Address Phone number Model number Serial number Purchase date 16 This limited warranty is valid only in the United States or Canada and applies only when the major appliance is used in accordance with published installation instructions. 11. ITEMS EXCLUDED FROM WARRANTY This limited warranty does not cover: 1. Expenses for travel and transportation for in a remote area where service by the customer. You will pay for future...


