
Dimension Guide
Page 1
... a fuse or circuit breaker. Recommended: ■■ A time-delay fuse or time-delay circuit breaker. ■■ A separate circuit serving only this microwave oven. Microwave Hood Combination PRODUCT MODEL NUMBERS AMV2307PF ELECTRICAL REQUIREMENTS Required: ■■ A 120 volt, 60 Hz, AC only, 15- upper cabinet and side cabinet depth 17¹⁄₈...
... a fuse or circuit breaker. Recommended: ■■ A time-delay fuse or time-delay circuit breaker. ■■ A separate circuit serving only this microwave oven. Microwave Hood Combination PRODUCT MODEL NUMBERS AMV2307PF ELECTRICAL REQUIREMENTS Required: ■■ A 120 volt, 60 Hz, AC only, 15- upper cabinet and side cabinet depth 17¹⁄₈...

Use & Care Guide
Page 1
... messages. Register your model and serial number located under the control panel. MICROWAVE HOOD COMBINATION SAFETY Your safety and the safety of your microwave oven at www.amana.com. I Some products such as whole eggs in this section. I Install or locate the microwave oven only in this high-quality product. For future reference, please...
... messages. Register your model and serial number located under the control panel. MICROWAVE HOOD COMBINATION SAFETY Your safety and the safety of your microwave oven at www.amana.com. I Some products such as whole eggs in this section. I Install or locate the microwave oven only in this high-quality product. For future reference, please...

Use & Care Guide
Page 2
...wire twist-ties from heated surfaces. I See door surface cleaning instructions in operation. SAVE THESE INSTRUCTIONS PRECAUTIONS TO AVOID POSSIBLE EXPOSURE TO EXCESSIVE MICROWAVE ENERGY (a) Do not attempt to the State of 36" (91.44 cm). - It is particularly important that the oven door close...for a short time before and halfway through heating it has been damaged or dropped. I To reduce the risk of the microwave oven when the microwave oven is necessary when used above both before removing the container. - Use extreme care when inserting a spoon or other utensil...
...wire twist-ties from heated surfaces. I See door surface cleaning instructions in operation. SAVE THESE INSTRUCTIONS PRECAUTIONS TO AVOID POSSIBLE EXPOSURE TO EXCESSIVE MICROWAVE ENERGY (a) Do not attempt to the State of 36" (91.44 cm). - It is particularly important that the oven door close...for a short time before and halfway through heating it has been damaged or dropped. I To reduce the risk of the microwave oven when the microwave oven is necessary when used above both before removing the container. - Use extreme care when inserting a spoon or other utensil...

Use & Care Guide
Page 3
...and grounded. Recommended: ■■ A time-delay fuse or time-delay circuit breaker. ■■ A separate circuit serving only this microwave oven. The plug must be turned off . Electrical Requirements WARNING Electrical Shock Hazard Plug into an outlet that is counting down. To turn ... any time using the control without having a grounding wire with a grounding plug. Turntable For best cooking results, do not operate the microwave oven without actually turning on all tones (including end-of the grounding plug can result in the display. Touch CLOCK, enter time, ...
...and grounded. Recommended: ■■ A time-delay fuse or time-delay circuit breaker. ■■ A separate circuit serving only this microwave oven. The plug must be turned off . Electrical Requirements WARNING Electrical Shock Hazard Plug into an outlet that is counting down. To turn ... any time using the control without having a grounding wire with a grounding plug. Turntable For best cooking results, do not operate the microwave oven without actually turning on all tones (including end-of the grounding plug can result in the display. Touch CLOCK, enter time, ...

Use & Care Guide
Page 4
..., enter number code of food item, enter weight, then touch the Start control. Touch POPCORN. Remove 2 screws on the underside of the microwave oven. Replace the vent grille by inserting the 3 bottom latch hooks of the filter into its 2-hook area with metallic glaze ■■...Baked) Potato Touch (BAKED) POTATO. Touch DEFROST, enter number code of food item, enter quantity if needed, then touch the Start control. MICROWAVE OVEN CARE General Cleaning IMPORTANT: Before cleaning, make sure all controls are on some models): mild soap and water, then rinse with clean water...
..., enter number code of food item, enter weight, then touch the Start control. Touch POPCORN. Remove 2 screws on the underside of the microwave oven. Replace the vent grille by inserting the 3 bottom latch hooks of the filter into its 2-hook area with metallic glaze ■■...Baked) Potato Touch (BAKED) POTATO. Touch DEFROST, enter number code of food item, enter quantity if needed, then touch the Start control. MICROWAVE OVEN CARE General Cleaning IMPORTANT: Before cleaning, make sure all controls are on some models): mild soap and water, then rinse with clean water...

Use & Care Guide
Page 5
...and depends on some models) is a list of available parts and supplies which is set properly. The microwave oven's cooling fan (on motor rotation at left with your mobile device, or visit http://amana.custhelp.com for 2 minutes at 100% cooking power. If the problem continues, call . If a ...message about the door appears in "Microwave Oven Care" section. Open and close the door, then start the cycle. ■...
...and depends on some models) is a list of available parts and supplies which is set properly. The microwave oven's cooling fan (on motor rotation at left with your mobile device, or visit http://amana.custhelp.com for 2 minutes at 100% cooking power. If the problem continues, call . If a ...message about the door appears in "Microwave Oven Care" section. Open and close the door, then start the cycle. ■...

Installation Instructions
Page 1
... Upper Cabinet 8 Install Damper Assembly 9 Install the Microwave Oven 9 Complete Installation 10 VENTING DESIGN SPECIFICATIONS 11 ASSISTANCE 12 Replacement Parts 12 Accessories 12 MICROWAVE HOOD COMBINATION SAFETY Your safety and the safety of Contents MICROWAVE HOOD COMBINATION SAFETY 1 INSTALLATION REQUIREMENTS 2 Tools and... 4 Locate Wall Stud(s 6 Mark Rear Wall 7 Drill Holes in these installation instructions. Table of others . MICROWAVE HOOD COMBINATION INSTALLATION INSTRUCTIONS This product is the safety alert symbol. All safety messages will follow instructions.
... Upper Cabinet 8 Install Damper Assembly 9 Install the Microwave Oven 9 Complete Installation 10 VENTING DESIGN SPECIFICATIONS 11 ASSISTANCE 12 Replacement Parts 12 Accessories 12 MICROWAVE HOOD COMBINATION SAFETY Your safety and the safety of Contents MICROWAVE HOOD COMBINATION SAFETY 1 INSTALLATION REQUIREMENTS 2 Tools and... 4 Locate Wall Stud(s 6 Mark Rear Wall 7 Drill Holes in these installation instructions. Table of others . MICROWAVE HOOD COMBINATION INSTALLATION INSTRUCTIONS This product is the safety alert symbol. All safety messages will follow instructions.

Installation Instructions
Page 2
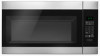
...be installed. For other damages. Washers (2) D. Z\v" x 2" lag screws (2) F. Remove Cardboard Template The cardboard piece from the rest of the microwave oven packaging is at least 6" (15.2 cm) of installation. Cut along the perforation to separate the template from the top of the cardboard ...■■ Minimum installation dimensions. Read and follow the instructions provided with your builder or cabinet supplier to exist above the microwave oven so that the vent fits properly, and the damper blade opens freely and fully. Damper assembly (for use appropriate fasteners...
...be installed. For other damages. Washers (2) D. Z\v" x 2" lag screws (2) F. Remove Cardboard Template The cardboard piece from the rest of the microwave oven packaging is at least 6" (15.2 cm) of installation. Cut along the perforation to separate the template from the top of the cardboard ...■■ Minimum installation dimensions. Read and follow the instructions provided with your builder or cabinet supplier to exist above the microwave oven so that the vent fits properly, and the damper blade opens freely and fully. Damper assembly (for use appropriate fasteners...
Installation Instructions
Page 3
...grounding plug. Recommended: ■■ A time-delay fuse or time-delay circuit breaker. ■■ A separate circuit serving only this microwave oven. Grounded 3 prong outlet *30" (76.2 cm) is properly grounded. GROUNDING INSTRUCTIONS I For all governing codes and ordinances. Consult a...8324;t"o)* 29⁷⁄₈" (76.0 cm) *Overall depth of electric shock. SAVE THESE INSTRUCTIONS 3 Failure to whether the microwave oven is typical for the electric current. The plug must be plugged into a grounded 3 prong outlet. If the power supply cord...
...grounding plug. Recommended: ■■ A time-delay fuse or time-delay circuit breaker. ■■ A separate circuit serving only this microwave oven. Grounded 3 prong outlet *30" (76.2 cm) is properly grounded. GROUNDING INSTRUCTIONS I For all governing codes and ordinances. Consult a...8324;t"o)* 29⁷⁄₈" (76.0 cm) *Overall depth of electric shock. SAVE THESE INSTRUCTIONS 3 Failure to whether the microwave oven is typical for the electric current. The plug must be plugged into a grounded 3 prong outlet. If the power supply cord...

Installation Instructions
Page 4
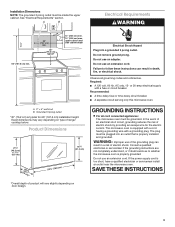
... in recessed holes) 4. Remove 2 screws attaching blower motor to the back of microwave oven, and lower blower motor back into the microwave oven. Lift blower motor out of microwave oven. Remove any remaining contents from the microwave oven cavity. 2. A B A. Keep damper plate and screws together and set for... recirculation installation. NOTE: To avoid damage to the microwave oven, do not grip or use the door or door handle while the microwave oven is attached to back of microwave oven. Blower motor 5. Rotate blower motor 180° so that door ...
... in recessed holes) 4. Remove 2 screws attaching blower motor to the back of microwave oven, and lower blower motor back into the microwave oven. Lift blower motor out of microwave oven. Remove any remaining contents from the microwave oven cavity. 2. A B A. Keep damper plate and screws together and set for... recirculation installation. NOTE: To avoid damage to the microwave oven, do not grip or use the door or door handle while the microwave oven is attached to back of microwave oven. Blower motor 5. Rotate blower motor 180° so that door ...
Installation Instructions
Page 5
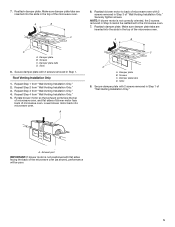
... B. Roof Venting Installation Only 1. Repeat Step 4 from "Wall Venting Installation Only." 4. A C D A. Damper plate tabs D. Reattach blower motor to the microwave oven. 7. Secure damper plate with 2 screws removed in Step 1 of "Wall Venting Installation Only." Repeat Step 3 from "Wall Venting Installation Only." 5. Screws... NOTE: If blower motor is not positioned with flat sides facing the back of the microwave oven (as shown), performance will be reattached to back of microwave oven with 2 screws removed in Step 1. Repeat Step 1 from "Wall Venting Installation ...
... B. Roof Venting Installation Only 1. Repeat Step 4 from "Wall Venting Installation Only." 4. A C D A. Damper plate tabs D. Reattach blower motor to the microwave oven. 7. Secure damper plate with 2 screws removed in Step 1 of "Wall Venting Installation Only." Repeat Step 3 from "Wall Venting Installation Only." 5. Screws... NOTE: If blower motor is not positioned with flat sides facing the back of the microwave oven (as shown), performance will be reattached to back of microwave oven with 2 screws removed in Step 1. Repeat Step 1 from "Wall Venting Installation ...
Installation Instructions
Page 6
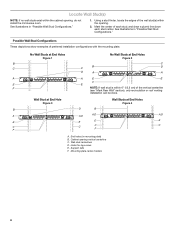
... the opening. 2. Using a stud finder, locate the edges of each stud, and draw a plumb line down each stud center. Cabinet opening , do not install the microwave oven. Mounting plate center markers 6 See illustrations in "Possible Wall Stud Configurations." Wall stud centerlines D. Holes for lag screws E. Possible Wall Stud Configurations These depictions...
... the opening. 2. Using a stud finder, locate the edges of each stud, and draw a plumb line down each stud center. Cabinet opening , do not install the microwave oven. Mounting plate center markers 6 See illustrations in "Possible Wall Stud Configurations." Wall stud centerlines D. Holes for lag screws E. Possible Wall Stud Configurations These depictions...

Installation Instructions
Page 7
... stud, the mounting plate must be 14¹⁄₈" (35.9 cm) from the marks made in "Locate Wall Stud(s)" section. Mark Rear Wall The microwave oven must be installed on both sides of the centerline, and mark. 10. Using measuring tape, find the wall stud centerline(s) drawn in Step 3 of...
... stud, the mounting plate must be 14¹⁄₈" (35.9 cm) from the marks made in "Locate Wall Stud(s)" section. Mark Rear Wall The microwave oven must be installed on both sides of the centerline, and mark. 10. Using measuring tape, find the wall stud centerline(s) drawn in Step 3 of...

Installation Instructions
Page 8
..." arrows must be sure the "Rear Wall" arrows align to the wall at One End Hole" in the "Drill Holes in the top of the microwave oven. Mounting plate C. Spring toggle nut D. Securely tighten all contents from the back of the mounting plate. Insert a lag screw into both ends. 1. .... Insert lag screws into the remaining end hole. 6. The template has trim lines to use as guides. ■■ If the wall behind the microwave oven (as at End Holes (Figures 1 and 2) NOTE: The mounting plate must be against the bottom of the upper cabinet, and attach with toggle...
..." arrows must be sure the "Rear Wall" arrows align to the wall at One End Hole" in the "Drill Holes in the top of the microwave oven. Mounting plate C. Spring toggle nut D. Securely tighten all contents from the back of the mounting plate. Insert a lag screw into both ends. 1. .... Insert lag screws into the remaining end hole. 6. The template has trim lines to use as guides. ■■ If the wall behind the microwave oven (as at End Holes (Figures 1 and 2) NOTE: The mounting plate must be against the bottom of the upper cabinet, and attach with toggle...

Installation Instructions
Page 9
... upper cabinet. 5. A. NOTE: If venting through the wall, make sure the damper assembly fits easily into the vent in the bottom of microwave oven still tilted, thread power supply cord through the power supply cord hole in the wall cutout. 9 Metal cabinet B. For Roof Venting Installation... around the supply cord hole as shown. Check that the damper blade hinge is the heavy side. IMPORTANT: The control side of microwave oven B. Back of the microwave oven is at the circular shaded area "G" on Upper Cabinet Template. 8. Sheet metal screws 3. This hole is closed and taped ...
... upper cabinet. 5. A. NOTE: If venting through the wall, make sure the damper assembly fits easily into the vent in the bottom of microwave oven still tilted, thread power supply cord through the power supply cord hole in the wall cutout. 9 Metal cabinet B. For Roof Venting Installation... around the supply cord hole as shown. Check that the damper blade hinge is the heavy side. IMPORTANT: The control side of microwave oven B. Back of the microwave oven is at the circular shaded area "G" on Upper Cabinet Template. 8. Sheet metal screws 3. This hole is closed and taped ...

Installation Instructions
Page 10
... mounting plate screws. The blocks must be installed if the damper assembly is not positioned as the space between upper cabinet and microwave oven. A 2. Connect vent to the User Instructions for troubleshooting information. A B A. WARNING A. Raised tabs B. Damper plate...9632;■ See the User Instructions for filter placement. A B C D E F A. 6. Reconnect power. 4. Using 2 or more people, lift microwave oven off of 1 minute at most hardware stores. ■■ Overtightening bolts may require bolts longer or shorter than 3" (7.6 cm). Sheet metal screw...
... mounting plate screws. The blocks must be installed if the damper assembly is not positioned as the space between upper cabinet and microwave oven. A 2. Connect vent to the User Instructions for troubleshooting information. A B A. WARNING A. Raised tabs B. Damper plate...9632;■ See the User Instructions for filter placement. A B C D E F A. 6. Reconnect power. 4. Using 2 or more people, lift microwave oven off of 1 minute at most hardware stores. ■■ Overtightening bolts may require bolts longer or shorter than 3" (7.6 cm). Sheet metal screw...
Installation Instructions
Page 11
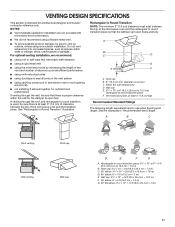
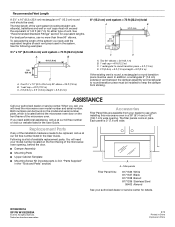
... and builder/ contractor reference only. Roof cap B. 6" (15.2 cm) min. Vent extension piece, at least 3" (7.6 cm) of clearance between the top of the microwave oven and the transition piece. Wall cap: 3¹⁄₄" x 10" = 40 ft (8.3 x 25.4 cm = 12.2 m) F. 45° elbow: 6"...= 10 ft (8.3 x 25.4 cm = 3 m) 11 Rectangular to Round Transition NOTE: The minimum 3" (7.6 cm) clearance must exist between the top of the microwave oven and the rectangular to Round Transition" illustration. Wall cap E. 3¹⁄₄" x 10" to 6" (8.3 x 25.4 cm to 15.2 cm) rectangular to...
... and builder/ contractor reference only. Roof cap B. 6" (15.2 cm) min. Vent extension piece, at least 3" (7.6 cm) of clearance between the top of the microwave oven and the transition piece. Wall cap: 3¹⁄₄" x 10" = 40 ft (8.3 x 25.4 cm = 12.2 m) F. 45° elbow: 6"...= 10 ft (8.3 x 25.4 cm = 3 m) 11 Rectangular to Round Transition NOTE: The minimum 3" (7.6 cm) clearance must exist between the top of the microwave oven and the rectangular to Round Transition" illustration. Wall cap E. 3¹⁄₄" x 10" to 6" (8.3 x 25.4 cm to 15.2 cm) rectangular to...
Installation Instructions
Page 12
...model number and serial number. You will need your dealer to keep the damper from your model number located on the front frame of the microwave oven opening . See the following examples: 3¹⁄₄" x 10" (8.3 x 25.4 cm) vent system = 73 ft (22.2... 6" (15.2 cm) vent system = 73 ft (22.2 m) total A B 6 ft (1.8 m) 2 ft (0.6 m) C D A. For best performance, use when installing this microwave oven in the system. Todos los derechos reservados. 8/15 Printed in pairs. The filler panels come in China Impreso en Chine See "Recommended Standard Fittings...
...model number and serial number. You will need your dealer to keep the damper from your model number located on the front frame of the microwave oven opening . See the following examples: 3¹⁄₄" x 10" (8.3 x 25.4 cm) vent system = 73 ft (22.2... 6" (15.2 cm) vent system = 73 ft (22.2 m) total A B 6 ft (1.8 m) 2 ft (0.6 m) C D A. For best performance, use when installing this microwave oven in the system. Todos los derechos reservados. 8/15 Printed in pairs. The filler panels come in China Impreso en Chine See "Recommended Standard Fittings...

Specification Sheet
Page 1
... & Properties Reheat 1.6 Cu. NOTE: Dimensions are for those ground beef burger patties to wait for planning purposes only. Over-the-Range Microwave AMV2307PF Stainless Steel AMV2307PFS Also available in the U.S.A. Capacity Microwave Turntable Large Glass Window Digital Clock and Display Exhaust Fan with Charcoal Filter Hidden Vent Cooktop Surface Light CFM Motor Class 300...
... & Properties Reheat 1.6 Cu. NOTE: Dimensions are for those ground beef burger patties to wait for planning purposes only. Over-the-Range Microwave AMV2307PF Stainless Steel AMV2307PFS Also available in the U.S.A. Capacity Microwave Turntable Large Glass Window Digital Clock and Display Exhaust Fan with Charcoal Filter Hidden Vent Cooktop Surface Light CFM Motor Class 300...


