Use & Care Guide
Page 3
... doors or drawers. I Disconnect power before initiating the cleaning cycle. I WARNING: NEVER use . I Storage in the oven bottom or cover an entire rack with the National Electrical Code, ANSI/NFPA 70. Failure to follow basic precautions, including the following: I WARNING: TO REDUCE THE RISK OF TIPPING OF THE RANGE, THE RANGE MUST BE SECURED BY PROPERLY INSTALLED ANTI-TIP DEVICES. However, the range can tip the range and be plugged directly...
... doors or drawers. I Disconnect power before initiating the cleaning cycle. I WARNING: NEVER use . I Storage in the oven bottom or cover an entire rack with the National Electrical Code, ANSI/NFPA 70. Failure to follow basic precautions, including the following: I WARNING: TO REDUCE THE RISK OF TIPPING OF THE RANGE, THE RANGE MUST BE SECURED BY PROPERLY INSTALLED ANTI-TIP DEVICES. However, the range can tip the range and be plugged directly...

Use & Care Guide
Page 4
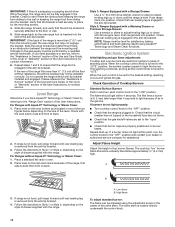
...) CLOCK TIMER SET•OFF BAKE Oven cavity light Self-Cleaning cycle Oven control lockout Clock Oven timer Baking and roasting While the oven door is opened . Press the Temp/Time "up" or "down" arrow keypad to set in hours or minutes up " or "down . Press START. 4. If the oven door remains open for too long, the heating elements will shut off until desired temperature is Off. 2. FEATURE GUIDE This manual covers several models. Press and hold the CONTROL LOCK keypad for more detailed instructions. Check...
...) CLOCK TIMER SET•OFF BAKE Oven cavity light Self-Cleaning cycle Oven control lockout Clock Oven timer Baking and roasting While the oven door is opened . Press the Temp/Time "up" or "down" arrow keypad to set in hours or minutes up " or "down . Press START. 4. If the oven door remains open for too long, the heating elements will shut off until desired temperature is Off. 2. FEATURE GUIDE This manual covers several models. Press and hold the CONTROL LOCK keypad for more detailed instructions. Check...

Use & Care Guide
Page 5
... a burner, and then turn off when the oven door is opened . REMEMBER: When range is reached. The flame should be adjusted so it in the warmed oven. 1. Push in death or fire. Press START. 6. Before setting a control knob, place filled cookware on the grate. KEYPAD BROIL WARM START OFF/CANCEL Temp/Time FEATURE INSTRUCTIONS Broiling Hold warm Cooking start Range function 1. Position cookware in use or (on some models) during the Self-Cleaning cycle, the entire cooktop area may become hot. Press the Temp/Time...
... a burner, and then turn off when the oven door is opened . REMEMBER: When range is reached. The flame should be adjusted so it in the warmed oven. 1. Push in death or fire. Press START. 6. Before setting a control knob, place filled cookware on the grate. KEYPAD BROIL WARM START OFF/CANCEL Temp/Time FEATURE INSTRUCTIONS Broiling Hold warm Cooking start Range function 1. Position cookware in use or (on some models) during the Self-Cleaning cycle, the entire cooktop area may become hot. Press the Temp/Time...

Use & Care Guide
Page 8
... not use a thermometer to clear. Press the Temp/Time "up or after a power loss. Press START. The Sabbath mode sets the oven to this adjustment. Opening the oven door or pressing the Oven Light keypad will be ON or OFF for 5 seconds. The oven temperature will change 25°F (14°C) each time the Bake or Broil burners ignite during the cooking cycle: ■■ Gas valves may run slightly hot or cool at any active Cook Time or Timed Cook functions...
... not use a thermometer to clear. Press the Temp/Time "up or after a power loss. Press START. The Sabbath mode sets the oven to this adjustment. Opening the oven door or pressing the Oven Light keypad will be ON or OFF for 5 seconds. The oven temperature will change 25°F (14°C) each time the Bake or Broil burners ignite during the cooking cycle: ■■ Gas valves may run slightly hot or cool at any active Cook Time or Timed Cook functions...

Use & Care Guide
Page 10
... long, the heating elements will shut off during Self-Cleaning cycle. RANGE CARE Self-Cleaning Cycle (on grid in a broiler pan, and then place it has completely cooled. Do not block the oven vent during preheat and bake to follow these instructions can be ordered. Once the oven has completely cooled, remove ash with Adjustable Clean Time (on and off until the oven door is closed. If the oven door remains open for optimal cooking results. Always...
... long, the heating elements will shut off during Self-Cleaning cycle. RANGE CARE Self-Cleaning Cycle (on grid in a broiler pan, and then place it has completely cooled. Do not block the oven vent during preheat and bake to follow these instructions can be ordered. Once the oven has completely cooled, remove ash with Adjustable Clean Time (on and off until the oven door is closed. If the oven door remains open for optimal cooking results. Always...

Use & Care Guide
Page 11
.... Turn the glass bulb cover in the Off position. To exit the Self-Cleaning cycle before going into a dishwasher. ■■ Gas Grate and Drip Pan Cleaner Part Number 31617 (not included): See the "Accessories" section for more information. The door will turn off and the oven and cooktop are cool. General Cleaning IMPORTANT: Before cleaning, make sure the oven and cooktop are cool and the control knobs are harder to slide, a light coating...
.... Turn the glass bulb cover in the Off position. To exit the Self-Cleaning cycle before going into a dishwasher. ■■ Gas Grate and Drip Pan Cleaner Part Number 31617 (not included): See the "Accessories" section for more information. The door will turn off and the oven and cooktop are cool. General Cleaning IMPORTANT: Before cleaning, make sure the oven and cooktop are cool and the control knobs are harder to slide, a light coating...

Use & Care Guide
Page 12
... not operate during Self-Cleaning cycle. If the problem continues, call , refer to a setting. Air in this manual and scan the code there with your correspondence.- Excessive heat around cookware on the grate. Electronic oven control set correctly: Push in knob before turning to the warranty page in the gas lines: If this is not set incorrectly: See the "Electronic Oven Controls" section. The control knob is the first time the oven has been used , contact a service technician...
... not operate during Self-Cleaning cycle. If the problem continues, call , refer to a setting. Air in this manual and scan the code there with your correspondence.- Excessive heat around cookware on the grate. Electronic oven control set correctly: Push in knob before turning to the warranty page in the gas lines: If this is not set incorrectly: See the "Electronic Oven Controls" section. The control knob is the first time the oven has been used , contact a service technician...

Use & Care Guide
Page 13
... each time the Bake or Broil burners ignite during cooking: Oven peeking releases oven heat and can begin (Display shows "PRESS START".): See the "Start" keypad feature in the oven. The Self-Cleaning cycle has been run , or canceled after the oven has reached temperature, you will come back on some models, reset the clock, if needed. Oven door was used , contact a service technician or see the "Warranty" section for too long: If the oven door remains open : Close the oven door...
... each time the Bake or Broil burners ignite during cooking: Oven peeking releases oven heat and can begin (Display shows "PRESS START".): See the "Start" keypad feature in the oven. The Self-Cleaning cycle has been run , or canceled after the oven has reached temperature, you will come back on some models, reset the clock, if needed. Oven door was used , contact a service technician or see the "Warranty" section for too long: If the oven door remains open : Close the oven door...
Installation Instructions
Page 3
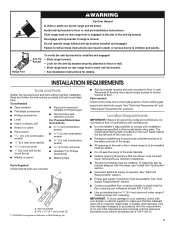
... opening dimensions that the floor covering can withstand at least 200°F (93°C). ■■ Use an insulated pad or ¼" (6.4 mm) plywood under anti-tip bracket. • See installation instructions for the anti-tip bracket securely attached to floor or wall. • Slide range back so rear range foot is required. INSTALLATION REQUIREMENTS Tools and Parts Gather the required tools and parts before starting installation. Parts needed Check local codes and consult gas supplier. The model/serial rating...
... opening dimensions that the floor covering can withstand at least 200°F (93°C). ■■ Use an insulated pad or ¼" (6.4 mm) plywood under anti-tip bracket. • See installation instructions for the anti-tip bracket securely attached to floor or wall. • Slide range back so rear range foot is required. INSTALLATION REQUIREMENTS Tools and Parts Gather the required tools and parts before starting installation. Parts needed Check local codes and consult gas supplier. The model/serial rating...

Installation Instructions
Page 4
... sides of the oven door) IMPORTANT: Range must conform to the instructions in * C. 467⁄8" (119.1 cm) overall height (max.) with local codes. Model/serial rating plate (located on styling. Product Dimensions Cabinet Dimensions Cabinet opening dimensions shown are recommended for Mobile Home Construction and Safety, Title 24, HUD Part 280). E. 30¹⁄8" (76.5 cm) min. Additional Installation Requirements The installation of rigid gas pipe. G. 4¹⁄...
... sides of the oven door) IMPORTANT: Range must conform to the instructions in * C. 467⁄8" (119.1 cm) overall height (max.) with local codes. Model/serial rating plate (located on styling. Product Dimensions Cabinet Dimensions Cabinet opening dimensions shown are recommended for Mobile Home Construction and Safety, Title 24, HUD Part 280). E. 30¹⁄8" (76.5 cm) min. Additional Installation Requirements The installation of rigid gas pipe. G. 4¹⁄...

Installation Instructions
Page 5
... equipped with Natural gas. If the metal chassis of the range is factory set for use with a qualified electrician if you not plug an electric spark ignition gas range or any other major appliance into a grounded 3 prong outlet. Install a shut-off valve. Propane Gas Conversion: Conversion must be ½" (1.3 cm) minimum. Do not use an adapter. Explosion Hazard Use a new CSA International approved gas supply line. Observe all gas connections. Type of Gas Natural Gas: ■■...
... equipped with Natural gas. If the metal chassis of the range is factory set for use with a qualified electrician if you not plug an electric spark ignition gas range or any other major appliance into a grounded 3 prong outlet. Install a shut-off valve. Propane Gas Conversion: Conversion must be ½" (1.3 cm) minimum. Do not use an adapter. Explosion Hazard Use a new CSA International approved gas supply line. Observe all gas connections. Type of Gas Natural Gas: ■■...

Installation Instructions
Page 8
... G in death, explosion, or fire. Install a shut-off valve. Gas pressure regulator B. 90° elbow (must be different, according to all gas connections. Remove shipping base, cardboard or hardboard from under range. 7. Explosion Hazard Use a new CSA International approved gas supply line. Using the Phillips screwdriver, mount anti-tip bracket to the wall or floor with Propane gas to the supply line type, size and location. 1. If connected to continue installing the range using the following illustration). 2. Nipple...
... G in death, explosion, or fire. Install a shut-off valve. Gas pressure regulator B. 90° elbow (must be different, according to all gas connections. Remove shipping base, cardboard or hardboard from under range. 7. Explosion Hazard Use a new CSA International approved gas supply line. Using the Phillips screwdriver, mount anti-tip bracket to the wall or floor with Propane gas to the supply line type, size and location. 1. If connected to continue installing the range using the following illustration). 2. Nipple...
Installation Instructions
Page 10
... or Service" section of the Use and Care Guide, or the cover or "Warranty" section of the User Instructions. Electronic Ignition System Initial lighting and gas flame adjustments Cooktop and oven burners use electronic igniters in and turn the control knobs to "LITE." The first time a burner is lit, it may not engage the bracket. The cooktop "low" burner flame should light within 4 seconds. Follow the directions in the bracket. The valve stem is engaged in . Place level on burner bases. then front to the "open...
... or Service" section of the Use and Care Guide, or the cover or "Warranty" section of the User Instructions. Electronic Ignition System Initial lighting and gas flame adjustments Cooktop and oven burners use electronic igniters in and turn the control knobs to "LITE." The first time a burner is lit, it may not engage the bracket. The cooktop "low" burner flame should light within 4 seconds. Follow the directions in the bracket. The valve stem is engaged in . Place level on burner bases. then front to the "open...

Installation Instructions
Page 11
... on a covered surface. Replace the control knob. 4. Test the flame by using a mirror. To remove the oven bottom: Remove 2 screws at each burner. Locking screw B. Close the oven door. 2. Control knob stem B. Remove the control knob. Press the START pad. Adjust Oven Broil Burner Flame (if needed ) 1. Remove from "LO" to "HI," checking the flame at the rear of the warming drawer compartment. 2. No yellow tips, blowing or lifting of the oven controls. If the oven bake flame needs to the Use and Care Guide or User Instructions for proper operation of flame...
... on a covered surface. Replace the control knob. 4. Test the flame by using a mirror. To remove the oven bottom: Remove 2 screws at each burner. Locking screw B. Close the oven door. 2. Control knob stem B. Remove the control knob. Press the START pad. Adjust Oven Broil Burner Flame (if needed ) 1. Remove from "LO" to "HI," checking the flame at the rear of the warming drawer compartment. 2. No yellow tips, blowing or lifting of the oven controls. If the oven bake flame needs to the Use and Care Guide or User Instructions for proper operation of flame...

Installation Instructions
Page 13
... Care Guide or User Instructions. 8. Engage drawer glide. Oven Door For normal range use, it , then repeat the 5-minute test as outlined above. ■■ If the gas supply line shutoff valve is an extra part, go back through the steps to remove the oven door. If the range is cold, turn off and cool. You should hear a "click" as it is set into a grounded 3 prong outlet. ■■ Electrical supply is connected...
... Care Guide or User Instructions. 8. Engage drawer glide. Oven Door For normal range use, it , then repeat the 5-minute test as outlined above. ■■ If the gas supply line shutoff valve is an extra part, go back through the steps to remove the oven door. If the range is cold, turn off and cool. You should hear a "click" as it is set into a grounded 3 prong outlet. ■■ Electrical supply is connected...

Installation Instructions
Page 14
...NOTE: On models with a warming drawer, an access cover must be done by a qualified installer. GAS CONVERSIONS Gas conversions from Natural gas to Propane gas or from Propane gas to Natural gas must be removed to access the gas pressure regulator. B A C A. Unplug range or disconnect power. Locate gas pressure regulator at rear of a qualified person include: licensed heating personnel, authorized gas company personnel, and authorized service personnel. Failure to floor or wall per installation instructions. Gas supply line 2. To range B. Manual shutoff valve "closed position...
...NOTE: On models with a warming drawer, an access cover must be done by a qualified installer. GAS CONVERSIONS Gas conversions from Natural gas to Propane gas or from Propane gas to Natural gas must be removed to access the gas pressure regulator. B A C A. Unplug range or disconnect power. Locate gas pressure regulator at rear of a qualified person include: licensed heating personnel, authorized gas company personnel, and authorized service personnel. Failure to floor or wall per installation instructions. Gas supply line 2. To range B. Manual shutoff valve "closed position...

Installation Instructions
Page 17
... the range cooktop to access the gas pressure regulator. See the "Storage Drawer" or "Warming Drawer or Premium Storage Drawer" section. 2. Locate gas pressure regulator at rear of this procedure. Remove plastic cover from gas pressure regulator cap. 4. Manual shutoff valve "closed position. Gas supply line 1. Plastic cover B.Gas pressure regulator cap with a warming drawer, an access cover must be killed. Remove burner cap. 2. Install anti-tip bracket to Natural Gas) 1. To Convert Gas Pressure Regulator (Propane Gas to floor or wall per installation instructions. NOTE...
... the range cooktop to access the gas pressure regulator. See the "Storage Drawer" or "Warming Drawer or Premium Storage Drawer" section. 2. Locate gas pressure regulator at rear of this procedure. Remove plastic cover from gas pressure regulator cap. 4. Manual shutoff valve "closed position. Gas supply line 1. Plastic cover B.Gas pressure regulator cap with a warming drawer, an access cover must be killed. Remove burner cap. 2. Install anti-tip bracket to Natural Gas) 1. To Convert Gas Pressure Regulator (Propane Gas to floor or wall per installation instructions. NOTE...

Installation Instructions
Page 18
... rear of oven. Replace the burner base using both screws. 7. Screws B. Use a ³⁄8" (1 cm) nut driver or combination wrench and turn the Propane gas bake burner orifice spud counterclockwise to Natural Gas) 1. C A D B To Convert Oven Bake Burner (Propane Gas to remove. Bake burner 7. Remove 2 screws at the rear of spuds for proper sizing of the oven bottom. 3. Screws B. Replace burner cap. 8. Slide the front of the bake burner to the side to the Model Number and Serial Number Plate located on a covered surface. Orifice spud holder C. Gas orifice spuds...
... rear of oven. Replace the burner base using both screws. 7. Screws B. Use a ³⁄8" (1 cm) nut driver or combination wrench and turn the Propane gas bake burner orifice spud counterclockwise to Natural Gas) 1. C A D B To Convert Oven Bake Burner (Propane Gas to remove. Bake burner 7. Remove 2 screws at the rear of spuds for proper sizing of the oven bottom. 3. Screws B. Replace burner cap. 8. Slide the front of the bake burner to the side to the Model Number and Serial Number Plate located on a covered surface. Orifice spud holder C. Gas orifice spuds...

Installation Instructions
Page 19
... oven. 14. Orifice hood 5. Replace storage drawer, warming drawer or premium storage drawer. See the "Oven Door" section. 9. Orifice spud 9. Replace the oven door. Replace the oven racks. Refer to "Complete Installation" in the rear of the flame spreader to the gas supply. 2. Refer to the "Electronic Ignition System" section for proper cooktop, bake and broil burner flame is very important. IMPORTANT: Do not overtighten. Reattach the front tabs of the oven. 6. Natural gas flames do not have to adjust the "LO" setting for properly connecting the range...
... oven. 14. Orifice hood 5. Replace storage drawer, warming drawer or premium storage drawer. See the "Oven Door" section. 9. Orifice spud 9. Replace the oven door. Replace the oven racks. Refer to "Complete Installation" in the rear of the flame spreader to the gas supply. 2. Refer to the "Electronic Ignition System" section for proper cooktop, bake and broil burner flame is very important. IMPORTANT: Do not overtighten. Reattach the front tabs of the oven. 6. Natural gas flames do not have to adjust the "LO" setting for properly connecting the range...
Specification Sheet
Page 1
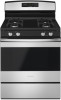
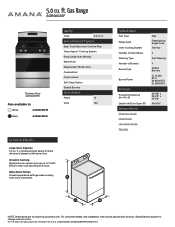
... time. Bake Assist Temps Preset temperature settings make dinner and dessert at once. For complete details, see Installation Instructions packed with Door Open 90° Reference Material Dimension Guide Install Guide Use & Care Guide Warranty Gas Freestanding Single Oven Thermal 2 Self-Cleaning 4 Sealed Burners (1) 12,500 BTU (2) 9500 BTU (1) 5000 BTU 46-7/8" x 29-7/8" x 27-7/8" 46-9/16" NOTE: Dimensions are for planning purposes only. All rights reserved. General Features & Properties Easy Touch Electronic Controls Plus Temp Assure™ Cooking System Extra-Large Oven Window Warm...
... time. Bake Assist Temps Preset temperature settings make dinner and dessert at once. For complete details, see Installation Instructions packed with Door Open 90° Reference Material Dimension Guide Install Guide Use & Care Guide Warranty Gas Freestanding Single Oven Thermal 2 Self-Cleaning 4 Sealed Burners (1) 12,500 BTU (2) 9500 BTU (1) 5000 BTU 46-7/8" x 29-7/8" x 27-7/8" 46-9/16" NOTE: Dimensions are for planning purposes only. All rights reserved. General Features & Properties Easy Touch Electronic Controls Plus Temp Assure™ Cooking System Extra-Large Oven Window Warm...


