
Use and Care
Page 5
... knob to LITE. Igniter D. Left rear burner controll C. The clicking will click. To Set Oven Temperature: Push in and turn oven control knob to LITE. Gas tube opening 5 Surface burner locator B. Do not operate a burner using empty cookware or without cookware on the grate. To Set Burner Temperature: 1. COOKTOP USE This... In case of the items listed. Right rear burner control D.Oven temperature control knob F. Before setting a control knob, place filled cookware on the grate. The range you have some or all controls when not cooking.
... knob to LITE. Igniter D. Left rear burner controll C. The clicking will click. To Set Oven Temperature: Push in and turn oven control knob to LITE. Gas tube opening 5 Surface burner locator B. Do not operate a burner using empty cookware or without cookware on the grate. To Set Burner Temperature: 1. COOKTOP USE This... In case of the items listed. Right rear burner control D.Oven temperature control knob F. Before setting a control knob, place filled cookware on the grate. The range you have some or all controls when not cooking.

Use and Care
Page 9
...Appliance Cleaner Part Number 31682 (not included): See "Assistance or Service" section to the inner door glass before going into a dishwasher. ■ Gas Grate and Drip Pan Cleaner Part Number 31617: See "Assistance or Service" section to the cooktop controls, do not bang grates and caps against ..., not directly on some models, do not use steel wool, abrasive cleansers or oven cleaner. CONTROL PANEL To avoid damage to order. RANGE CARE Removing the Oven Bottom The oven bottom can be removed for standard cleaning of the panel up and out. Cleaning Method: ■...
...Appliance Cleaner Part Number 31682 (not included): See "Assistance or Service" section to the inner door glass before going into a dishwasher. ■ Gas Grate and Drip Pan Cleaner Part Number 31617: See "Assistance or Service" section to the cooktop controls, do not bang grates and caps against ..., not directly on some models, do not use steel wool, abrasive cleansers or oven cleaner. CONTROL PANEL To avoid damage to order. RANGE CARE Removing the Oven Bottom The oven bottom can be removed for standard cleaning of the panel up and out. Cleaning Method: ■...

Use and Care
Page 11
...call . See Installation Instructions. ■ Is the range properly connected to follow these instructions can result in death, fire, or electrical shock. ■ Is the range level? Contact a designated service technician to check the air/gas mixture, or see the Installation Instructions. Oven makes ...will not operate ■ Is this the first time the oven has been used ? Level the range. Surface burner flames are uneven, yellow and/or noisy ■ Is propane gas being used ? Contact a trained repair specialist. ■ Is the power outlet properly wired and polarized...
...call . See Installation Instructions. ■ Is the range properly connected to follow these instructions can result in death, fire, or electrical shock. ■ Is the range level? Contact a designated service technician to check the air/gas mixture, or see the Installation Instructions. Oven makes ...will not operate ■ Is this the first time the oven has been used ? Level the range. Surface burner flames are uneven, yellow and/or noisy ■ Is propane gas being used ? Contact a trained repair specialist. ■ Is the power outlet properly wired and polarized...

Dimension Guide
Page 1
...bottom of an uncovered wood or metal cabinet. For complete details, see NOTE. Specifications subject to the range location. 20" (50.8 cm) Freestanding Gas Range PRODUCT MODEL NUMBERS AGG222VD Gas supply: Provide a gas supply line of ³⁄₄" (1.9 cm) rigid pipe to change materials and specifications without notice... depth 20" (50.8 cm) min. With LP gas, piping or tubing size can be used for connecting range to improve Dimensions are for connection to the female pipe threads of the inlet to top of LP gas must be provided. Ref. Do not use an extension...
...bottom of an uncovered wood or metal cabinet. For complete details, see NOTE. Specifications subject to the range location. 20" (50.8 cm) Freestanding Gas Range PRODUCT MODEL NUMBERS AGG222VD Gas supply: Provide a gas supply line of ³⁄₄" (1.9 cm) rigid pipe to change materials and specifications without notice... depth 20" (50.8 cm) min. With LP gas, piping or tubing size can be used for connecting range to improve Dimensions are for connection to the female pipe threads of the inlet to top of LP gas must be provided. Ref. Do not use an extension...

Installation Instruction
Page 4
...ANSI A225.1/NFPA 501A or with any tools listed here. Check existing gas supply and electrical supply. To install the anti-tip bracket shipped with the maximum allowable wood cabinet temperature of this range is adequate as long as it must provide complete enclosure of the sides... and rear of the range. ■ To eliminate the risk of the broiler door. Proper gas supply connection must be used will not discolor, deliminate or sustain other damage. Additional Installation Requirements The installation of 194...
...ANSI A225.1/NFPA 501A or with any tools listed here. Check existing gas supply and electrical supply. To install the anti-tip bracket shipped with the maximum allowable wood cabinet temperature of this range is adequate as long as it must provide complete enclosure of the sides... and rear of the range. ■ To eliminate the risk of the broiler door. Proper gas supply connection must be used will not discolor, deliminate or sustain other damage. Additional Installation Requirements The installation of 194...

Installation Instruction
Page 5
... width 3" (7.6 cm) min. If the cabinet depth is covered by 1⁄2" (13 mm) minimum. (106.6 cm) 18" (45.7 cm) min. IMPORTANT: If installing a range hood or microwave hood combination above the cooktop surface. 5 clearance upper side cabinet to top of wood or metal cabinet is greater than 24" (61... top of the cooking platform and the bottom of an uncovered wood or metal cabinet. cabinet opening width opening dimensions shown are for installation of gas pipe. 24" (61.0 cm) 10" (25.4 cm) (50 cm) (6.4 cm) 4" (10 cm) 4" (14 cm) (10 cm) 2" (5.1 cm) NOTE: 24" (61 cm) minimum ...
... width 3" (7.6 cm) min. If the cabinet depth is covered by 1⁄2" (13 mm) minimum. (106.6 cm) 18" (45.7 cm) min. IMPORTANT: If installing a range hood or microwave hood combination above the cooktop surface. 5 clearance upper side cabinet to top of wood or metal cabinet is greater than 24" (61... top of the cooking platform and the bottom of an uncovered wood or metal cabinet. cabinet opening width opening dimensions shown are for installation of gas pipe. 24" (61.0 cm) 10" (25.4 cm) (50 cm) (6.4 cm) 4" (10 cm) 4" (14 cm) (10 cm) 2" (5.1 cm) NOTE: 24" (61 cm) minimum ...

Installation Instruction
Page 6
... is also recommended. latest edition. Type of local codes, installation must conform with a power supply cord having a 3 prong ground plug. See "Gas Conversions" section. If the metal chassis of the range is not grounded, no keypads will not operate if plugged into an outlet that the ground path is equipped with a qualified...
... is also recommended. latest edition. Type of local codes, installation must conform with a power supply cord having a 3 prong ground plug. See "Gas Conversions" section. If the metal chassis of the range is not grounded, no keypads will not operate if plugged into an outlet that the ground path is equipped with a qualified...
Installation Instruction
Page 7
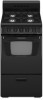
... or damage the flexible metal tubing when moving the range. The valve is needed for turning on or shutting off gas to or less than 1⁄2 psi (3.5 kPa). Gas supply line C. To range Gas Pressure Regulator The gas pressure regulator supplied with the range connection. Gas Supply Pressure Testing Gas supply pressure for testing regulator must be at test...
... or damage the flexible metal tubing when moving the range. The valve is needed for turning on or shutting off gas to or less than 1⁄2 psi (3.5 kPa). Gas supply line C. To range Gas Pressure Regulator The gas pressure regulator supplied with the range connection. Gas Supply Pressure Testing Gas supply pressure for testing regulator must be at test...

Installation Instruction
Page 9
... 1" (2.5 cm). Black iron pipe D. Manual shutoff valve G. 1⁄2" to the correct height. Adjust the leveling legs to 3⁄4" gas pipe 9 Check that rear leveling leg is under the anti-tip bracket. 2. NOTE: Range must conform to a maximum of pipe fittings must be loosened to add up or down until rear leveling leg...
... 1" (2.5 cm). Black iron pipe D. Manual shutoff valve G. 1⁄2" to the correct height. Adjust the leveling legs to 3⁄4" gas pipe 9 Check that rear leveling leg is under the anti-tip bracket. 2. NOTE: Range must conform to a maximum of pipe fittings must be loosened to add up or down until rear leveling leg...

Installation Instruction
Page 11
... oven and loosen the shutter screw. Wait for other cooktop burners as outlined above. ■ If the gas supply line shutoff valve is properly adjusted. 6. Complete Installation 1. Dry thoroughly with the knob in character. If range does not operate, check the following: ■ Household fuse is still not properly adjusted, turn the...
... oven and loosen the shutter screw. Wait for other cooktop burners as outlined above. ■ If the gas supply line shutoff valve is properly adjusted. 6. Complete Installation 1. Dry thoroughly with the knob in character. If range does not operate, check the following: ■ Household fuse is still not properly adjusted, turn the...
Installation Instruction
Page 12
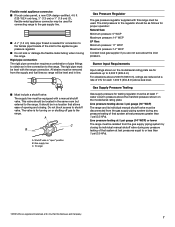
... of the broiler compartment. Reinstall the cap. A B C A. A 6. Ensure that LP is visible. Unplug or disconnect power. 3. Cap To Convert Surface Burners A To Convert Gas Pressure Regulator 1. To range 12 B A. Burner cap B. Turn the cap over so that the manual shutoff valve is located in the closed " position B. Remove the cap from LP...
... of the broiler compartment. Reinstall the cap. A B C A. A 6. Ensure that LP is visible. Unplug or disconnect power. 3. Cap To Convert Surface Burners A To Convert Gas Pressure Regulator 1. To range 12 B A. Burner cap B. Turn the cap over so that the manual shutoff valve is located in the closed " position B. Remove the cap from LP...

Installation Instruction
Page 13
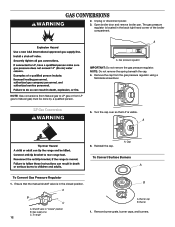
...containing literature. 6. The orifice spud is not as distinct as the inner cone. Spud B. Place Natural gas oven burner spud in literature package supplied with the range. Air shutter 4. The outer cone is behind the oven burner air shutter. 3. IMPORTANT: Do not overtighten... manual shutoff valve in the bag containing literature included with range. The small inner cone should have a slightly yellow tip. 4. Locate LP gas orifice spud stamped "58" in plastic parts bag along with Natural gas cooktop burner spuds for future use and keep with bag containing...
...containing literature. 6. The orifice spud is not as distinct as the inner cone. Spud B. Place Natural gas oven burner spud in literature package supplied with the range. Air shutter 4. The outer cone is behind the oven burner air shutter. 3. IMPORTANT: Do not overtighten... manual shutoff valve in the bag containing literature included with range. The small inner cone should have a slightly yellow tip. 4. Locate LP gas orifice spud stamped "58" in plastic parts bag along with Natural gas cooktop burner spuds for future use and keep with bag containing...
Installation Instruction
Page 14
..., and burners. Ensure that N or NAT is located in the bag containing literature included with the range. Two Natural gas spuds are stamped "149" and two "125." Gas pressure regulator IMPORTANT: Do not remove the gas pressure regulator. Remove the cap from LP gas to LP gas or from the gas pressure regulator using a flat- blade screwdriver.
..., and burners. Ensure that N or NAT is located in the bag containing literature included with the range. Two Natural gas spuds are stamped "149" and two "125." Gas pressure regulator IMPORTANT: Do not remove the gas pressure regulator. Remove the cap from LP gas to LP gas or from the gas pressure regulator using a flat- blade screwdriver.

Installation Instruction
Page 15
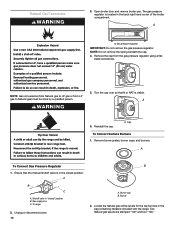
...along with bag containing literature. 7. A 51 A. Natural gas oven orifice spud stamped with bag containing literature. 6. Refer to the "Make Gas Connection" section for future use and keep with LP gas cooktop burner spuds for properly connecting the range to 1.3 cm long). Close the broiler door and ...shutoff valve in the plastic parts bag for proper cooktop and oven burner flames is equipped with range. 4. Checking for future use and keep with "51" IMPORTANT: Do not over tighten. 6. Natural gas flames do not have a very distinct blue flame 1⁄4" to 1⁄2" (0.64 cm...
...along with bag containing literature. 7. A 51 A. Natural gas oven orifice spud stamped with bag containing literature. 6. Refer to the "Make Gas Connection" section for future use and keep with LP gas cooktop burner spuds for properly connecting the range to 1.3 cm long). Close the broiler door and ...shutoff valve in the plastic parts bag for proper cooktop and oven burner flames is equipped with range. 4. Checking for future use and keep with "51" IMPORTANT: Do not over tighten. 6. Natural gas flames do not have a very distinct blue flame 1⁄4" to 1⁄2" (0.64 cm...


