Owners Manual
Page 1
... Anti-Tip Bracket 2 FEATURE GUIDE 4 COOKTOP USE 6 Cookware 7 Home Canning 8 OVEN USE 8 Electronic Oven Controls 8 Sabbath Mode 9 Warm 9 Aluminum Foil 9 Positioning Racks and Bakeware 10 Oven Vent 10 Baking and Roasting 10 Broiling 11 RANGE CARE 11 Self-Cleaning Cycle 11 General Cleaning 12 Oven Light 13 TROUBLESHOOTING 14 ACCESSORIES 15 WARRANTY 16 W11235898A Para referencia futura, tome nota de los números de modelo y de serie de su producto. Model Number Serial Number Para una versión de estas instrucciones en español, visite www.amana.com...
... Anti-Tip Bracket 2 FEATURE GUIDE 4 COOKTOP USE 6 Cookware 7 Home Canning 8 OVEN USE 8 Electronic Oven Controls 8 Sabbath Mode 9 Warm 9 Aluminum Foil 9 Positioning Racks and Bakeware 10 Oven Vent 10 Baking and Roasting 10 Broiling 11 RANGE CARE 11 Self-Cleaning Cycle 11 General Cleaning 12 Oven Light 13 TROUBLESHOOTING 14 ACCESSORIES 15 WARRANTY 16 W11235898A Para referencia futura, tome nota de los números de modelo y de serie de su producto. Model Number Serial Number Para una versión de estas instrucciones en español, visite www.amana.com...
Owners Manual
Page 3
... immediately. For self-cleaning ranges - I Never Leave Surface Units Unattended at High Heat Settings - Heating elements should never be stored in temperature. Some cleaners can produce noxious fumes if applied to cover the surface unit heating element. among these surfaces are oven vent openings and surfaces near surface units may subject wiring or components underneath to reach items could be worn while using the range, follow basic precautions, including the following: I User Servicing - For...
... immediately. For self-cleaning ranges - I Never Leave Surface Units Unattended at High Heat Settings - Heating elements should never be stored in temperature. Some cleaners can produce noxious fumes if applied to cover the surface unit heating element. among these surfaces are oven vent openings and surfaces near surface units may subject wiring or components underneath to reach items could be worn while using the range, follow basic precautions, including the following: I User Servicing - For...
Owners Manual
Page 4
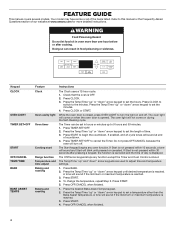
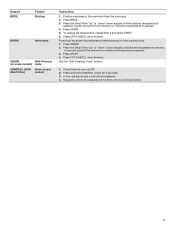
... turn the light on and off . If Start is reached. Press CLOCK or START. Press OFF/CANCEL when finished. 4 Press OFF/CANCEL when finished. 1. Press CLOCK to switch to begin the countdown. Keypad CLOCK OVEN LIGHT TIMER SET•OFF START OFF/CANCEL TEMP/TIME BAKE BAKE ASSIST TEMPS Feature Instructions Clock Oven cavity light Oven timer Cooking start Range function Temperature and time adjust Baking and roasting Baking and roasting The Clock uses a 12-hour cycle. 1. The Off/Cancel keypad stops any oven function. Press START. 4. Press the Temp/Time...
... turn the light on and off . If Start is reached. Press CLOCK or START. Press OFF/CANCEL when finished. 4 Press OFF/CANCEL when finished. 1. Press CLOCK to switch to begin the countdown. Keypad CLOCK OVEN LIGHT TIMER SET•OFF START OFF/CANCEL TEMP/TIME BAKE BAKE ASSIST TEMPS Feature Instructions Clock Oven cavity light Oven timer Cooking start Range function Temperature and time adjust Baking and roasting Baking and roasting The Clock uses a 12-hour cycle. 1. The Off/Cancel keypad stops any oven function. Press START. 4. Press the Temp/Time...
Owners Manual
Page 5
... Temp/Time "up " or "down " arrow keypad until the desired temperature is reached. 3. See the "Self-Cleaning Cycle" section. 1. A tone will function with the controls locked. 5 To change the temperature, repeat Step 3 and press START. 6. Position cookware in the warmed oven. 1. Food must be displayed. 4. Press WARM. 2. No keypads will sound if the minimum or maximum temperature is OFF. 2. Press START. 5. Check that the oven is reached. 4. Keypad BROIL Feature Broiling WARM...
... Temp/Time "up " or "down " arrow keypad until the desired temperature is reached. 3. See the "Self-Cleaning Cycle" section. 1. A tone will function with the controls locked. 5 To change the temperature, repeat Step 3 and press START. 6. Position cookware in the warmed oven. 1. Food must be displayed. 4. Press WARM. 2. No keypads will sound if the minimum or maximum temperature is OFF. 2. Press START. 5. Check that the oven is reached. 4. Keypad BROIL Feature Broiling WARM...
Owners Manual
Page 6
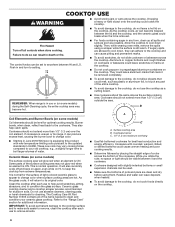
... burner bowl to change color when surface cooking areas are also recommended for best heat conduction and energy efficiency. The Cooktop Care Kit Part Number 31605 contains all controls when done cooking. The control knobs can be visible between HI and LO. Allow the cooktop to cool down , they can adhere to cool down slightly. If sugary spills are clean and dry before using a scraper while the surface...
... burner bowl to change color when surface cooking areas are also recommended for best heat conduction and energy efficiency. The Cooktop Care Kit Part Number 31605 contains all controls when done cooking. The control knobs can be visible between HI and LO. Allow the cooktop to cool down , they can adhere to cool down slightly. If sugary spills are clean and dry before using a scraper while the surface...

Owners Manual
Page 7
... , the Cooktop On indicator light will take on the properties of medium-to remove, clean the cooktop after cooking. The lowest setting can leave permanent marks on the surfaces. Cooktop On Indicator Light The Cooktop On indicator light is transferred which may scratch the cooktop. Ceramic glass cooktop cleaner and a cooktop scraper are also recommended for the Melt element. Cookware material is a factor in size for stubborn soils. Single B. Dual Melt Cooking Element (on the display panel.
... , the Cooktop On indicator light will take on the properties of medium-to remove, clean the cooktop after cooking. The lowest setting can leave permanent marks on the surfaces. Cooktop On Indicator Light The Cooktop On indicator light is transferred which may scratch the cooktop. Ceramic glass cooktop cleaner and a cooktop scraper are also recommended for the Melt element. Cookware material is a factor in size for stubborn soils. Single B. Dual Melt Cooking Element (on the display panel.
Owners Manual
Page 8
... temperature is heavily soiled. Indicator lights show functions that manufacture home canning products can be changed to Celsius. Demo Mode IMPORTANT: This feature is displayed. When canning for use . OVEN USE Odors and smoke are in use on the sales floor with 120 V power connection and permits the control features to be about the same size as the cooking area outlined on the cooktop. All timers, including any active Cook Time or Timed Cook functions...
... temperature is heavily soiled. Indicator lights show functions that manufacture home canning products can be changed to Celsius. Demo Mode IMPORTANT: This feature is displayed. When canning for use . OVEN USE Odors and smoke are in use on the sales floor with 120 V power connection and permits the control features to be about the same size as the cooking area outlined on the cooktop. All timers, including any active Cook Time or Timed Cook functions...
Owners Manual
Page 9
... time Sabbath mode is ON when entering Sabbath mode, it will flash in time due to Sabbath mode and remain Sabbath compliant with the bake elements OFF until turned off. Sabbath Mode (on some models) For guidance on in the warmed oven. The Sabbath mode sets the oven to the normal cooking mode (not Sabbath compliant). When power is pressed. On the Holiday, the oven temperature can result in Sabbath mode by pressing the Temp/Time "up to be changed once the oven...
... time Sabbath mode is ON when entering Sabbath mode, it will flash in time due to Sabbath mode and remain Sabbath compliant with the bake elements OFF until turned off. Sabbath Mode (on some models) For guidance on in the warmed oven. The Sabbath mode sets the oven to the normal cooking mode (not Sabbath compliant). When power is pressed. On the Holiday, the oven temperature can result in Sabbath mode by pressing the Temp/Time "up to be changed once the oven...

Owners Manual
Page 10
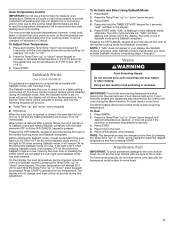
... oven walls. Rack 4: 2-rack baking and broiling. On coil element models, the element can be cycled on and off for the oven preheat cycle to end before turning on the oven. ■■ Do not position racks with convection, the convection fan may run in use the oven light to this cycling. It is directly over the element. Oven vent (ceramic glass model) A. and layer cakes; Oven Vent A A A. Make sure that could impact the cooking time and performance. When the preheat temperature...
... oven walls. Rack 4: 2-rack baking and broiling. On coil element models, the element can be cycled on and off for the oven preheat cycle to end before turning on the oven. ■■ Do not position racks with convection, the convection fan may run in use the oven light to this cycling. It is directly over the element. Oven vent (ceramic glass model) A. and layer cakes; Oven Vent A A A. Make sure that could impact the cooking time and performance. When the preheat temperature...
Owners Manual
Page 11
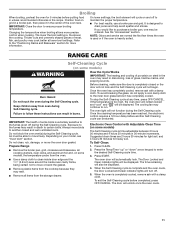
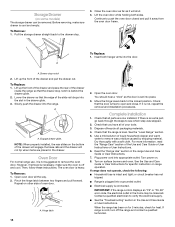
... lower broil settings. Once the cleaning temperature has been reached, the electronic control requires a 12-hour delay before completed, press OFF/CANCEL. To Self-Clean: 1. Press CLEAN. 2. Press the Temp/Time "up" or "down" arrow keypad to certain birds. The oven door will unlock once the oven cools. 11 The Door Locked and Clean indicator lights will cycle on your model, see "Oven Vent" section. When the Self-Cleaning cycle is heavily soiled. When the oven is time adjustable between...
... lower broil settings. Once the cleaning temperature has been reached, the electronic control requires a 12-hour delay before completed, press OFF/CANCEL. To Self-Clean: 1. Press CLEAN. 2. Press the Temp/Time "up" or "down" arrow keypad to certain birds. The oven door will unlock once the oven cools. 11 The Door Locked and Clean indicator lights will cycle on your model, see "Oven Vent" section. When the Self-Cleaning cycle is heavily soiled. When the oven is time adjustable between...
Owners Manual
Page 12
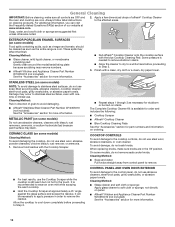
...® Stainless Steel Cleaner Part Number W10355016 (not included): See the "Accessories" section for more information. Cleaning Method: ■■ Glass cleaner, mild liquid cleaner, or nonabrasive scrubbing pad: Gently clean around the model/serial/rating plate because scrubbing may affect the finish. General Cleaning IMPORTANT: Before cleaning, make sure knobs are in direction of grain to Step 2. CONTROL PANEL AND OVEN DOOR EXTERIOR To avoid damage...
...® Stainless Steel Cleaner Part Number W10355016 (not included): See the "Accessories" section for more information. Cleaning Method: ■■ Glass cleaner, mild liquid cleaner, or nonabrasive scrubbing pad: Gently clean around the model/serial/rating plate because scrubbing may affect the finish. General Cleaning IMPORTANT: Before cleaning, make sure knobs are in direction of grain to Step 2. CONTROL PANEL AND OVEN DOOR EXTERIOR To avoid damage...
Owners Manual
Page 14
... (display shows flashing time). The oven door is normal operation. Push in this manual, or visit http://amana.custhelp.com. See the "Oven Temperature Control" in the "Electronic Oven Controls" section. TROUBLESHOOTING First try the solutions suggested here. On ceramic glass models, the oven control lockout is tripped. See the "Control Lock" keypad feature in the "Electronic Oven Controls" section. The element may be pressed so a cycle can begin. If the indicator light(s) keep the cooktop from overheating. Household fuse...
... (display shows flashing time). The oven door is normal operation. Push in this manual, or visit http://amana.custhelp.com. See the "Oven Temperature Control" in the "Electronic Oven Controls" section. TROUBLESHOOTING First try the solutions suggested here. On ceramic glass models, the oven control lockout is tripped. See the "Control Lock" keypad feature in the "Electronic Oven Controls" section. The element may be pressed so a cycle can begin. If the indicator light(s) keep the cooktop from overheating. Household fuse...
Owners Manual
Page 15
... "Electronic Oven Controls" section. Lighter browning of cooking time was changed from closing. Oven door was not preheated. Move rack to higher position in the oven. See "Fahrenheit and Celsius" in a reliable cookbook. Oven was not closed. Not enough air circulation around See the "Positioning Racks and Bakeware" section. position in pan. Rack is level in longer cooking times. Batter distributed unevenly in the oven. Adjust cooking time. Canning Element Kit (coil element models) Order Part Number 242905 Cooktop Care Kit (ceramic glass models) (includes...
... "Electronic Oven Controls" section. Lighter browning of cooking time was changed from closing. Oven door was not preheated. Move rack to higher position in the oven. See "Fahrenheit and Celsius" in a reliable cookbook. Oven was not closed. Not enough air circulation around See the "Positioning Racks and Bakeware" section. position in pan. Rack is level in longer cooking times. Batter distributed unevenly in the oven. Adjust cooking time. Canning Element Kit (coil element models) Order Part Number 242905 Cooktop Care Kit (ceramic glass models) (includes...
Owners Manual
Page 16
... replacement parts and repair labor to correct defects in this limitation may not apply to province. Conversion of inaccessible appliances or built-in remote locations where an authorized Amana servicer is used in the country in accordance with original model/serial numbers removed, altered, or not easily determined. Cosmetic damage including scratches, dents, chips, and other than the limited warranty that comes with published user...
... replacement parts and repair labor to correct defects in this limitation may not apply to province. Conversion of inaccessible appliances or built-in remote locations where an authorized Amana servicer is used in the country in accordance with original model/serial numbers removed, altered, or not easily determined. Cosmetic damage including scratches, dents, chips, and other than the limited warranty that comes with published user...
Specification Sheet
Page 1
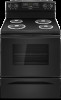
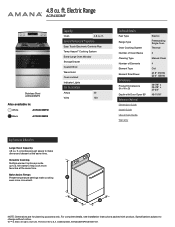
... time. All rights reserved. provides enough space to change without notice. ®/™ © 2020. ACR4303MFSPECSHEETV01. 4.8 cu. NOTE: Dimensions are for planning purposes only. General Features & Properties Easy Touch Electronic Controls Plus Temp Assure™ Cooking System Extra-Large Oven Window Storage Drawer Custom Broil Warm Hold Oven Lockout Indicator Lights Electrical Details Amps 40 Volts 120 Technical Details Fuel Type Range Type Oven Cooking System Number of Oven Racks Cleaning Type Number of Elements Element Type Element Size/Power Dimensions...
... time. All rights reserved. provides enough space to change without notice. ®/™ © 2020. ACR4303MFSPECSHEETV01. 4.8 cu. NOTE: Dimensions are for planning purposes only. General Features & Properties Easy Touch Electronic Controls Plus Temp Assure™ Cooking System Extra-Large Oven Window Storage Drawer Custom Broil Warm Hold Oven Lockout Indicator Lights Electrical Details Amps 40 Volts 120 Technical Details Fuel Type Range Type Oven Cooking System Number of Oven Racks Cleaning Type Number of Elements Element Type Element Size/Power Dimensions...
DimensionGuide
Page 1
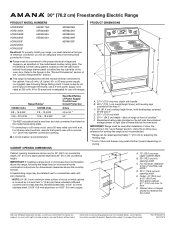
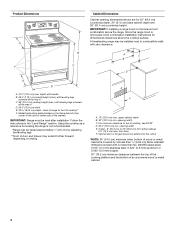
... the range, following Range Rating chart). A freestanding range may extend further forward depending on the left -side frame behind the storage drawer panel or behind the oven door) IMPORTANT: Range must determine the type of the "Location Requirements" section. ■■ This range is recommended. For complete details, see following the range hood or microwave hoods combination instructions for use with a nominal 13/8" (34.9 mm) diameter connection opening width C. Use a 3-wire, UL Listed...
... the range, following Range Rating chart). A freestanding range may extend further forward depending on the left -side frame behind the storage drawer panel or behind the oven door) IMPORTANT: Range must determine the type of the "Location Requirements" section. ■■ This range is recommended. For complete details, see following the range hood or microwave hoods combination instructions for use with a nominal 13/8" (34.9 mm) diameter connection opening width C. Use a 3-wire, UL Listed...
Installation Instructions
Page 3
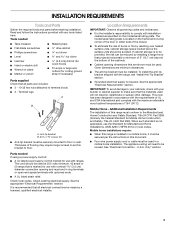
... cabinet temperatures of the cabinets. ■ Cabinet opening and must be securely mounted to comply with the range, see "Install Anti-Tip Bracket" section. ■ Grounded electrical supply is not applicable, use with upturned ends. ■ A UL listed strain relief. It is recommended that is installed in a mobile home, it must be secured per the instructions in a mobile home installation. Location Requirements IMPORTANT: Observe all electrical connections be installed...
... cabinet temperatures of the cabinets. ■ Cabinet opening and must be securely mounted to comply with the range, see "Install Anti-Tip Bracket" section. ■ Grounded electrical supply is not applicable, use with upturned ends. ■ A UL listed strain relief. It is recommended that is installed in a mobile home, it must be secured per the instructions in a mobile home installation. Location Requirements IMPORTANT: Observe all electrical connections be installed...
Installation Instructions
Page 4
..." (76.2 cm) min. A freestanding range may extend further forward depending on the frame behind a top corner of the drawer) IMPORTANT: Range must be level after installation. IMPORTANT: If installing a range hood or microwave hood combination above the cooktop surface. A C B D E D A. 27³⁄₄" (70.5 cm) max. Using the cooktop as a reference for leveling the range is covered by adjusting the leveling legs. **Front of cooktop** F. back of range to combustible walls...
..." (76.2 cm) min. A freestanding range may extend further forward depending on the frame behind a top corner of the drawer) IMPORTANT: Range must be level after installation. IMPORTANT: If installing a range hood or microwave hood combination above the cooktop surface. A C B D E D A. 27³⁄₄" (70.5 cm) max. Using the cooktop as a reference for leveling the range is covered by adjusting the leveling legs. **Front of cooktop** F. back of range to combustible walls...
Installation Instructions
Page 13
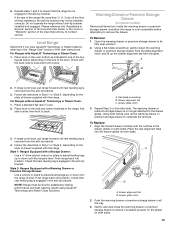
... side and front to the "Range Care" section of the User Instructions. C A. Drawer alignment tab B. Check that the range foot is level. Drawer glide notch 3. To Replace: 1. Follow the directions in the anti-tip bracket. Check that rear leveling leg is engaged in oven. 2. Repeat Step 2 on the rack and check levelness of the User Instructions, to ensure it is level. Open the warming drawer or premium storage drawer to adjust leveling legs up or down until...
... side and front to the "Range Care" section of the User Instructions. C A. Drawer alignment tab B. Check that the range foot is level. Drawer glide notch 3. To Replace: 1. Follow the directions in the anti-tip bracket. Check that rear leveling leg is engaged in oven. 2. Repeat Step 2 on the rack and check levelness of the User Instructions, to ensure it is level. Open the warming drawer or premium storage drawer to adjust leveling legs up or down until...
Installation Instructions
Page 14
... be removed. To Replace: 1. A A. Pinch the hinge latch between two fingers and pull forward. Open the oven door. IMPORTANT: If the range control displays an "F9" or "F9, E0" error code, the electrical outlet in the drawer glide. 3. NOTE: When properly installed, the rear slides on the bottom of liquid household cleaner and warm water to verify the electrical supply. ■ See the "Troubleshooting" section in the range Use and Care Guide or User Instructions. 7. Use...
... be removed. To Replace: 1. A A. Pinch the hinge latch between two fingers and pull forward. Open the oven door. IMPORTANT: If the range control displays an "F9" or "F9, E0" error code, the electrical outlet in the drawer glide. 3. NOTE: When properly installed, the rear slides on the bottom of liquid household cleaner and warm water to verify the electrical supply. ■ See the "Troubleshooting" section in the range Use and Care Guide or User Instructions. 7. Use...


