Owner's Manual (english)
Page 4
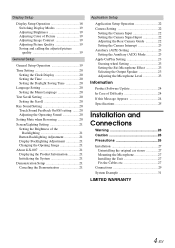
... the Brightness of the Backlighting 21 Button Backlighting Adjustment 21 Display Backlighting Adjustment 21 Changing the Opening Image 21 About iLX-007 21 Displaying the Product Information 21 Initializing the System 21 Demonstration Setup 21 Canceling the Demonstration 21 Application Setup Application ...the Auxiliary (AUX) Mode 23 Apple CarPlay Setting 23 Steering wheel Setting 23 Setting the Siri Microphone Effect 23 Selecting the Output Speaker 23 Adjusting the Microphone Level 23 Information Product Software Update 24 In Case of Difficulty 24 If this Message Appears 24...
... the Brightness of the Backlighting 21 Button Backlighting Adjustment 21 Display Backlighting Adjustment 21 Changing the Opening Image 21 About iLX-007 21 Displaying the Product Information 21 Initializing the System 21 Demonstration Setup 21 Canceling the Demonstration 21 Application Setup Application ...the Auxiliary (AUX) Mode 23 Apple CarPlay Setting 23 Steering wheel Setting 23 Setting the Siri Microphone Effect 23 Selecting the Output Speaker 23 Adjusting the Microphone Level 23 Information Product Software Update 24 In Case of Difficulty 24 If this Message Appears 24...
Owner's Manual (english)
Page 8
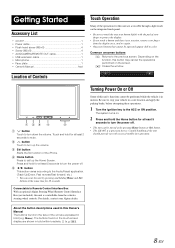
...these operations. 1 Turn the ignition key to the ACC or ON position. Connectable to Remote Control Interface Box With an optional Alpine Steering Wheel Remote Control Interface Box (not included), this Owner's Manual The buttons found on the touch-screen display are expressed ... and there is in bold (e.g. Getting Started Accessory List • iLX-007 1 • Power cable 1 • Flush head screw (M5×8 4 • Screw (M5×8 4 • AUX/CAMERA/REMOTE OUT cable 1 • USB extension cable 1 • Microphone 1 • Face plate 1 • Owner's Manual 1set Touch...
...these operations. 1 Turn the ignition key to the ACC or ON position. Connectable to Remote Control Interface Box With an optional Alpine Steering Wheel Remote Control Interface Box (not included), this Owner's Manual The buttons found on the touch-screen display are expressed ... and there is in bold (e.g. Getting Started Accessory List • iLX-007 1 • Power cable 1 • Flush head screw (M5×8 4 • Screw (M5×8 4 • AUX/CAMERA/REMOTE OUT cable 1 • USB extension cable 1 • Microphone 1 • Face plate 1 • Owner's Manual 1set Touch...

Owner's Manual (english)
Page 10
...the iPhone and this unit at the same time. • When the unit is downloadable from Alpine's TuneIt database stored in heavy traffic or on narrow or winding roads. Keep your Alpine dealer. • The application program and related specifications and data may be deleted or terminated ...Setup Operation" on the iPhone. • Volume level cannot be adjusted via the iPhone. • Please obey all local traffic laws while using a microphone, speak as directly as hands-free. Refer to share and rate. Display example for others to "Apple CarPlay Setting" (page 23). • Avoid...
...the iPhone and this unit at the same time. • When the unit is downloadable from Alpine's TuneIt database stored in heavy traffic or on narrow or winding roads. Keep your Alpine dealer. • The application program and related specifications and data may be deleted or terminated ...Setup Operation" on the iPhone. • Volume level cannot be adjusted via the iPhone. • Please obey all local traffic laws while using a microphone, speak as directly as hands-free. Refer to share and rate. Display example for others to "Apple CarPlay Setting" (page 23). • Avoid...
Owner's Manual (english)
Page 23
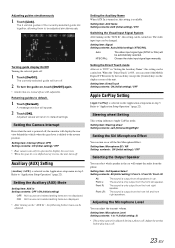
... setting) / NTSC/PAL Auto: NTSC/PAL: The video input signal type (NTSC or PAL) will appear. 2 Touch [OK]. Setting item: Microphone EC / NR Setting contents : ON (Initial setting:) / OFF Selecting the Output Speaker You can select which speaker in "Setting the Auxiliary Name",...the setting before placing a call . Refer to default. 1 Touch [Default]. Choose the video input signal type manually. Adjusting the Microphone Level You can be automatically selected. Adjusted values will output the audio from the front left speaker. Steering wheel Setting This setting influences...
... setting) / NTSC/PAL Auto: NTSC/PAL: The video input signal type (NTSC or PAL) will appear. 2 Touch [OK]. Setting item: Microphone EC / NR Setting contents : ON (Initial setting:) / OFF Selecting the Output Speaker You can select which speaker in "Setting the Auxiliary Name",...the setting before placing a call . Refer to default. 1 Touch [Default]. Choose the video input signal type manually. Adjusting the Microphone Level You can be automatically selected. Adjusted values will output the audio from the front left speaker. Steering wheel Setting This setting influences...

Owner's Manual (english)
Page 27
...safe use, make sure of the following: • Location is stable and firm. • Driver's view and operations are not obstructed. • Microphone is located where the driver's voice can be used in a car. *1 To securely connect the ground lead, use an already installed screw on .... 2 Mount the original mounting bracket to details described in the "Connections" section (page 29). 4 Mounting the unit in "Installing the unit".) Mounting the Microphone. This may cause a fire. Chassis 3 Connect all other leads of the vehicle (marked ( )) or a clean, bare metal spot on the vehicle's chassis...
...safe use, make sure of the following: • Location is stable and firm. • Driver's view and operations are not obstructed. • Microphone is located where the driver's voice can be used in a car. *1 To securely connect the ground lead, use an already installed screw on .... 2 Mount the original mounting bracket to details described in the "Connections" section (page 29). 4 Mounting the unit in "Installing the unit".) Mounting the Microphone. This may cause a fire. Chassis 3 Connect all other leads of the vehicle (marked ( )) or a clean, bare metal spot on the vehicle's chassis...
Owner's Manual (english)
Page 29
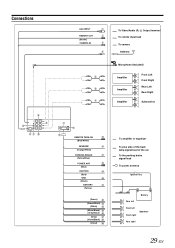
Connections AUX INPUT REMOTE OUT (Brown) CAMERA IN To Video/Audio (R, L) Output terminal To remote input lead To camera Antenna Microphone (Included) Amplifier Amplifier Amplifier Front Left Front Right Rear Left Rear Right Subwoofers REMOTE TURN-ON (Blue/White) REVERSE (Orange/White) PARKING BRAKE (Yellow/Blue) ...
Connections AUX INPUT REMOTE OUT (Brown) CAMERA IN To Video/Audio (R, L) Output terminal To remote input lead To camera Antenna Microphone (Included) Amplifier Amplifier Amplifier Front Left Front Right Rear Left Rear Right Subwoofers REMOTE TURN-ON (Blue/White) REVERSE (Orange/White) PARKING BRAKE (Yellow/Blue) ...
Owner's Manual (english)
Page 30
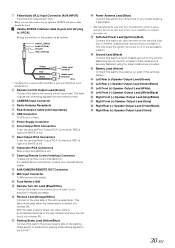
...RCA Connectors It can be used as Front Output RCA Connectors. AUX/CAMERA/REMOTE OUT Connector MIC Input Connector To Microphone (Included). Fuse Holder (10A) Remote Turn-On Lead (Blue/White) Connect this lead to the positive (+) ...left . Switched Power Lead (Ignition) (Red) Connect this lead properly wired, the video picture automatically switches to the iLX-007. RED is right and WHITE is put into reverse (R). RED is right and WHITE is shifted into reverse (R). Make...metal screw provided. With this lead to the +B terminal of your nearest Alpine dealer.
...RCA Connectors It can be used as Front Output RCA Connectors. AUX/CAMERA/REMOTE OUT Connector MIC Input Connector To Microphone (Included). Fuse Holder (10A) Remote Turn-On Lead (Blue/White) Connect this lead to the positive (+) ...left . Switched Power Lead (Ignition) (Red) Connect this lead properly wired, the video picture automatically switches to the iLX-007. RED is right and WHITE is put into reverse (R). RED is right and WHITE is shifted into reverse (R). Make...metal screw provided. With this lead to the +B terminal of your nearest Alpine dealer.

