Owners Manual
Page 5
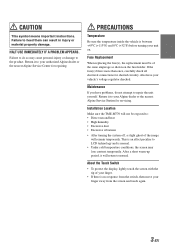
...fuse(s), the replacement must be exposed to your Alpine dealer or the nearest Alpine Service Station for servicing. About the Touch Switch • To protect the display, lightly touch the screen with the tip of the same amperage as ...screen and touch again. IT • If there is between +45°C (+113°F) and 0°C (+32°F) before turning your vehicle's voltage regulator checked. FR Maintenance If you have your unit on the fuse holder. Installation Location ES Make sure the TME-M770 will return to repair the unit yourself. Failure to LCD...
...fuse(s), the replacement must be exposed to your Alpine dealer or the nearest Alpine Service Station for servicing. About the Touch Switch • To protect the display, lightly touch the screen with the tip of the same amperage as ...screen and touch again. IT • If there is between +45°C (+113°F) and 0°C (+32°F) before turning your vehicle's voltage regulator checked. FR Maintenance If you have your unit on the fuse holder. Installation Location ES Make sure the TME-M770 will return to repair the unit yourself. Failure to LCD...
Owners Manual
Page 6
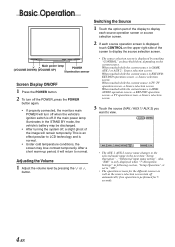
...display to display each source operation screen or source selection screen. 2 If each source operation screen is displayed, touch CONTROL on the current source. This is an effect peculiar to LCD technology and is normal. • Under cold temperature conditions, the screen may be discharged. • ... slight ghost of the screen to normal. Main power lamp POWER (VOLUME DOWN) (VOLUME UP) Illumination sensor Screen Display ON/OFF 1 Press the POWER button. 2 To turn off the POWER, press the POWER button again. • If properly connected, the monitors main POWER will turn off...
...display to display each source operation screen or source selection screen. 2 If each source operation screen is displayed, touch CONTROL on the current source. This is an effect peculiar to LCD technology and is normal. • Under cold temperature conditions, the screen may be discharged. • ... slight ghost of the screen to normal. Main power lamp POWER (VOLUME DOWN) (VOLUME UP) Illumination sensor Screen Display ON/OFF 1 Press the POWER button. 2 To turn off the POWER, press the POWER button again. • If properly connected, the monitors main POWER will turn off...

Owners Manual
Page 7
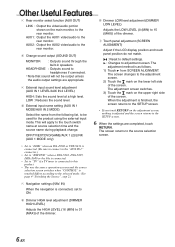
...OUT WIDE HIGH LINK MONITOR RETURN CINEMA Normal images are displayed over the entire screen. Normal image (4:3) DE NORMAL 2 Dimmer adjustment (DIMMER) HIGH : The backlighting is set to the value adjusted at "DIMMER HIGH LEVEL". Other Useful Features Setup Operation 1 Touch the option part ...of the display to display each source operation screen or source selection screen. 2 If each source operation screen is displayed, touch CONTROL on the brightness in the car. (Within the range of ...
...OUT WIDE HIGH LINK MONITOR RETURN CINEMA Normal images are displayed over the entire screen. Normal image (4:3) DE NORMAL 2 Dimmer adjustment (DIMMER) HIGH : The backlighting is set to the value adjusted at "DIMMER HIGH LEVEL". Other Useful Features Setup Operation 1 Touch the option part ...of the display to display each source operation screen or source selection screen. 2 If each source operation screen is displayed, touch CONTROL on the brightness in the car. (Within the range of ...
Owners Manual
Page 8
...)) of the dimmer. p Touch panel adjustment (SCREEN ALIGNMENT) Adjust if the LCD display position and touch panel position do not match. : Reset to default settings. : Changes to the rear monitor. 4 Change sound output (SOUND OUT) MONITOR : Outputs sound through the built-in speakers. The screen changes to the adjustment screen. 2) Touch the mark on the main monitor, to be output...
...)) of the dimmer. p Touch panel adjustment (SCREEN ALIGNMENT) Adjust if the LCD display position and touch panel position do not match. : Reset to default settings. : Changes to the rear monitor. 4 Change sound output (SOUND OUT) MONITOR : Outputs sound through the built-in speakers. The screen changes to the adjustment screen. 2) Touch the mark on the main monitor, to be output...
Owners Manual
Page 9
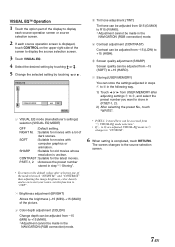
... 1 VISUAL EQ mode (manufacturer's settings) selection (VISUAL EQ MODE) OFF : Default setting. VISUAL EQTM Operation 1 Touch the option part of the display to display each source operation screen or source selection screen. 2 If each source operation screen is displayed, touch CONTROL on to suit your tastes, set this function to "OFF". • P.SET-1, 2 stored here...
... 1 VISUAL EQ mode (manufacturer's settings) selection (VISUAL EQ MODE) OFF : Default setting. VISUAL EQTM Operation 1 Touch the option part of the display to display each source operation screen or source selection screen. 2 If each source operation screen is displayed, touch CONTROL on to suit your tastes, set this function to "OFF". • P.SET-1, 2 stored here...
Owners Manual
Page 10
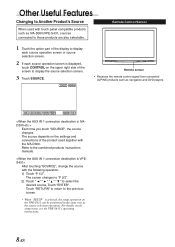
...CONTROL Remote sensor • Receives the remote control signal from connected ALPINE products such as the source selection operation. The screen changes to "P 2/2". 2) Touch to the previous screen. • When "SETUP" is displayed, touch CONTROL on the VPE-S431 can be performed in the same way.... For details on the settings and connections of the screen to display the source selection screen. 3 Touch SOURCE. The source depends on the setup items, see the VPE-S431's operating instructions. 8-EN Touch "ENTER". After touching "SOURCE", change the source with the IVA-D300. ...
...CONTROL Remote sensor • Receives the remote control signal from connected ALPINE products such as the source selection operation. The screen changes to "P 2/2". 2) Touch to the previous screen. • When "SETUP" is displayed, touch CONTROL on the VPE-S431 can be performed in the same way.... For details on the settings and connections of the screen to display the source selection screen. 3 Touch SOURCE. The source depends on the setup items, see the VPE-S431's operating instructions. 8-EN Touch "ENTER". After touching "SOURCE", change the source with the IVA-D300. ...
Owners Manual
Page 11
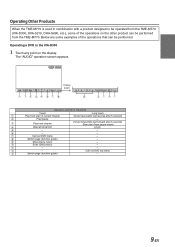
...FR Operation of DVD in IVA-D300 Touch Long touch 1 Play from start of current chapter 2x fast reverse/8x fast reverse after 5 seconds 2 Play/pause - 3 Play next chapter 2x fast forward/8x fast forward after 5 seconds Slow play (from the TME-M770. p Enter (DVD menu) - ES... DVD in the IVA-D300 EN 1 Touch any point on the other product can be performed from pause mode) 4ł PRE STOP/STOP STOP 5 - - 6 - - 7 Call out DVD menu - 8 Switch page (function guide) - 9 Move menu cursor - w - The "AUDIO" operation screen appears. q - - Below are some ...
...FR Operation of DVD in IVA-D300 Touch Long touch 1 Play from start of current chapter 2x fast reverse/8x fast reverse after 5 seconds 2 Play/pause - 3 Play next chapter 2x fast forward/8x fast forward after 5 seconds Slow play (from the TME-M770. p Enter (DVD menu) - ES... DVD in the IVA-D300 EN 1 Touch any point on the other product can be performed from pause mode) 4ł PRE STOP/STOP STOP 5 - - 6 - - 7 Call out DVD menu - 8 Switch page (function guide) - 9 Move menu cursor - w - The "AUDIO" operation screen appears. q - - Below are some ...
Owners Manual
Page 12
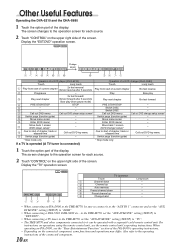
... next chapter Slow play (from start of chapter, track or w elapsed time Call out DVD top menu Cue to the operation screen for each source. 2 Touch "CONTROL" on the connected component, some functions and operations may differ. Switch DISC - 7 Call out DVD menu Call out...- TV CONTROL A.MEMO 123 P.DN P.UP BAND 456 TV Operation Touch Long touch 1 Channel down - 2 Channel up - 3 Auto memory - 4 Preset channel down - 5 Preset channel up - 6 Change band - • When connecting an IVA-D300 to the TME-M770, be sure to connect it to the "AUX IN 1" connector and...
... next chapter Slow play (from start of chapter, track or w elapsed time Call out DVD top menu Cue to the operation screen for each source. 2 Touch "CONTROL" on the connected component, some functions and operations may differ. Switch DISC - 7 Call out DVD menu Call out...- TV CONTROL A.MEMO 123 P.DN P.UP BAND 456 TV Operation Touch Long touch 1 Channel down - 2 Channel up - 3 Auto memory - 4 Preset channel down - 5 Preset channel up - 6 Change band - • When connecting an IVA-D300 to the TME-M770, be sure to connect it to the "AUX IN 1" connector and...

