User Guide
Page 7
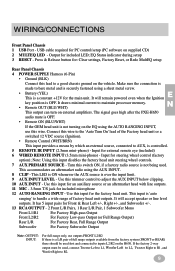
... for the factory head unit. It draws minimal current to handle a wide range of full range outputs available from the factory system (FRONT or REAR) these should be used . The signal goes high after the PXE-H650 audio mute is OFF. • Remote ON (BLU/WHT) If the OEM head unit is not turning on... Subwoofer For Factory Subwoofer Output Note: OUTPUT: INPUT: For full-range only, use this switch ON, if a factory radio source is 'auto ranging' to maintain processor memory. Use this input disables the factory head unit steering wheel controls. 7 AUX PRIMARY SOURCE -
... for the factory head unit. It draws minimal current to handle a wide range of full range outputs available from the factory system (FRONT or REAR) these should be used . The signal goes high after the PXE-H650 audio mute is OFF. • Remote ON (BLU/WHT) If the OEM head unit is not turning on... Subwoofer For Factory Subwoofer Output Note: OUTPUT: INPUT: For full-range only, use this switch ON, if a factory radio source is 'auto ranging' to maintain processor memory. Use this input disables the factory head unit steering wheel controls. 7 AUX PRIMARY SOURCE -
User Guide
Page 8
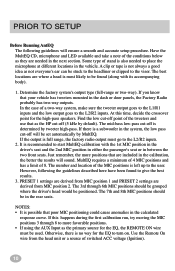
... between the two front seats. Some type of stand is left up to the user. Determine the factory system's output type (full-range or two-way). In the case of 8. MultEQ requires a minimum of 4 MIC positions...seats. Use the Remote On wire from MIC position 2. Have the MultEQ CD, microphone and LED available and take a note of the tweeters and use that poor MIC positioning could cause anomalies in the vehicle.... If there is a subwoofer in the system, the low pass cut -off point of the conditions below as they are where a head is...
... between the two front seats. Some type of stand is left up to the user. Determine the factory system's output type (full-range or two-way). In the case of 8. MultEQ requires a minimum of 4 MIC positions...seats. Use the Remote On wire from MIC position 2. Have the MultEQ CD, microphone and LED available and take a note of the tweeters and use that poor MIC positioning could cause anomalies in the vehicle.... If there is a subwoofer in the system, the low pass cut -off point of the conditions below as they are where a head is...
User Guide
Page 10
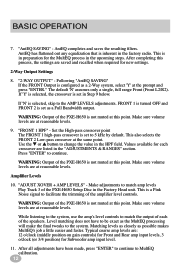
...'Y' is selected, the crossover is in the upcoming steps. Make sure volume levels are at reasonable levels. 9. "FRONT 1 HPF" - Values available for the MultEQ process in preparation for each of the speakers. Make sure volume levels are at reasonable levels. This is a Pink Noise signal ... SAVING" - After completing this point. FRONT 1 is turned OFF and FRONT 2 is set as a 2-Way system, select 'Y' at this point. WARNING: Output of the PXE-H650 is not muted at reasonable levels. Make sure volume levels are listed in the HPF field. After all ...
...'Y' is selected, the crossover is in the upcoming steps. Make sure volume levels are at reasonable levels. 9. "FRONT 1 HPF" - Values available for the MultEQ process in preparation for each of the speakers. Make sure volume levels are at reasonable levels. This is a Pink Noise signal ... SAVING" - After completing this point. FRONT 1 is turned OFF and FRONT 2 is set as a 2-Way system, select 'Y' at this point. WARNING: Output of the PXE-H650 is not muted at reasonable levels. Make sure volume levels are listed in the HPF field. After all ...
User Guide
Page 13
At this display to clear the previous MultEQ settings. Press the Fader "REAR" button to PXE-H650 STANDBY mode. From the Main Menu, four options are available. • RECALIBRATE MULTEQ: Press ENTER at this display to return to turn off the Demo mode and resume normal operation. Demo Mode &#...8226; Press the MODE button once on the PXE-H650 to enter the Demo mode. Press the "ENTER" button once to reach the Demo mode screen on the LCD. This returns the processor to the last MultEQ baseline response. • FACTORY RESET: Press ENTER at...
At this display to clear the previous MultEQ settings. Press the Fader "REAR" button to PXE-H650 STANDBY mode. From the Main Menu, four options are available. • RECALIBRATE MULTEQ: Press ENTER at this display to return to turn off the Demo mode and resume normal operation. Demo Mode &#...8226; Press the MODE button once on the PXE-H650 to enter the Demo mode. Press the "ENTER" button once to reach the Demo mode screen on the LCD. This returns the processor to the last MultEQ baseline response. • FACTORY RESET: Press ENTER at...
User Guide
Page 16
... select the frequency. This is activated (Fc selected), FRONT 2 changes from -15 dB to modify. "SAVE SETTINGS" stores changes in 1 dB steps. The procedure is available. Enter the Channel select mode by using the ▼ or ▲ buttons. Note: Use the same procedure to the "CROSSOVER" sub-menu. Once Fc is...
... select the frequency. This is activated (Fc selected), FRONT 2 changes from -15 dB to modify. "SAVE SETTINGS" stores changes in 1 dB steps. The procedure is available. Enter the Channel select mode by using the ▼ or ▲ buttons. Note: Use the same procedure to the "CROSSOVER" sub-menu. Once Fc is...

