Owners Manual
Page 1
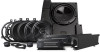
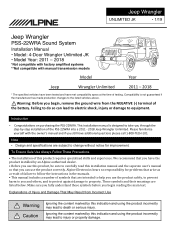
... correctly. Introduction • Congratulations on purchasing the PSS-22WRA. Note • Design and specifications are listed below. Explanations of Injury and Damage That May Result from the NEGATIVE (-) terminal of this installation manual and the separate user's manual so that you have the product installed by this indication and using the product incorrectly may lead to carefully read this product requires specialized...
... correctly. Introduction • Congratulations on purchasing the PSS-22WRA. Note • Design and specifications are listed below. Explanations of Injury and Damage That May Result from the NEGATIVE (-) terminal of this installation manual and the separate user's manual so that you have the product installed by this indication and using the product incorrectly may lead to carefully read this product requires specialized...
Owners Manual
Page 2
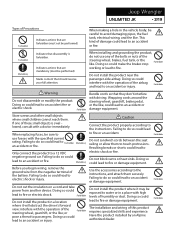
... a cord and take power from the negative terminal of the battery. Forbidden Forbidden Forbidden Store screws and other small objects where small children cannot reach them to an accident or injury. Before you begin wiring, remove the ground wire from another device. or pose a threat to the instructions. Have the product installed by an Alpine authorized dealer. Jeep...
... a cord and take power from the negative terminal of the battery. Forbidden Forbidden Forbidden Store screws and other small objects where small children cannot reach them to an accident or injury. Before you begin wiring, remove the ground wire from another device. or pose a threat to the instructions. Have the product installed by an Alpine authorized dealer. Jeep...
Owners Manual
Page 4
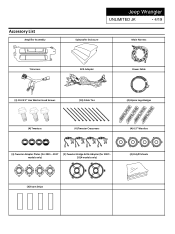
Accessory List Amplifier Assembly T-Harness Jeep Wrangler UNLIMITED JK • 4/19 Subwoofer Enclosure Main Harness RCA Adapter Power Cable (3) 10-24 ¾" Hex Washer Head Screws (10) Cable Ties (4) Alpine Logo Badges (4) Tweeters (4) Tweeter Crossovers TW level +3db TW level 0db TW level +3db TW level 0db TW level +3db TW level 0db TW level +3db TW level 0db (4) Tweeter Adapter Plates (for 2015 - 2017 (2) Tweeter Bridge Grille Adapter (for 2007- models only) 2014 models only) (4) 6.5" Woofers (4) Polyfill sheets (4) Foam Strips
Accessory List Amplifier Assembly T-Harness Jeep Wrangler UNLIMITED JK • 4/19 Subwoofer Enclosure Main Harness RCA Adapter Power Cable (3) 10-24 ¾" Hex Washer Head Screws (10) Cable Ties (4) Alpine Logo Badges (4) Tweeters (4) Tweeter Crossovers TW level +3db TW level 0db TW level +3db TW level 0db TW level +3db TW level 0db TW level +3db TW level 0db (4) Tweeter Adapter Plates (for 2015 - 2017 (2) Tweeter Bridge Grille Adapter (for 2007- models only) 2014 models only) (4) 6.5" Woofers (4) Polyfill sheets (4) Foam Strips

Owners Manual
Page 5
Jeep Wrangler UNLIMITED JK • 5/19 Factory Equipment Removal Process 2011 - 2018 Models Radio 1 Remove the rubber cover from the top storage area and extract (1) 7mm screw. 2 Remove the knee cover panel and extract (2) 7mm screws located to ... 120 20 140 0 160 100 F 2 1 0 3 RPM 4 km/h 5 6 7 C H Left side of steering wheel column Right side of the steering wheel column. 3 Remove the window switch pod using a panel removing tool and extract (1) 7mm screw.
Jeep Wrangler UNLIMITED JK • 5/19 Factory Equipment Removal Process 2011 - 2018 Models Radio 1 Remove the rubber cover from the top storage area and extract (1) 7mm screw. 2 Remove the knee cover panel and extract (2) 7mm screws located to ... 120 20 140 0 160 100 F 2 1 0 3 RPM 4 km/h 5 6 7 C H Left side of steering wheel column Right side of the steering wheel column. 3 Remove the window switch pod using a panel removing tool and extract (1) 7mm screw.

Owners Manual
Page 6
Factory Equipment Removal Process 2015 - 2018 Models Top Dash Speakers 1 Remove the top dash tweeter using a panel removal tool. 2 Gently open the (3) lock tabs to release the factory tweeter. Jeep Wrangler UNLIMITED JK • 6/19 Factory Equipment Removal Process 2011 - 2014 Models Tweeters 1 Remove the top dash tweeter using a panel removal tool. 2 Using a 7mm socket remove (2) screws, disconnect and remove the factory speakers.
Factory Equipment Removal Process 2015 - 2018 Models Top Dash Speakers 1 Remove the top dash tweeter using a panel removal tool. 2 Gently open the (3) lock tabs to release the factory tweeter. Jeep Wrangler UNLIMITED JK • 6/19 Factory Equipment Removal Process 2011 - 2014 Models Tweeters 1 Remove the top dash tweeter using a panel removal tool. 2 Using a 7mm socket remove (2) screws, disconnect and remove the factory speakers.

Owners Manual
Page 7
Driver Side Passenger Side 3 Extract (2) 10mm screws from the metal steering wheel column cover and remove it. 10mm 4 Extract (2) 7mm screws from the lower dash. 5 Remove glove box by releasing the (2) top clips. Jeep Wrangler UNLIMITED JK • 7/19 2 Remove the driver side knee cover by pushing both left and right sides inwards. 7mm 6 Extract (2) 7mm screws located on the lower dash section. Front Lower Dash Speaker Removal 1 Using a panel removing tools, remove the dash side covers by each door.
Driver Side Passenger Side 3 Extract (2) 10mm screws from the metal steering wheel column cover and remove it. 10mm 4 Extract (2) 7mm screws from the lower dash. 5 Remove glove box by releasing the (2) top clips. Jeep Wrangler UNLIMITED JK • 7/19 2 Remove the driver side knee cover by pushing both left and right sides inwards. 7mm 6 Extract (2) 7mm screws located on the lower dash section. Front Lower Dash Speaker Removal 1 Using a panel removing tools, remove the dash side covers by each door.

Owners Manual
Page 8
Jeep Wrangler UNLIMITED JK • 8/19 Front Lower Dash Speaker Removal (continued) '07-11 Models have (2) additional screws 7 Extract (2) 7mm screws from under the each respective dash enclosure. 8 Remove (1) 10mm screws from the side of the vehicle and remove the ... the transfer case shifter knob by pulling up. (some force may be needed) 2 Remove the shifter panel by turning towards the back of each enclosure. Driver Side Passenger Side 9 Disconnect the speaker enclosure (connector located on the back) 10 Pull the dash towards the back.
Jeep Wrangler UNLIMITED JK • 8/19 Front Lower Dash Speaker Removal (continued) '07-11 Models have (2) additional screws 7 Extract (2) 7mm screws from under the each respective dash enclosure. 8 Remove (1) 10mm screws from the side of the vehicle and remove the ... the transfer case shifter knob by pulling up. (some force may be needed) 2 Remove the shifter panel by turning towards the back of each enclosure. Driver Side Passenger Side 9 Disconnect the speaker enclosure (connector located on the back) 10 Pull the dash towards the back.
Owners Manual
Page 9
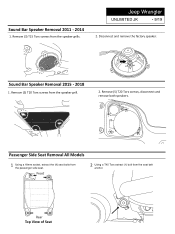
Remove (3) T15 Torx screws from the passenger side seat. Passenger Side Seat Removal All Models 1 Using a 18mm socket, extract the (4) seat bolts from the speaker grills. Rear Top View of Seat Sound Bar Speaker Removal 2015 - 2018 1. Front 2 Using a T45 Torx extract (1) bolt from the speaker grill. 2. Sound Bar Speaker Removal 2011 - 2014 1. Remove (5) T20 Torx screws, disconnect and remove both speakers. Disconnect and remove the factory speaker. Jeep Wrangler UNLIMITED JK • 9/19 2. Remove (3) T20 Torx screws from the seat belt anchor.
Remove (3) T15 Torx screws from the passenger side seat. Passenger Side Seat Removal All Models 1 Using a 18mm socket, extract the (4) seat bolts from the speaker grills. Rear Top View of Seat Sound Bar Speaker Removal 2015 - 2018 1. Front 2 Using a T45 Torx extract (1) bolt from the speaker grill. 2. Sound Bar Speaker Removal 2011 - 2014 1. Remove (5) T20 Torx screws, disconnect and remove both speakers. Disconnect and remove the factory speaker. Jeep Wrangler UNLIMITED JK • 9/19 2. Remove (3) T20 Torx screws from the seat belt anchor.

Owners Manual
Page 10
... on the drivers side. 5 Use the supplied cable ties to secure the main harness to the dashboard frame with the inductors between the vehicle's body and dash board frame. 6 Route the amplifier main harness up to the POSITIVE (+) battery terminal. Jeep Jeep Wrangler UNLIMITED JK • 10/19 2 Use a 10mm socket to connect the power cable to...
... on the drivers side. 5 Use the supplied cable ties to secure the main harness to the dashboard frame with the inductors between the vehicle's body and dash board frame. 6 Route the amplifier main harness up to the POSITIVE (+) battery terminal. Jeep Jeep Wrangler UNLIMITED JK • 10/19 2 Use a 10mm socket to connect the power cable to...
Owners Manual
Page 11
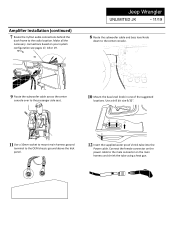
... and shrink the tube using a heat gun. Use a drill bit size 9/32". 11 Use a 10mm socket to mount main harness ground terminal to the passenger side seat. 10 Mount the bass level knob in one of the suggested locations. Amplifier Installation (continued) 7 Route the In/Out audio connections behind the dash frame to the male connector on your system...
... and shrink the tube using a heat gun. Use a drill bit size 9/32". 11 Use a 10mm socket to mount main harness ground terminal to the passenger side seat. 10 Mount the bass level knob in one of the suggested locations. Amplifier Installation (continued) 7 Route the In/Out audio connections behind the dash frame to the male connector on your system...
Owners Manual
Page 12
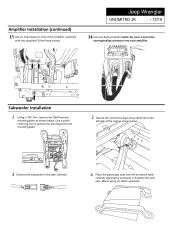
... enclosure in between the seat rails. Amplifier Installation (continued) 13 Use an impact gun to insert the corresponding connector into each amplifier. + ++ Subwoofer Installation 1 Using a T30 Torx, remove the OEM harness mounting plate as shown below . Jeep Wrangler UNLIMITED JK • 12/19 14 Connect both amplifiers Note: Be sure to mount the amplifier assembly with the supplied (3) Hex...
... enclosure in between the seat rails. Amplifier Installation (continued) 13 Use an impact gun to insert the corresponding connector into each amplifier. + ++ Subwoofer Installation 1 Using a T30 Torx, remove the OEM harness mounting plate as shown below . Jeep Wrangler UNLIMITED JK • 12/19 14 Connect both amplifiers Note: Be sure to mount the amplifier assembly with the supplied (3) Hex...
Owners Manual
Page 13
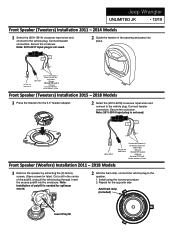
... is not used. 2 Guide the tweeter in the center of polyfill is not used. Jeep Wrangler UNLIMITED JK • 13/19 Front Speaker (Tweeters) Installation 2011 - 2014 Models 1 Select the (2011-2014) crossover input wires and connect to the vehicle plug. Connect tweeter connectors. Secure the crossover. Cut a slit in the opening and press into place. Repeat for the tweeter (+) lead Front Speaker (Tweeters) Installation 2015 - 2018 Models 1 Press the tweeter into...
... is not used. 2 Guide the tweeter in the center of polyfill is not used. Jeep Wrangler UNLIMITED JK • 13/19 Front Speaker (Tweeters) Installation 2011 - 2014 Models 1 Select the (2011-2014) crossover input wires and connect to the vehicle plug. Connect tweeter connectors. Secure the crossover. Cut a slit in the opening and press into place. Repeat for the tweeter (+) lead Front Speaker (Tweeters) Installation 2015 - 2018 Models 1 Press the tweeter into...

Owners Manual
Page 14
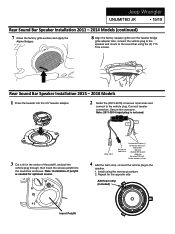
.../19 Rear Sound Bar Speaker Installation 2011 - 2014 Models 1 Press the tweeter into the sound bar enclosure. Secure the crossover. TW level +3db TW level 0db (-) (+) (+) Do not use (2015-2017) 2007-2014 Connect the tweeter (-) to the vehicle plug. Ensure the wires do not get pinched. 4 Add foam strip on the basket, then press the grille into place. then...
.../19 Rear Sound Bar Speaker Installation 2011 - 2014 Models 1 Press the tweeter into the sound bar enclosure. Secure the crossover. TW level +3db TW level 0db (-) (+) (+) Do not use (2015-2017) 2007-2014 Connect the tweeter (-) to the vehicle plug. Ensure the wires do not get pinched. 4 Add foam strip on the basket, then press the grille into place. then...
Owners Manual
Page 15
... Speaker Installation 2011 - 2014 Models (continued) 7 Clean the factory grille surface and apply the Alpine Badges. 8 Align the factory speaker grille over the tweeter bridge grille adapter tabs, connect the vehicle plug to the speaker and mount to the speaker. 1. then insert the excess polyfill into the 3.5" tweeter adapter. 2 Select the (2015-2018) crossover input wires and connect to the vehicle plug. Rear Sound Bar Speaker Installation 2015 - 2018 Models...
... Speaker Installation 2011 - 2014 Models (continued) 7 Clean the factory grille surface and apply the Alpine Badges. 8 Align the factory speaker grille over the tweeter bridge grille adapter tabs, connect the vehicle plug to the speaker and mount to the speaker. 1. then insert the excess polyfill into the 3.5" tweeter adapter. 2 Select the (2015-2018) crossover input wires and connect to the vehicle plug. Rear Sound Bar Speaker Installation 2015 - 2018 Models...
Owners Manual
Page 16
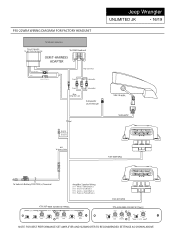
...) LP FILTER NOTE: FOR BEST PERFORMANCE SET AMPLIFIER AND SUBWOOFER TO RECOMMENDED SETTINGS AS SHOWN ABOVE PSS-22WRA WIRING DIAGRAM FOR FACTORY HEADUNIT To Vehicle Connectors Power/Speaker 16-pin Gray Connector To OEM Headunit OEM T-HARNESS ADAPTER Front Speakers 4 PIN WHITE CONNECTOR Rear 4 PIN BLACK CONNECTOR High Level Out Front Rear Subwoofer Front Rear Subwoofer Blue Amp Turn-on Subwoofer Level Remote Jeep Wrangler UNLIMITED JK •...
...) LP FILTER NOTE: FOR BEST PERFORMANCE SET AMPLIFIER AND SUBWOOFER TO RECOMMENDED SETTINGS AS SHOWN ABOVE PSS-22WRA WIRING DIAGRAM FOR FACTORY HEADUNIT To Vehicle Connectors Power/Speaker 16-pin Gray Connector To OEM Headunit OEM T-HARNESS ADAPTER Front Speakers 4 PIN WHITE CONNECTOR Rear 4 PIN BLACK CONNECTOR High Level Out Front Rear Subwoofer Front Rear Subwoofer Blue Amp Turn-on Subwoofer Level Remote Jeep Wrangler UNLIMITED JK •...
Owners Manual
Page 17
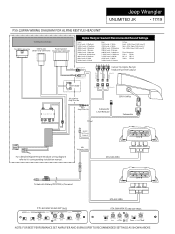
Jeep Wrangler UNLIMITED JK • 17/19 PSS-22WRA WIRING DIAGRAM FOR ALPINE RESTYLE HEADUNIT To Vehicle Connectors To OBDII Connector OEM Audio Power/Speaker 20-pin Gray Connector 16-pin Gray Connector Alpine Restyle Headunit Recommended Sound Settings Front 63Hz Level +5 Medium 140Hz Level +6 ...Amp Turn-On Subwoofer Level Remote Subwoofer BLACK To Chassis Ground For a detailed Alpine Restyle headunit wiring diagram refer to it's corresponding installation manual. RED To Battery Cable KTA-30M-WRA To Vehicle's Battery POSITIVE (+) Terminal KTA-30F-WRA KTA-30F-WRA SOUND SETTINGS...
Jeep Wrangler UNLIMITED JK • 17/19 PSS-22WRA WIRING DIAGRAM FOR ALPINE RESTYLE HEADUNIT To Vehicle Connectors To OBDII Connector OEM Audio Power/Speaker 20-pin Gray Connector 16-pin Gray Connector Alpine Restyle Headunit Recommended Sound Settings Front 63Hz Level +5 Medium 140Hz Level +6 ...Amp Turn-On Subwoofer Level Remote Subwoofer BLACK To Chassis Ground For a detailed Alpine Restyle headunit wiring diagram refer to it's corresponding installation manual. RED To Battery Cable KTA-30M-WRA To Vehicle's Battery POSITIVE (+) Terminal KTA-30F-WRA KTA-30F-WRA SOUND SETTINGS...

Owners Manual
Page 18
PSS-22WRA WIRING DIAGRAM FOR AFTER MARKET HEADUNIT Jeep Wrangler UNLIMITED JK • 18/19 To Vehicle Connectors Power/Speaker 16-pin Green Connector OEM T-HARNESS ADAPTER To 3rd party wire harness and radio replacement interface * Wire Harness and Interface sold separately Front Speakers 4 PIN WHITE CONNECTOR Rear 4 PIN BLACK CONNECTOR Front Rear Subwoofer High Level Out NOT USED Blue/White Amp Turn-On L R L R L R Connect to Alpine Restyle headunit low...
PSS-22WRA WIRING DIAGRAM FOR AFTER MARKET HEADUNIT Jeep Wrangler UNLIMITED JK • 18/19 To Vehicle Connectors Power/Speaker 16-pin Green Connector OEM T-HARNESS ADAPTER To 3rd party wire harness and radio replacement interface * Wire Harness and Interface sold separately Front Speakers 4 PIN WHITE CONNECTOR Rear 4 PIN BLACK CONNECTOR Front Rear Subwoofer High Level Out NOT USED Blue/White Amp Turn-On L R L R L R Connect to Alpine Restyle headunit low...
Owners Manual
Page 19
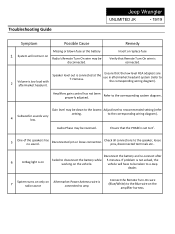
.... Troubleshooting Guide Jeep Wrangler UNLIMITED JK • 19/19 Symptom Possible Cause Missing or blown fuse ar the battery 1 System will have to be taken to a Jeep dealer. 7 System turns on only on radio source Aftermarket Power Antenna wire is connected. to the corresponding system diagram. If problem is on Radio's Remote Turn-On wire may be reversed. setting...
.... Troubleshooting Guide Jeep Wrangler UNLIMITED JK • 19/19 Symptom Possible Cause Missing or blown fuse ar the battery 1 System will have to be taken to a Jeep dealer. 7 System turns on only on radio source Aftermarket Power Antenna wire is connected. to the corresponding system diagram. If problem is on Radio's Remote Turn-On wire may be reversed. setting...


