Installation Manual
Page 1
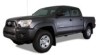
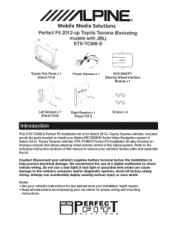
... factory airbag wiring. We recommend the use a test light! Included are all instructions accompanying your vehicle's factory radio and assemble the kit. Airbags can cause damage to remove your car stereo for proper wiring and mounting instructions. Notes: • See your vehicle's instructions for Select 2012+ Toyota Tacoma vehicles. KTX-TCM8-S Perfect Fit installation kit also includes an interface module that allows steering wheel remote control of a digital multimeter to help...
... factory airbag wiring. We recommend the use a test light! Included are all instructions accompanying your vehicle's factory radio and assemble the kit. Airbags can cause damage to remove your car stereo for proper wiring and mounting instructions. Notes: • See your vehicle's instructions for Select 2012+ Toyota Tacoma vehicles. KTX-TCM8-S Perfect Fit installation kit also includes an interface module that allows steering wheel remote control of a digital multimeter to help...
Installation Manual
Page 2
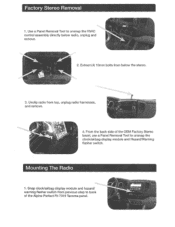
From the back side of the Alpine Perfect Fit 7315 Tacoma panel. Factory Stereo Removal 1. Unclip radio from previous step to back of the OEM Factory Stereo bezel, use a Panel Removal Tool to unsnap the HVAC control assembly directly below the stereo. 3. Snap clocklairbag display module and hazard/ warning flasher switch from top, unplug radio harnesses, and remove. 4. Mounting The Radio 1. Extract (4) 1Omm bolts from below radio, unplug and remove. 2. Use a Panel Removal Tool to unsnap the clock/airbag display module and Hazard/Warning flasher switch.
From the back side of the Alpine Perfect Fit 7315 Tacoma panel. Factory Stereo Removal 1. Unclip radio from previous step to back of the OEM Factory Stereo bezel, use a Panel Removal Tool to unsnap the HVAC control assembly directly below the stereo. 3. Snap clocklairbag display module and hazard/ warning flasher switch from top, unplug radio harnesses, and remove. 4. Mounting The Radio 1. Extract (4) 1Omm bolts from below radio, unplug and remove. 2. Use a Panel Removal Tool to unsnap the clock/airbag display module and Hazard/Warning flasher switch.
Installation Manual
Page 3
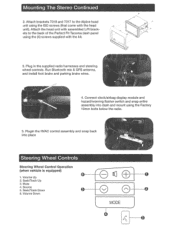
Mounting The Stereo Continued 2. Mute 4. Volume Down F8 EB] [(] 0 I 8 8 I fj MODE ~ Plug in the supplied radio harnesses and steering wheel controls. Run Bluetooth mic & GPS antenna, and install foot brake and parking brake wires. 4. Volume Up 2. Attach brackets 7318 and 7317 to the back of the Perfect Fit Tacoma dash panel using the (4) screws supplied with the head unit}. Seek/Track Up 3. Seek/Track Down 0 6. Plugin the HVAC control assembly and...
Mounting The Stereo Continued 2. Mute 4. Volume Down F8 EB] [(] 0 I 8 8 I fj MODE ~ Plug in the supplied radio harnesses and steering wheel controls. Run Bluetooth mic & GPS antenna, and install foot brake and parking brake wires. 4. Volume Up 2. Attach brackets 7318 and 7317 to the back of the Perfect Fit Tacoma dash panel using the (4) screws supplied with the head unit}. Seek/Track Up 3. Seek/Track Down 0 6. Plugin the HVAC control assembly and...
Installation Manual
Page 4
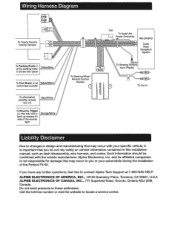
... be confirmed with your automobile during the installation of the reverse light 10A To Head Unit Power Connector [-~~~~~~~~~~iii~~~~~NE-zAu9d2io8H0 Video Navigation System To Steering Wheel Remote Control Module ToAux In Liability Disclaimer Due to changes in drivers kick panel To aftermarket amplifier remote turn on vehicle information contained in this installation manual, such as dash disassembly, wire harness, and codes. Call the toll free number or visit the website to these...
... be confirmed with your automobile during the installation of the reverse light 10A To Head Unit Power Connector [-~~~~~~~~~~iii~~~~~NE-zAu9d2io8H0 Video Navigation System To Steering Wheel Remote Control Module ToAux In Liability Disclaimer Due to changes in drivers kick panel To aftermarket amplifier remote turn on vehicle information contained in this installation manual, such as dash disassembly, wire harness, and codes. Call the toll free number or visit the website to these...

