
Owners Manual
Page 1
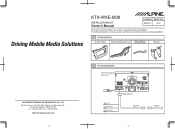
...26th Floor, Phaholyothin Rd., Chatuchak, Bangkok, Thailand 10900 Tel : +662-937-0505 Fax : +662-937-0569 http://www.alpine-asia.com 4 KTX-WXE-M38 INSTALLATION KIT Owner's Manual Car Model Model Year MAZDA 3 2012 This owner's manual will give you clearly understanding about installation. ...into the port. For making installation correctly, please read this manual carefully before operating installation. 1 Component Parts Audio Panel Alpine-Mazda power cord Alpine-Mazda Antenna cable Bracket 2 Connecting Diagram For other Audio connectivity please refer to the head unit Owner's manual.
...26th Floor, Phaholyothin Rd., Chatuchak, Bangkok, Thailand 10900 Tel : +662-937-0505 Fax : +662-937-0569 http://www.alpine-asia.com 4 KTX-WXE-M38 INSTALLATION KIT Owner's Manual Car Model Model Year MAZDA 3 2012 This owner's manual will give you clearly understanding about installation. ...into the port. For making installation correctly, please read this manual carefully before operating installation. 1 Component Parts Audio Panel Alpine-Mazda power cord Alpine-Mazda Antenna cable Bracket 2 Connecting Diagram For other Audio connectivity please refer to the head unit Owner's manual.
Owners Manual
Page 2
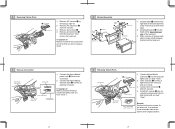
...Then, remove the head unit. !!! Make connection between bracket and the head unit. 4 Harness Connection Alpine-Mazda antenna cable 2 Antenna cable 1. Drive 2 screws 2 to their original position. 2 3 3 Removing Vehicle Parts A/C Connector 2 4 1 A/C Console 3 Screw 2 Pcs. 1. Install bracket 1 both left and ... hear "Click". Remove all clips to make it tight between connectors tightly (until you hear "Click".) 6 Retracing Vehicle Parts A/C Connector 3 1 Alpine-Mazda power cord 1. Install audio panel 2 into the car connectors. 2. Remove A/C connector 2 from rear side of...
...Then, remove the head unit. !!! Make connection between bracket and the head unit. 4 Harness Connection Alpine-Mazda antenna cable 2 Antenna cable 1. Drive 2 screws 2 to their original position. 2 3 3 Removing Vehicle Parts A/C Connector 2 4 1 A/C Console 3 Screw 2 Pcs. 1. Install bracket 1 both left and ... hear "Click". Remove all clips to make it tight between connectors tightly (until you hear "Click".) 6 Retracing Vehicle Parts A/C Connector 3 1 Alpine-Mazda power cord 1. Install audio panel 2 into the car connectors. 2. Remove A/C connector 2 from rear side of...

