
Installation Manual
Page 1
.... Included are all factory airbag wiring. KTX-GM7-0 Perfect Fit installation kit also includes an interface module that allows steering wheel remote control of this manual to check vehicle wiring. Airbags can cause damage to the vehicle's computer and/or diagnostic systems. Avoid all the parts needed to help prevent electrical damage. Do not use of a digital multimeter to remove your Alpine INA-NAV-1 0, INANAV...
.... Included are all factory airbag wiring. KTX-GM7-0 Perfect Fit installation kit also includes an interface module that allows steering wheel remote control of this manual to check vehicle wiring. Airbags can cause damage to the vehicle's computer and/or diagnostic systems. Avoid all the parts needed to help prevent electrical damage. Do not use of a digital multimeter to remove your Alpine INA-NAV-1 0, INANAV...
Installation Manual
Page 2
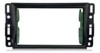
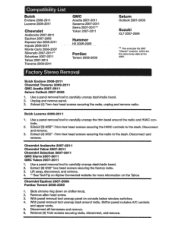
Unplug and remove panel. 3. Disconnect and remove. Slide chrome ring down on console below window switches. 4. With panel removal tool unsnap panel on shifter knob. 2. Disconnect all harnesses and remove. 6. Remove allen head screw. 3. With panel removal tool unsnap dash around the radio and HVAC controls. 2~ i:Xtrac£(3).9/3:2··,-:.(mm hexhead screws securing the HVAC controls to carefully unsnap dash/radio bezel. 2. Compatibility List Buick Enclave 2008-2011 Lucerne 2006...
Unplug and remove panel. 3. Disconnect and remove. Slide chrome ring down on console below window switches. 4. With panel removal tool unsnap panel on shifter knob. 2. Disconnect all harnesses and remove. 6. Remove allen head screw. 3. With panel removal tool unsnap dash around the radio and HVAC controls. 2~ i:Xtrac£(3).9/3:2··,-:.(mm hexhead screws securing the HVAC controls to carefully unsnap dash/radio bezel. 2. Compatibility List Buick Enclave 2008-2011 Lucerne 2006...
Installation Manual
Page 3
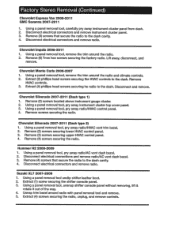
... away instrument cluster panel from dash. 2. Extract (4) phillips head screws securing he radio to the dash. Extract (1) screw securing the shifter console panel. 3. Disconnect electrical connectors and remove instrument cluster panel. 3. Remove (3) screws that secure the radio to the dash cavity. 4. Using a panel removal tool, remove the trim around the radio. 2. Remove HVAC controls. 3. Disconnect and remove. Chevrolet Silverado 2007-2011 (Dash type 2) 1. Disconnect electrical connections and remove radio/AC vent dash bezel. 3. Using a panel removal tool unclip...
... away instrument cluster panel from dash. 2. Extract (4) phillips head screws securing he radio to the dash. Extract (1) screw securing the shifter console panel. 3. Disconnect electrical connectors and remove instrument cluster panel. 3. Remove (3) screws that secure the radio to the dash cavity. 4. Using a panel removal tool, remove the trim around the radio. 2. Remove HVAC controls. 3. Disconnect and remove. Chevrolet Silverado 2007-2011 (Dash type 2) 1. Disconnect electrical connections and remove radio/AC vent dash bezel. 3. Using a panel removal tool unclip...
Installation Manual
Page 4
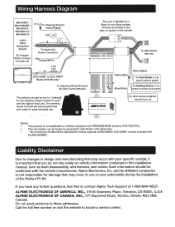
... ready for the steering wheel controls to the type of system in this installation manual, such as dash disassembly, wire harness, and codes. Wiring Harness Diagram INA-W900/ INA-W900BT I INA-W910/ INA-NAV-10 I INA-NAV-20 Audio Video Navigation System To Orange/ White on back of head unit To Head Unit Power Connector range/White To Steering Wheel Remote/ On-Star Control Module The selector should be confirmed...
... ready for the steering wheel controls to the type of system in this installation manual, such as dash disassembly, wire harness, and codes. Wiring Harness Diagram INA-W900/ INA-W900BT I INA-W910/ INA-NAV-10 I INA-NAV-20 Audio Video Navigation System To Orange/ White on back of head unit To Head Unit Power Connector range/White To Steering Wheel Remote/ On-Star Control Module The selector should be confirmed...


