Owners Manual
Page 20
..., calibration cannot be flat to provide the self-adhesive on the base to determine the attachment angle Install the camera so that the camera and bracket won't come in contact with any part of the vehicle both of the vehicle. M Switch adhesive sheet N Cord clamp (Switch) O Buzzer X3 P Mounting (Buzzer) Q Buzzer...
..., calibration cannot be flat to provide the self-adhesive on the base to determine the attachment angle Install the camera so that the camera and bracket won't come in contact with any part of the vehicle both of the vehicle. M Switch adhesive sheet N Cord clamp (Switch) O Buzzer X3 P Mounting (Buzzer) Q Buzzer...

Owners Manual
Page 21
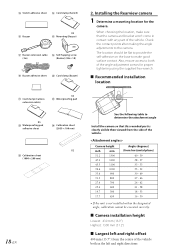
...the waterproof pad adhesive sheet W, and secure any hinges. • The cable should be possible. 2 Installing the camera and the camera mounting bracket to attach the camera bracket K. 3 Secure the camera cable. Attach the waterproof pad V with the camera. Drill 2.5 mm (3/32") holes for the camera cable (1)... area will not be at the mounting location for the camera cable. It's horizontal viewing angle should go on the bracket H. Also, ensure that the ALPINE logo of car hinges and harness covers. • After completing wiring, open and close the trunk 19 and the...
...the waterproof pad adhesive sheet W, and secure any hinges. • The cable should be possible. 2 Installing the camera and the camera mounting bracket to attach the camera bracket K. 3 Secure the camera cable. Attach the waterproof pad V with the camera. Drill 2.5 mm (3/32") holes for the camera cable (1)... area will not be at the mounting location for the camera cable. It's horizontal viewing angle should go on the bracket H. Also, ensure that the ALPINE logo of car hinges and harness covers. • After completing wiring, open and close the trunk 19 and the...

Owners Manual
Page 22
... (under the seat, etc.) with the supplied cord clamp T. 20-EN If necessary, secure the cable with the screws (1) Assemble the buzzer O and its mounting bracket P. 4. 3. Do not place anything within 10 mm of the switch, then peel off any dust, oil, etc., on the other protective sheet and install in...
... (under the seat, etc.) with the supplied cord clamp T. 20-EN If necessary, secure the cable with the screws (1) Assemble the buzzer O and its mounting bracket P. 4. 3. Do not place anything within 10 mm of the switch, then peel off any dust, oil, etc., on the other protective sheet and install in...