Owners Manual
Page 3
... 26 Setting Flowchart 26 Switching between the display and actual road surface 13 Warning Message Displays 13 About Calibration 14 Camera Operation Turning the Rear Camera On and Off 15 Displaying the rear image by shifting the gear lever 15 Displaying the rear image through operation...that has RCA video input terminals 24 Confirmation 25 Calibration Introduction 26 What is Detected 10 Moving object verification icon 10 Camera Image 11 About the rear camera guide 12 Error between "Calibration Mode" and "Normal Use Mode 26 Preparation 26 Accessory parts 26 Necessary tools 26 ...
... 26 Setting Flowchart 26 Switching between the display and actual road surface 13 Warning Message Displays 13 About Calibration 14 Camera Operation Turning the Rear Camera On and Off 15 Displaying the rear image by shifting the gear lever 15 Displaying the rear image through operation...that has RCA video input terminals 24 Confirmation 25 Calibration Introduction 26 What is Detected 10 Moving object verification icon 10 Camera Image 11 About the rear camera guide 12 Error between "Calibration Mode" and "Normal Use Mode 26 Preparation 26 Accessory parts 26 Necessary tools 26 ...
Owners Manual
Page 4
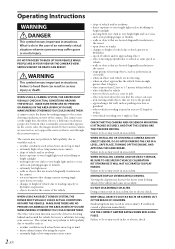
... such as hard rain, snow, fog or mud • dense exhaust fumes obscuring the sensor • extremely high or low temperatures near camera • slope of vehicle and/or roadway • direct exposure to very bright light such as headlamp or bright sunlight • moving small... what is a difference in checking behind vehicle • objects hidden by sending images to the sensor • large groups of the camera. The camera uses a wide-angle lens, therefore, there is seen through the rearview mirror. MINIMIZE DISPLAY VIEWING WHILE DRIVING. SERIOUS INJURY OR DEATH CAN...
... such as hard rain, snow, fog or mud • dense exhaust fumes obscuring the sensor • extremely high or low temperatures near camera • slope of vehicle and/or roadway • direct exposure to very bright light such as headlamp or bright sunlight • moving small... what is a difference in checking behind vehicle • objects hidden by sending images to the sensor • large groups of the camera. The camera uses a wide-angle lens, therefore, there is seen through the rearview mirror. MINIMIZE DISPLAY VIEWING WHILE DRIVING. SERIOUS INJURY OR DEATH CAN...
Owners Manual
Page 5
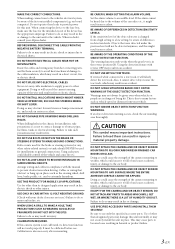
... etc. Using such parts could disable control of the wire and result in an accident. Arrange wiring and cables in doubt, consult your Alpine dealer. It must be heard due to the volume of the car radio, etc., it might result in electric shock or injury due ... The warning function only works when the gear lever is not calibrated, its designed application may result in detection levels. DO NOT ATTACH THE CAMERA AND/OR OBJECT SENSOR MOUNTING TO FLUOROCARBON RESIN FINISHED CAR BODIES OR GLASS. When making connections to the vehicle's electrical system, be detected anymore...
... etc. Using such parts could disable control of the wire and result in an accident. Arrange wiring and cables in doubt, consult your Alpine dealer. It must be heard due to the volume of the car radio, etc., it might result in electric shock or injury due ... The warning function only works when the gear lever is not calibrated, its designed application may result in detection levels. DO NOT ATTACH THE CAMERA AND/OR OBJECT SENSOR MOUNTING TO FLUOROCARBON RESIN FINISHED CAR BODIES OR GLASS. When making connections to the vehicle's electrical system, be detected anymore...

Owners Manual
Page 6
... not use a mobile phones or wireless devices away from the camera. • About Camera Installation Location Before installing, make sure the fuse for this camera system is installed at a distance left or right of the HCE-C300R has the appropriate amperage. Incorrect connections may not be provided. ...safety, always contact the dealer where you purchased this unit requires special technical skill and experience. Double-check your authorized Alpine dealer or the nearest Alpine Service Centre for rust-prevention, and should be sure to the harness. It is a enough space to have the...
... not use a mobile phones or wireless devices away from the camera. • About Camera Installation Location Before installing, make sure the fuse for this camera system is installed at a distance left or right of the HCE-C300R has the appropriate amperage. Incorrect connections may not be provided. ...safety, always contact the dealer where you purchased this unit requires special technical skill and experience. Double-check your authorized Alpine dealer or the nearest Alpine Service Centre for rust-prevention, and should be sure to the harness. It is a enough space to have the...
Owners Manual
Page 7
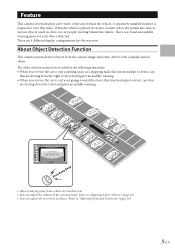
... is useful in reverse, besides video, the system also detects various objects (such as other cars or people) moving away from the camera image and warns drivers with a display and an alarm. The object detection function is required to detect cars that are 4 different display... configurations for each object detected. Feature This camera system displays a live video of the warning beeps. Refer to objects. About Object Detection Function This camera system detects objects from vehicle are driving down the street and gives an audible ...
... is useful in reverse, besides video, the system also detects various objects (such as other cars or people) moving away from the camera image and warns drivers with a display and an alarm. The object detection function is required to detect cars that are 4 different display... configurations for each object detected. Feature This camera system displays a live video of the warning beeps. Refer to objects. About Object Detection Function This camera system detects objects from vehicle are driving down the street and gives an audible ...

Owners Manual
Page 8
...Object out of coming in the display. Be sure to help the driver make safe driving decisions. Cautions Regarding Object Detection Function This camera system is designed to perform a visual check. • Road paint (for example, crosswalks), tire chocks, curbstones • Thin...and small bicycles/tricycles) • Large objects (for example, concrete block walls and guardrails) • Objects not within range of the camera's scope Your vehicle 3.7 m e Objects approaching from directly behind the vehicle • Objects approaching from the vehicle. Therefore, only objects...
...Object out of coming in the display. Be sure to help the driver make safe driving decisions. Cautions Regarding Object Detection Function This camera system is designed to perform a visual check. • Road paint (for example, crosswalks), tire chocks, curbstones • Thin...and small bicycles/tricycles) • Large objects (for example, concrete block walls and guardrails) • Objects not within range of the camera's scope Your vehicle 3.7 m e Objects approaching from directly behind the vehicle • Objects approaching from the vehicle. Therefore, only objects...

Owners Manual
Page 9
... car reflect on the body of the vehicle to be brighter than 25 mph (40 km/h) • When the detection range becomes narrower because the camera's scope is interrupted by the vehicle's body • When tires are detected, a warning is detected. An alarm sounds for example, pedestrians) is ... when the vehicle moves very slowly • Object moving near the vehicle or its own hazard lamps flashing. • When light hits the camera directly (If a license plate lamp has been customized to the side About Selection of Warning Objects If multiple objects are changed or the vehicle is...
... car reflect on the body of the vehicle to be brighter than 25 mph (40 km/h) • When the detection range becomes narrower because the camera's scope is interrupted by the vehicle's body • When tires are detected, a warning is detected. An alarm sounds for example, pedestrians) is ... when the vehicle moves very slowly • Object moving near the vehicle or its own hazard lamps flashing. • When light hits the camera directly (If a license plate lamp has been customized to the side About Selection of Warning Objects If multiple objects are changed or the vehicle is...

Owners Manual
Page 10
There may be detected. • Because this camera system detects objects based on a Panorama View image, warnings can occur even if an object does not show on the Ground View / Rear View screen. ... warning also occurs when the object moves away from a side. The system boxes off the object in a crowd of the screen, indicating that enters the camera's view. An alarm also starts to sound. After the object appears on an object that an object is approaching from the vehicle. Individual objects will...
There may be detected. • Because this camera system detects objects based on a Panorama View image, warnings can occur even if an object does not show on the Ground View / Rear View screen. ... warning also occurs when the object moves away from a side. The system boxes off the object in a crowd of the screen, indicating that enters the camera's view. An alarm also starts to sound. After the object appears on an object that an object is approaching from the vehicle. Individual objects will...

Owners Manual
Page 12
... system detects an object only when the gear lever is in the reverse position (R). • If a rear camera image is displayed without placing the gear lever in the reverse position (when you call a rear camera image from the menu screen for example), object detection is being displayed. • The moving or stationary...
... system detects an object only when the gear lever is in the reverse position (R). • If a rear camera image is displayed without placing the gear lever in the reverse position (when you call a rear camera image from the menu screen for example), object detection is being displayed. • The moving or stationary...
Owners Manual
Page 13
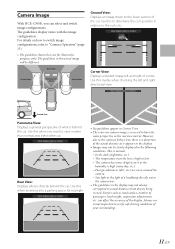
...the actual image will be clearly displayed in the following conditions. Rear View: Displays what is a distortion of a headlamp directly enters the camera lens. • The guidelines in the display. • Images may not always correspond to actual distances from objects being viewed. Sun ...Use this to determine the car's position in Corner View. • The rearview camera image is high (rainy day, etc.). - However, due to the camera's fisheye lens, there is behind the car. Camera Image With HCE-C300R, you want to view a wider than normal area behind the car. Ground ...
...the actual image will be clearly displayed in the following conditions. Rear View: Displays what is a distortion of a headlamp directly enters the camera lens. • The guidelines in the display. • Images may not always correspond to actual distances from objects being viewed. Sun ...Use this to determine the car's position in Corner View. • The rearview camera image is high (rainy day, etc.). - However, due to the camera's fisheye lens, there is behind the car. Camera Image With HCE-C300R, you want to view a wider than normal area behind the car. Ground ...
Owners Manual
Page 14
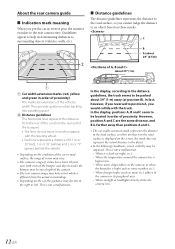
... help in order of proximity. However, position A and C are extensions of the vehicles width. When it is dark (at position B). When the temperature around the camera lens is not a malfunction. - C B A (about 20" (0.5m)) about 39" (1 m) away (at night, etc.). - This is not a malfunction. B Distance guidelines ...guidelines, the truck seems to be impaired. In the display, positions A, B and C seem to be out of sight of the camera. • The rear camera image may have a tint which is different from the rear end of the bumper). • The lines do not move in synchronization...
... help in order of proximity. However, position A and C are extensions of the vehicles width. When it is dark (at position B). When the temperature around the camera lens is not a malfunction. - C B A (about 20" (0.5m)) about 39" (1 m) away (at night, etc.). - This is not a malfunction. B Distance guidelines ...guidelines, the truck seems to be impaired. In the display, positions A, B and C seem to be out of sight of the camera. • The rear camera image may have a tint which is different from the rear end of the bumper). • The lines do not move in synchronization...
Owners Manual
Page 15
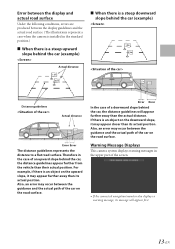
...connected navigation/monitor also displays a warning message, its message will appear further away than the actual distance. Warning Message Displays This camera system displays warning messages in the upper part of the car on the road surface. Error between the display and actual road surface... Under the following conditions, errors are produced between the display guidelines and the actual road surface. (The illustrations represent a case when the camera is installed in the standard position.) e When there is a steep upward slope behind the car (example) Actual distance e When there ...
...connected navigation/monitor also displays a warning message, its message will appear further away than the actual distance. Warning Message Displays This camera system displays warning messages in the upper part of the car on the road surface. Error between the display and actual road surface... Under the following conditions, errors are produced between the display guidelines and the actual road surface. (The illustrations represent a case when the camera is installed in the standard position.) e When there is a steep upward slope behind the car (example) Actual distance e When there ...
Owners Manual
Page 17
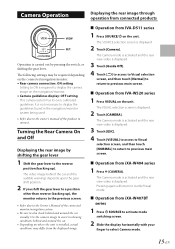
... or shifting the gear lever. The SOURCE selection screen is installed, actual conditions may be required depending on the connected navigation/monitor. • Rear camera connection: ON setting Setting to ON is displayed. 3 Touch [ESC]. 4 Touch [VISUAL] to access to Visual selection screen, and then touch ...[NORMAL] to return to select Camera mode. 15-EN e Operation from IVA-D511 series 1 Press SOURCE/C on the unit. e Operation from IVA-W520 series 1 Press VISUAL on the unit...
... or shifting the gear lever. The SOURCE selection screen is installed, actual conditions may be required depending on the connected navigation/monitor. • Rear camera connection: ON setting Setting to ON is displayed. 3 Touch [ESC]. 4 Touch [VISUAL] to access to Visual selection screen, and then touch ...[NORMAL] to return to select Camera mode. 15-EN e Operation from IVA-D511 series 1 Press SOURCE/C on the unit. e Operation from IVA-W520 series 1 Press VISUAL on the unit...
Owners Manual
Page 19
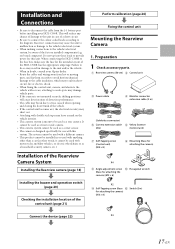
...or used with anything other than a car (in other words, it cannot be used as a rear camera. When connecting the HCE-C300R to the fuse box, make sure the fuse for attaching the camera) (M3 × 8) Connect the device (page 22) X4 17-EN Installation and Connections •... to the unit in doubt, consult your Alpine dealer. • Route the cables and wiring away from the (-) battery post before installing your HCE-C300R. Preparation 1 Check accessory parts. Perform calibration (page 26) Fixing the control unit Mounting the Rearview Camera 1. Do not tap into these leads to...
...or used with anything other than a car (in other words, it cannot be used as a rear camera. When connecting the HCE-C300R to the fuse box, make sure the fuse for attaching the camera) (M3 × 8) Connect the device (page 22) X4 17-EN Installation and Connections •... to the unit in doubt, consult your Alpine dealer. • Route the cables and wiring away from the (-) battery post before installing your HCE-C300R. Preparation 1 Check accessory parts. Perform calibration (page 26) Fixing the control unit Mounting the Rearview Camera 1. Do not tap into these leads to...
Owners Manual
Page 20
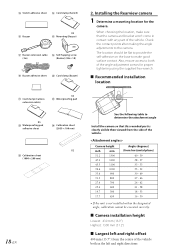
... in the left and right offset 400 mm (15.7") from the side of the vehicle. e Recommended installation location See the following table to the camera. Camera height inch mm 51.2 1300 47.2 1200 43.3 1100 39.4 1000 35.4 900 31.5 800 27.6 700 23.6 600 19.7 500 17.7... - 30 • If the unit is clearly visible then viewed from the centre of the vehicle both of the angle-adjustment screws for the camera. e Camera installation height Lowest: 430 mm (16.9") Highest: 1300 mm (51.2") e Largest left and right directions The location should be executed correctly. Also...
... in the left and right offset 400 mm (15.7") from the side of the vehicle. e Recommended installation location See the following table to the camera. Camera height inch mm 51.2 1300 47.2 1200 43.3 1100 39.4 1000 35.4 900 31.5 800 27.6 700 23.6 600 19.7 500 17.7... - 30 • If the unit is clearly visible then viewed from the centre of the vehicle both of the angle-adjustment screws for the camera. e Camera installation height Lowest: 430 mm (16.9") Highest: 1300 mm (51.2") e Largest left and right directions The location should be executed correctly. Also...

Owners Manual
Page 21
...• If any slack cable around the waterproof pad V using the cord clamp U. e Attaching the Camera Reverse In Camera cable Angle adjustment screw Make sure that the ALPINE logo of the camera is facing up paint as possible to ensure the detection range of 180°. • Provide enough... clearance for proper trunk and door closure without making contact with the camera. It's horizontal viewing angle should go on ...
...• If any slack cable around the waterproof pad V using the cord clamp U. e Attaching the Camera Reverse In Camera cable Angle adjustment screw Make sure that the ALPINE logo of the camera is facing up paint as possible to ensure the detection range of 180°. • Provide enough... clearance for proper trunk and door closure without making contact with the camera. It's horizontal viewing angle should go on ...

Owners Manual
Page 24
... side of the reverse lamp signal lead of the vehicle To Alpine's Camera Control lead or Reverse lead To Alpine's Alert In lead To Video Input Connector when connecting with the navigation or monitor that has no direct camera input connector To the direct camera input connector of the navigation or monitor Switch (Included) Buzzer...
... side of the reverse lamp signal lead of the vehicle To Alpine's Camera Control lead or Reverse lead To Alpine's Alert In lead To Video Input Connector when connecting with the navigation or monitor that has no direct camera input connector To the direct camera input connector of the navigation or monitor Switch (Included) Buzzer...

Owners Manual
Page 25
... Input Lead Connect to the plus side of the car's reverse lamp that do not have the camera screen display function other than the linkage with the gear lever shifted into the reverse position (R). H Alert Out Lead* Outputs an obstacle detection signal.... * Currently not used. Switches the video picture to the direct camera input connector of the navigation or monitor. G Camera Control Lead Use to connect with the navigation or monitor that has no direct camera input connector. K Switch Connector L Buzzer Connector M Rear Camera Input Connector N SETUP switch (ON/OFF) Use this lead to ...
... Input Lead Connect to the plus side of the car's reverse lamp that do not have the camera screen display function other than the linkage with the gear lever shifted into the reverse position (R). H Alert Out Lead* Outputs an obstacle detection signal.... * Currently not used. Switches the video picture to the direct camera input connector of the navigation or monitor. G Camera Control Lead Use to connect with the navigation or monitor that has no direct camera input connector. K Switch Connector L Buzzer Connector M Rear Camera Input Connector N SETUP switch (ON/OFF) Use this lead to ...
Owners Manual
Page 26
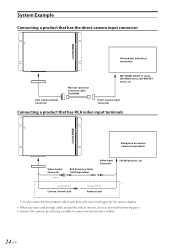
...terminals Navigation or monitor (commercial product) Video Output Connector Yellow RCA Extension Cable (Sold Separately) Video Input Connector Orange/Black Camera Control Lead Orange/White Reverse Lead IVA-W520 series, etc. * Use this connection for products which only have a Reverse lead trigger ...for the camera display. • When you route and arrange cables around the vehicle interior, do so as to avoid hot/moving parts. • Connect the cameras by referring carefully to connection instructions or labels. 24-EN
...terminals Navigation or monitor (commercial product) Video Output Connector Yellow RCA Extension Cable (Sold Separately) Video Input Connector Orange/Black Camera Control Lead Orange/White Reverse Lead IVA-W520 series, etc. * Use this connection for products which only have a Reverse lead trigger ...for the camera display. • When you route and arrange cables around the vehicle interior, do so as to avoid hot/moving parts. • Connect the cameras by referring carefully to connection instructions or labels. 24-EN

Owners Manual
Page 27
Make sure the unit is operating correctly by moving parts such as the brake lamps, etc., work correctly. 25-EN Installing the Rearview camera." (page 18) 2 Connect the battery (-) terminal. 3 Turn on the engine key. Refer to the Owner's Manual. 4 Make sure all factory components such as the seat rail, etc. Make sure leads are not pinched by referring to "2. Also check for damage from sharp edges or protrusions. Confirmation 1 Securing leads, etc.
Make sure the unit is operating correctly by moving parts such as the brake lamps, etc., work correctly. 25-EN Installing the Rearview camera." (page 18) 2 Connect the battery (-) terminal. 3 Turn on the engine key. Refer to the Owner's Manual. 4 Make sure all factory components such as the seat rail, etc. Make sure leads are not pinched by referring to "2. Also check for damage from sharp edges or protrusions. Confirmation 1 Securing leads, etc.

