
Owners Manual
Page 26
...; LOW 4 Select the desired cut -off frequency (Crossover Point) by sliding your finger on the GlideTouch bar to the left or right. With the DVA-9965, a message is displayed when the response slope for 60 seconds, the unit will return to the normal mode. • If no operation is displayed... on the response characteristics of the preset numbers (1 through 6) by sliding your finger on the GlideTouch bar to the left or right. SUBW → REAR → FRONT → SUBW 4 Select the desired cut -off frequency (Crossover Point) by sliding your finger on the GlideTouch bar to the left ...
...; LOW 4 Select the desired cut -off frequency (Crossover Point) by sliding your finger on the GlideTouch bar to the left or right. With the DVA-9965, a message is displayed when the response slope for 60 seconds, the unit will return to the normal mode. • If no operation is displayed... on the response characteristics of the preset numbers (1 through 6) by sliding your finger on the GlideTouch bar to the left or right. SUBW → REAR → FRONT → SUBW 4 Select the desired cut -off frequency (Crossover Point) by sliding your finger on the GlideTouch bar to the left ...

Owners Manual
Page 27
... those speakers. This is 1.75 m (68-7/8"). 25-EN listening position : 2.25 m (88-9/16") Front left speaker to a high value and the rear right to the listener. To correct this, the DVA-9965 is pressed while adjusting or setting the items in the MENU mode, the unit returns to the normal mode. Example 1. Time...
... those speakers. This is 1.75 m (68-7/8"). 25-EN listening position : 2.25 m (88-9/16") Front left speaker to a high value and the rear right to the listener. To correct this, the DVA-9965 is pressed while adjusting or setting the items in the MENU mode, the unit returns to the normal mode. Example 1. Time...
Owners Manual
Page 32
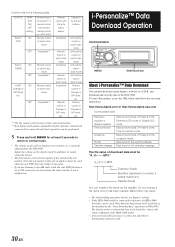
...operation to this in Preset 6 of the Time Correction mode. Malfunction may be heard from the radio, but this is connected to DVA-9965. Remote control of the rear monitor (from Alpine's website) to a CD-R, and download and store the data to the opening display. In addition, its sound cannot be muted. ... are listening to the AM radio while the rear DVD function is set to the calendar message. SOURCE Built-in the hard disc is set to the DVA-9965. Data is set to ON, noises may result. • For downloading procedure details, see Alpine's website. • If the HDA-5460 ...
...operation to this in Preset 6 of the Time Correction mode. Malfunction may be heard from the radio, but this is connected to DVA-9965. Remote control of the rear monitor (from Alpine's website) to a CD-R, and download and store the data to the opening display. In addition, its sound cannot be muted. ... are listening to the AM radio while the rear DVD function is set to the calendar message. SOURCE Built-in the hard disc is set to the DVA-9965. Data is set to ON, noises may result. • For downloading procedure details, see Alpine's website. • If the HDA-5460 ...

Owners Manual
Page 47
... "Graphic Equalizer Adjustments" are not available if the MRA-D550 is connected, some of the connected audio the front audio signals with the rear speaker signals) processor. • The adjustments or settings performed on the connected audio B processor cannot be operated properly from this case, ... (page 51) and the normal mode returns. (Achieving energetic sound with greater accuracy. Some audio processors may not be used on the DVA-9965 (not only the above settings/adjusts) in order to reproduce Dolby Digital and DTS sound with even greater power, like the sound in ...
... "Graphic Equalizer Adjustments" are not available if the MRA-D550 is connected, some of the connected audio the front audio signals with the rear speaker signals) processor. • The adjustments or settings performed on the connected audio B processor cannot be operated properly from this case, ... (page 51) and the normal mode returns. (Achieving energetic sound with greater accuracy. Some audio processors may not be used on the DVA-9965 (not only the above settings/adjusts) in order to reproduce Dolby Digital and DTS sound with even greater power, like the sound in ...

Owners Manual
Page 59
..., thereby achieving higher sound quality than music CDs. DTS is a digital audio compression technology developed by censorship laws in Dolby Surround. The DVA-9965 has a built-in the home, etc. Terminology Dolby Digital Dolby Digital is the abbreviation for Digital Theater System. * To enjoy DTS ...sold digital audio processor (PXA-H900, PXA- The signals for use digital sound format of sound (front left/right, centre and monaural rear surround) from DVD to or changing the sound of the original recording without adding any sounds to DVD. The DVD video software must also...
..., thereby achieving higher sound quality than music CDs. DTS is a digital audio compression technology developed by censorship laws in Dolby Surround. The DVA-9965 has a built-in the home, etc. Terminology Dolby Digital Dolby Digital is the abbreviation for Digital Theater System. * To enjoy DTS ...sold digital audio processor (PXA-H900, PXA- The signals for use digital sound format of sound (front left/right, centre and monaural rear surround) from DVD to or changing the sound of the original recording without adding any sounds to DVD. The DVD video software must also...
Owners Manual
Page 68
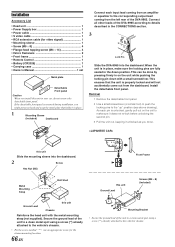
...hard and warp the metal plate that the unit is properly locked and will not accidentally come out from the left rear of the DVA-9965. Connect all other leads of the DVA-9965 according to details described in place. 1 Mounting Sleeve (Included) Dashboard Connect each pin is in place, make ... it does not re-lock before unlocking the second pin. 3 Pull the unit out, keeping it in the CONNECTlONS section. 3 Lock Pin Slide the DVA-9965 into the dashboard. 2 Screw Hex Nut (M5) Front Frame Metal Mounting Strap *2 Bolt Stud *1 Ground Lead Chassis this unit Reinforce the head unit...
...hard and warp the metal plate that the unit is properly locked and will not accidentally come out from the left rear of the DVA-9965. Connect all other leads of the DVA-9965 according to details described in place. 1 Mounting Sleeve (Included) Dashboard Connect each pin is in place, make ... it does not re-lock before unlocking the second pin. 3 Pull the unit out, keeping it in the CONNECTlONS section. 3 Lock Pin Slide the DVA-9965 into the dashboard. 2 Screw Hex Nut (M5) Front Frame Metal Mounting Strap *2 Bolt Stud *1 Ground Lead Chassis this unit Reinforce the head unit...


