Owners Manual
Page 1
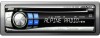
... (BENELUX) GmbH Leuvensesteenweg 510-B6, 1930 Zaventem, Belgium Phone 02-725-13 15 Designed by ALPINE Japan Printed in China (Y) 68-04123Z36-A R MP3 CD Receiver EN CDE-9846 FR FM/AM CD Receiver CDE-9842 ES • OWNER'S MANUAL Please read before using this equipment. • MODE D'EMPLOI Veuillez lire avant d'utiliser cet appareil. •...
... (BENELUX) GmbH Leuvensesteenweg 510-B6, 1930 Zaventem, Belgium Phone 02-725-13 15 Designed by ALPINE Japan Printed in China (Y) 68-04123Z36-A R MP3 CD Receiver EN CDE-9846 FR FM/AM CD Receiver CDE-9842 ES • OWNER'S MANUAL Please read before using this equipment. • MODE D'EMPLOI Veuillez lire avant d'utiliser cet appareil. •...
Owners Manual
Page 2
... 5 Detaching and Attaching the Front Panel ......... 5 Initial System Start-Up 5 Adjusting Volume 5 Lowering Volume Quickly 5 Radio Changing the Radio Frequencies for each Country (CDE-9846 only 6 Listening to Radio 6 Manual Storing of Station Presets 6 Automatic Memory of Station Presets 7 Tuning to Preset Stations 7 CD/MP3 Playback 8 Repeat Play 9 M.I.X. (Random Play 9 Scanning Programs 9 Searching...
... 5 Detaching and Attaching the Front Panel ......... 5 Initial System Start-Up 5 Adjusting Volume 5 Lowering Volume Quickly 5 Radio Changing the Radio Frequencies for each Country (CDE-9846 only 6 Listening to Radio 6 Manual Storing of Station Presets 6 Automatic Memory of Station Presets 7 Tuning to Preset Stations 7 CD/MP3 Playback 8 Repeat Play 9 M.I.X. (Random Play 9 Scanning Programs 9 Searching...
Owners Manual
Page 7
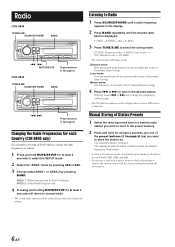
.... Manual mode: The frequency is manually tuned in the desired station. Manual Storing of 18 stations can be cleared and replaced with the new station. 6-EN Holding down g or f will return to select the SETUP mode. 2 Select the "AREA" mode by pressing g or f. 3 Choose either AREA 1 or AREA 2 by pressing BAND. Radio CDE-9846 TUNE...
.... Manual mode: The frequency is manually tuned in the desired station. Manual Storing of 18 stations can be cleared and replaced with the new station. 6-EN Holding down g or f will return to select the SETUP mode. 2 Select the "AREA" mode by pressing g or f. 3 Choose either AREA 1 or AREA 2 by pressing BAND. Radio CDE-9846 TUNE...

Owners Manual
Page 11
...3 to switch to File Name Search mode. • "NO FILE" is displayed for 2 seconds if the folder that software. About MP3 (CDE-9846 only) CAUTION Except for private use, duplicating audio data (including MP3 data) or distributing, transferring, or copying it, whether for free or for...Rotary encoder within 10 seconds to select the desired folder. 3 Press the Rotary encoder to play back are prepared, then written to the user's manual for that is canceled by the Folder Name Search mode contains no extension cannot be made during M.I .X. File Name Search mode 2 Press 1...
...3 to switch to File Name Search mode. • "NO FILE" is displayed for 2 seconds if the folder that software. About MP3 (CDE-9846 only) CAUTION Except for private use, duplicating audio data (including MP3 data) or distributing, transferring, or copying it, whether for free or for...Rotary encoder within 10 seconds to select the desired folder. 3 Press the Rotary encoder to play back are prepared, then written to the user's manual for that is canceled by the Folder Name Search mode contains no extension cannot be made during M.I .X. File Name Search mode 2 Press 1...
Owners Manual
Page 16
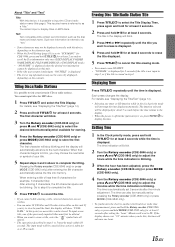
...the time indication is blinking. 3 When the hour has been adjusted, press the Rotary encoder (CDE-9846 only) or press MODE (CDE-9842 only). 4 Turn the Rotary encoder (CDE-9846 only) or press 4 and 3 (CDE-9842 only) to adjust the minutes while the time indication is blinking. Text: Text compatible ...title): After entering 3 characters, the 4th character space will be canceled if no more titles can also be manually set by pressing the Rotary encoder (CDE-9846 only) or press MODE (CDE-9842 only). • To synchronize the clock to another clock/watch or radio time announcement, press and hold ...
...the time indication is blinking. 3 When the hour has been adjusted, press the Rotary encoder (CDE-9846 only) or press MODE (CDE-9842 only). 4 Turn the Rotary encoder (CDE-9846 only) or press 4 and 3 (CDE-9842 only) to adjust the minutes while the time indication is blinking. Text: Text compatible ...title): After entering 3 characters, the 4th character space will be canceled if no more titles can also be manually set by pressing the Rotary encoder (CDE-9846 only) or press MODE (CDE-9842 only). • To synchronize the clock to another clock/watch or radio time announcement, press and hold ...
Owners Manual
Page 17
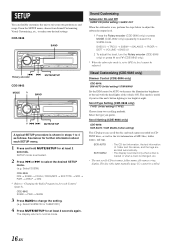
...AUTO SCR MANU : The CD text information, the text information of MP3 files, folder names, and tags. The disc titles input manually (page 15) cannot be adjusted. Select SUBW) CDE-9846 DIM → SUBW → CD-DA / CDDA/MP3 → SCR TYPE → SCR → PWR → AREA*...flexibly customize the unit to make your own preferences and usage. The display returns to change the setting. (e.g. Visual Customizing (CDE-9846 only) Dimmer Control (CDE-9846 only) CDE-9846: DIM AUTO (Initial setting) / DIM MANU Set the DIM control to AUTO to select the desired SETUP menu. (e.g. ...
...AUTO SCR MANU : The CD text information, the text information of MP3 files, folder names, and tags. The disc titles input manually (page 15) cannot be adjusted. Select SUBW) CDE-9846 DIM → SUBW → CD-DA / CDDA/MP3 → SCR TYPE → SCR → PWR → AREA*...flexibly customize the unit to make your own preferences and usage. The display returns to change the setting. (e.g. Visual Customizing (CDE-9846 only) Dimmer Control (CDE-9846 only) CDE-9846: DIM AUTO (Initial setting) / DIM MANU Set the DIM control to AUTO to select the desired SETUP menu. (e.g. ...
Owners Manual
Page 21
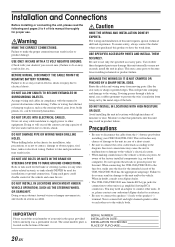
... below and keep it as a permanent record. IMPORTANT Please record the serial number of your unit in doubt, consult your Alpine dealer. • The CDE-9846/CDE-9842 uses female RCA-type jacks for proper use a rubber grommet to prevent obstructions when driving. BEFORE WIRING, DISCONNECT THE ...AS THE STEERING WHEEL OR GEARSHIFT. USE SPECIFIED ACCESSORY PARTS AND INSTALL THEM SECURELY. If wiring passes through a hole in compliance with the manual to prevent the wire's insulation from being cut away cable insulation to supply power to 4 of damage to other units (e.g. Precautions &#...
... below and keep it as a permanent record. IMPORTANT Please record the serial number of your unit in doubt, consult your Alpine dealer. • The CDE-9846/CDE-9842 uses female RCA-type jacks for proper use a rubber grommet to prevent obstructions when driving. BEFORE WIRING, DISCONNECT THE ...AS THE STEERING WHEEL OR GEARSHIFT. USE SPECIFIED ACCESSORY PARTS AND INSTALL THEM SECURELY. If wiring passes through a hole in compliance with the manual to prevent the wire's insulation from being cut away cable insulation to supply power to 4 of damage to other units (e.g. Precautions &#...
Owners Manual
Page 22
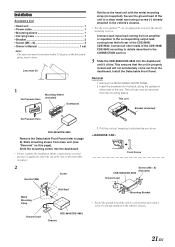
... PANEL. 2 Insert the brackets into the dashboard until it unlocked as you do so. Front Frame Screws (M5 × 8) (Included) CDE-9846/CDE-9842 Ground Lead * Mounting Bracket • Secure the ground lead of the unit to a clean metal spot using a screw (*) already attached...Bracket 2 • Screw (M5 × 8 4 • Owner's Manual 1 set Note: The main unit must be removed from the mounting sleeve. Secure the ground lead of the CDE-9846/ CDE-9842. This unit Bracket (included) No Pressure Here CDE-9846/CDE-9842 Remove the Detachable Front Panel (refer to the vehicle's chassis. &#...
... PANEL. 2 Insert the brackets into the dashboard until it unlocked as you do so. Front Frame Screws (M5 × 8) (Included) CDE-9846/CDE-9842 Ground Lead * Mounting Bracket • Secure the ground lead of the unit to a clean metal spot using a screw (*) already attached...Bracket 2 • Screw (M5 × 8 4 • Owner's Manual 1 set Note: The main unit must be removed from the mounting sleeve. Secure the ground lead of the CDE-9846/ CDE-9842. This unit Bracket (included) No Pressure Here CDE-9846/CDE-9842 Remove the Detachable Front Panel (refer to the vehicle's chassis. &#...


