Owners Manual
Page 1
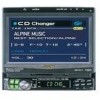
... OF CANADA, INC. 7300 Warden Ave., Suite 203, Markham, Ontario L3R 9Z6, Canada Phone 1-800-ALPINE-1 (1-800-257-4631) ALPINE ELECTRONICS OF AUSTRALIA PTY. R EN CVA-1004 MOBILE MULTIMEDIA STATION FR • OWNER'S MANUAL Please read before using this equipment. LTD. Phone 0870-33 33 ...763 JEIL Moon Hwa Co. 18-6, 3Ga, Pil-dong, Jung-gu, Seoul, Korea ALPINE ELECTRONICS FRANCE S.A.R.L. (RCS PONTOISE B ...
... OF CANADA, INC. 7300 Warden Ave., Suite 203, Markham, Ontario L3R 9Z6, Canada Phone 1-800-ALPINE-1 (1-800-257-4631) ALPINE ELECTRONICS OF AUSTRALIA PTY. R EN CVA-1004 MOBILE MULTIMEDIA STATION FR • OWNER'S MANUAL Please read before using this equipment. LTD. Phone 0870-33 33 ...763 JEIL Moon Hwa Co. 18-6, 3Ga, Pil-dong, Jung-gu, Seoul, Korea ALPINE ELECTRONICS FRANCE S.A.R.L. (RCS PONTOISE B ...
Owners Manual
Page 6
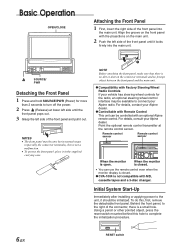
...High humidity and water • Excessive dust • Excessive vibrations Handling the Detachable Front Panel • Do not expose to the CVA-1004, can be on the road and not on the products connected, the functions and displays will restrict operation of the driver and passengers...during operation, the display will be operated from the CVA-1004. Installation Location Make sure the CVA-1004 will be valid. Depending on the CVA-1004. Maintenance If you are not possible while you have problems, do not attempt to your Alpine dealer. 4-EN This operation is moving. This ...
...High humidity and water • Excessive dust • Excessive vibrations Handling the Detachable Front Panel • Do not expose to the CVA-1004, can be on the road and not on the products connected, the functions and displays will restrict operation of the driver and passengers...during operation, the display will be operated from the CVA-1004. Installation Location Make sure the CVA-1004 will be valid. Depending on the CVA-1004. Maintenance If you are not possible while you have problems, do not attempt to your Alpine dealer. 4-EN This operation is moving. This ...
Owners Manual
Page 8
... not compatible with MD, cassette tapes and a 3-disc changer. When the monitor is closed . [CVA-1004 is open. Behind the front panel, to the right of the connector, there is no dirt or dust on the main unit. 2 Push the left ... front panel with the projections on the connector terminals and no foreign object between the front panel and the main unit. [Compatibility with an optional Alpine remote control. NOTES • The front panel may be controlled with Factory Steering Wheel Radio Controls If your vehicle has steering wheel controls for more...
... not compatible with MD, cassette tapes and a 3-disc changer. When the monitor is closed . [CVA-1004 is open. Behind the front panel, to the right of the connector, there is no dirt or dust on the main unit. 2 Push the left ... front panel with the projections on the connector terminals and no foreign object between the front panel and the main unit. [Compatibility with an optional Alpine remote control. NOTES • The front panel may be controlled with Factory Steering Wheel Radio Controls If your vehicle has steering wheel controls for more...
Owners Manual
Page 9
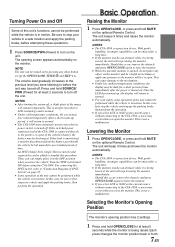
... An SPST (Single-Pole, Single-Throw) switch (sold separately) can simply place it will stop lowering the monitor immediately. NOTES • The CVA-1004 is not a malfunction. Lowering the Monitor 1 Press OPEN/CLOSE, or press and hold OPEN/CLOSE for a short period of this lead is unswitched,...this occur, remove the obstacle and press OPEN/CLOSE again to lower the monitor. • If you select AUX or NAVI as the current source without connecting to LCD technology and is connected directly to the CVA-1004, a noise may lose contrast temporarily. NOTES • After turning the...
... An SPST (Single-Pole, Single-Throw) switch (sold separately) can simply place it will stop lowering the monitor immediately. NOTES • The CVA-1004 is not a malfunction. Lowering the Monitor 1 Press OPEN/CLOSE, or press and hold OPEN/CLOSE for a short period of this lead is unswitched,...this occur, remove the obstacle and press OPEN/CLOSE again to lower the monitor. • If you select AUX or NAVI as the current source without connecting to LCD technology and is connected directly to the CVA-1004, a noise may lose contrast temporarily. NOTES • After turning the...

Owners Manual
Page 13
... Volume Level setting status Channel Name Channel Number Current Time You need to provide XM with an optional XM Antenna may be controllable from the CVA-1004. 1 While receiving XM1/XM2/XM3, press g or f to select channel "0." 2 The unit alternately displays "RADIO ID" and the number. 3 To cancel the... in order to subscribe to -coast via satellite. For a small monthly fee, subscribers can check your ID number printed on the label on the CVA-1004 for the ID Number. • You can hear crystal-clear music, sports, news and talk, coast-to XM's programming. For more information, visit...
... Volume Level setting status Channel Name Channel Number Current Time You need to provide XM with an optional XM Antenna may be controllable from the CVA-1004. 1 While receiving XM1/XM2/XM3, press g or f to select channel "0." 2 The unit alternately displays "RADIO ID" and the number. 3 To cancel the... in order to subscribe to -coast via satellite. For a small monthly fee, subscribers can check your ID number printed on the label on the CVA-1004 for the ID Number. • You can hear crystal-clear music, sports, news and talk, coast-to XM's programming. For more information, visit...
Owners Manual
Page 16
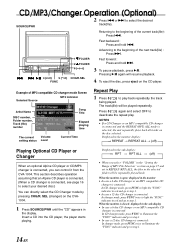
... CD changer is connected and the REPEAT (RPT) ALL mode is connected, you select "FOLDER" in the monitor display: → REPEAT → REPEAT ALL → (off ) • When you can directly select...RPT → RPT ALL → (off ) Playing Optional CD Player or Changer When an optional Alpine CD player or CD/MP3 changer is selected, the unit repeatedly plays back all tracks on the ...PWR 2 Press g or f to select your desired disc.) You can control it from the CVA-1004. The track(file) will resume playback. Returning to the beginning of MP3 compatible CD changer mode ...
... CD changer is connected and the REPEAT (RPT) ALL mode is connected, you select "FOLDER" in the monitor display: → REPEAT → REPEAT ALL → (off ) • When you can directly select...RPT → RPT ALL → (off ) Playing Optional CD Player or Changer When an optional Alpine CD player or CD/MP3 changer is selected, the unit repeatedly plays back all tracks on the ...PWR 2 Press g or f to select your desired disc.) You can control it from the CVA-1004. The track(file) will resume playback. Returning to the beginning of MP3 compatible CD changer mode ...
Owners Manual
Page 18
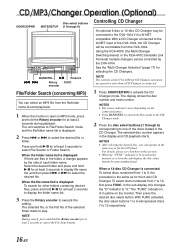
...select discs numbered from 7 to select the desired file or folder. With FUNC activated, the disc select buttons 1 to 6 will be controllable from the CVA-1004. Select the desired folder and press and hold -/J for the CD player. NOTE The controls on the connected source. • Press BAND/TEL. ...After selecting the desired disc, you can operate in the folder, a triangle appears by the CVA-1004. In the sub-display, this section. • When the "FUNC" indicator is lit in red in the monitor, or is lit in the sub-display, the disc select buttons become nonfunctional. Then press ...
...select discs numbered from 7 to select the desired file or folder. With FUNC activated, the disc select buttons 1 to 6 will be controllable from the CVA-1004. Select the desired folder and press and hold -/J for the CD player. NOTE The controls on the connected source. • Press BAND/TEL. ...After selecting the desired disc, you can operate in the folder, a triangle appears by the CVA-1004. In the sub-display, this section. • When the "FUNC" indicator is lit in red in the monitor, or is lit in the sub-display, the disc select buttons become nonfunctional. Then press ...
Owners Manual
Page 19
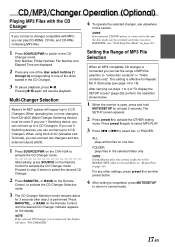
... Terminal), you can connect up to 6 CD Changers. Proceed to step 3 below . 1 When the monitor is open, press and hold MUTE/SETUP for 3 seconds after step 2 is connected to the unit, the...device) must be switched each time you press BAND/TEL. (see "Switching Disc Mode" on the CVA-1004 to activate the CD Changer mode. If you use 2 Switching devices, you can connect two changers...playback. The SETUP screen appears. 2 Press preset 6 to select ALL or FOLDER. Multi-Changer Selection Alpine's Ai-NET system will support up to "entire disc contents" or "folder contents only." Alternatively, press...
... Terminal), you can connect up to 6 CD Changers. Proceed to step 3 below . 1 When the monitor is open, press and hold MUTE/SETUP for 3 seconds after step 2 is connected to the unit, the...device) must be switched each time you press BAND/TEL. (see "Switching Disc Mode" on the CVA-1004 to activate the CD Changer mode. If you use 2 Switching devices, you can connect two changers...playback. The SETUP screen appears. 2 Press preset 6 to select ALL or FOLDER. Multi-Changer Selection Alpine's Ai-NET system will support up to "entire disc contents" or "folder contents only." Alternatively, press...
Owners Manual
Page 20
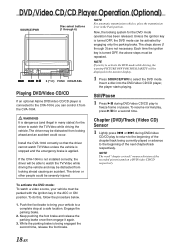
...from looking ahead causing an accident. Playing DVD/Video CD/CD If an optional Alpine DVD/video CD/CD player is not installed correctly, the driver will be distracted from the CVA-1004. Install the CVA-1004 correctly so that the driver cannot watch TV/Video unless the vehicle is stopped ... vehicle. The driver may be displayed in the ACC or ON position. The steps above steps must be parked with the ignition key in the monitor display. Engage the parking brake. 2. DVD/Video CD/CD Player Operation (Optional) SOURCE/PWR Disc select buttons (1 through 3) are not necessary. ...
...from looking ahead causing an accident. Playing DVD/Video CD/CD If an optional Alpine DVD/video CD/CD player is not installed correctly, the driver will be distracted from the CVA-1004. Install the CVA-1004 correctly so that the driver cannot watch TV/Video unless the vehicle is stopped ... vehicle. The driver may be displayed in the ACC or ON position. The steps above steps must be parked with the ignition key in the monitor display. Engage the parking brake. 2. DVD/Video CD/CD Player Operation (Optional) SOURCE/PWR Disc select buttons (1 through 3) are not necessary. ...
Owners Manual
Page 21
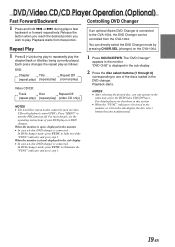
...After selecting the desired disc, you wish to play to fast backward or forward respectively. Playback starts from the CVA-1004. Playback starts. Press "MENU" to one of your DVD player or DVD changer. Release the button when you... reach the desired portion you can be used on the CVA-1004. 1 Press SOURCE/PWR. When the monitor is connected: In DVD changer mode, press FUNC to light in the same may as follows:...modes cannot be controlled from that portion. Controlling DVD Changer If an optional Alpine DVD Changer is displayed in the monitor.
...After selecting the desired disc, you wish to play to fast backward or forward respectively. Playback starts from the CVA-1004. Playback starts. Press "MENU" to one of your DVD player or DVD changer. Release the button when you... reach the desired portion you can be used on the CVA-1004. 1 Press SOURCE/PWR. When the monitor is connected: In DVD changer mode, press FUNC to light in the same may as follows:...modes cannot be controlled from that portion. Controlling DVD Changer If an optional Alpine DVD Changer is displayed in the monitor.
Owners Manual
Page 22
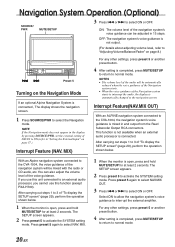
...NAV.IN to ON (refer to "Setting the External Input" on the Navigation Mode If an optional Alpine Navigation System is completed, press MUTE/SETUP to return to the CVA-1004, the voice guidance of the voice guidance. Select ON to allow the navigation system's voice guidance to... again to the CVA-1004, the navigation system's voice guidance is open , press and hold MUTE/SETUP for at least 2 seconds. With an Alpine navigation system connected to normal mode. Interrupt Feature(NAV.MIX OUT) With an ALPINE navigation system connected to select NAV. MIX. 1 When the monitor is mixed in ...
...NAV.IN to ON (refer to "Setting the External Input" on the Navigation Mode If an optional Alpine Navigation System is completed, press MUTE/SETUP to return to the CVA-1004, the voice guidance of the voice guidance. Select ON to allow the navigation system's voice guidance to... again to the CVA-1004, the navigation system's voice guidance is open , press and hold MUTE/SETUP for at least 2 seconds. With an Alpine navigation system connected to normal mode. Interrupt Feature(NAV.MIX OUT) With an ALPINE navigation system connected to select NAV. MIX. 1 When the monitor is mixed in ...
Owners Manual
Page 23
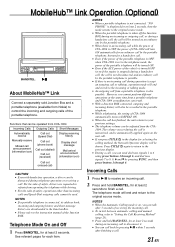
... but not for a hands-free call. • Even if the power of the portable telephone is OFF, when CVA-1004 is OFF, the power of CVA-1004 will be treated as malfunction can result. • With a Junction BOX connected, outgoing and incoming history will also be...; Link Operation (Optional) BAND/TEL. :/J About MobileHub™ Link Connect a separately sold Junction Box and a portable telephone (available from CVA-1004 Incoming Calls Outgoing Calls Short Messages Automatically receive Manually receive Missed call announcement (information icon) Call out (Speed Dial) Call out (phone book...
... but not for a hands-free call. • Even if the power of the portable telephone is OFF, when CVA-1004 is OFF, the power of CVA-1004 will be treated as malfunction can result. • With a Junction BOX connected, outgoing and incoming history will also be...; Link Operation (Optional) BAND/TEL. :/J About MobileHub™ Link Connect a separately sold Junction Box and a portable telephone (available from CVA-1004 Incoming Calls Outgoing Calls Short Messages Automatically receive Manually receive Missed call announcement (information icon) Call out (Speed Dial) Call out (phone book...
Owners Manual
Page 26
...every time the button is displayed for the CVA-1004 when a compatible changer with CD Text. CD text disc mark indicates that the CD has text data. Radio mode: The monitor is open. (displayed in the monitor) TITLE DISPLAY Radio mode: The monitor is closed. (displayed in the sub-display)..., such as the disc name and track name. Such text information is open . (displayed in the monitor) (Text is pressed. However, some characters may not be played back with the CVA-1004 if an MP3 compatible changer is connected.) ↓ TAG (TRACK/ALBUM/ARTIST NAME) DISPLAY∗2 ↓...
...every time the button is displayed for the CVA-1004 when a compatible changer with CD Text. CD text disc mark indicates that the CD has text data. Radio mode: The monitor is open. (displayed in the monitor) TITLE DISPLAY Radio mode: The monitor is closed. (displayed in the sub-display)..., such as the disc name and track name. Such text information is open . (displayed in the monitor) (Text is pressed. However, some characters may not be played back with the CVA-1004 if an MP3 compatible changer is connected.) ↓ TAG (TRACK/ALBUM/ARTIST NAME) DISPLAY∗2 ↓...
Owners Manual
Page 37
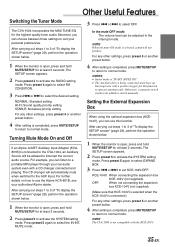
...CVA-1004, an Auxiliary Source will automatically mute when switched to 3 of "To display the SETUP screen" (page 29), perform the operation shown below . 1 When the monitor is completed, press MUTE/SETUP to return to normal mode. In the mute OFF mode: The volume level can use the Alpine...to operate automatically. Press preset 5 again to select EXPAND BOX. 3 Press g or f to suit your authorized Alpine dealer. Other Useful Features Switching the Tuner Mode The CVA-1004 incorporates the MAX TUNE SQ for at least 2 seconds. NORMAL: Standard setting HI-FI: Sound quality priority setting ...
...CVA-1004, an Auxiliary Source will automatically mute when switched to 3 of "To display the SETUP screen" (page 29), perform the operation shown below . 1 When the monitor is completed, press MUTE/SETUP to return to normal mode. In the mute OFF mode: The volume level can use the Alpine...to operate automatically. Press preset 5 again to select EXPAND BOX. 3 Press g or f to suit your authorized Alpine dealer. Other Useful Features Switching the Tuner Mode The CVA-1004 incorporates the MAX TUNE SQ for at least 2 seconds. NORMAL: Standard setting HI-FI: Sound quality priority setting ...
Owners Manual
Page 38
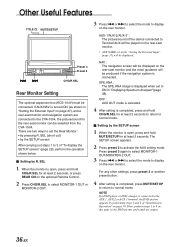
... 1 to 3 of the device connected to Terminal AUX will be selected from the CVA-1004. Setting by the SETUP screen 1 When the monitor is completed, press and hold MUTE/SETUP for at least 2 seconds to return to the CVA-1004, the picture/sound for at least 2 seconds. OFF : AUX OUT mode is ...canceled. 4 After setting is open , press and hold CHG/R.SEL for at least 2 seconds, or press REAR ON on the optional Remote Control. . 2 Press CHG/R.SEL to select MONITOR-1 OUT or MONITOR-2 OUT. 3 Press...
... 1 to 3 of the device connected to Terminal AUX will be selected from the CVA-1004. Setting by the SETUP screen 1 When the monitor is completed, press and hold MUTE/SETUP for at least 2 seconds to return to the CVA-1004, the picture/sound for at least 2 seconds. OFF : AUX OUT mode is ...canceled. 4 After setting is open , press and hold CHG/R.SEL for at least 2 seconds, or press REAR ON on the optional Remote Control. . 2 Press CHG/R.SEL to select MONITOR-1 OUT or MONITOR-2 OUT. 3 Press...
Owners Manual
Page 39
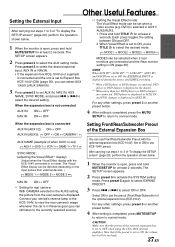
... is set when a video source (e.g. Setting Front/Rear/Subwoofer Preout of the External Expansion Box You can be set to OFF when using the CVA-1004 internal amplifier. The SETUP screen appears. 2 Press preset 5 to select the desired setting. For any other settings, press preset 5 or another ...External Input After carrying out steps 1 to 3 of "To display the SETUP screen" (page 29), perform the operation shown below . 1 When the monitor is open , press and hold MUTE/SETUP for rear camera: With CAMERA selected in the AUX3 setting, the picture from external devices. ) → MODE...
... is set when a video source (e.g. Setting Front/Rear/Subwoofer Preout of the External Expansion Box You can be set to OFF when using the CVA-1004 internal amplifier. The SETUP screen appears. 2 Press preset 5 to select the desired setting. For any other settings, press preset 5 or another ...External Input After carrying out steps 1 to 3 of "To display the SETUP screen" (page 29), perform the operation shown below . 1 When the monitor is open , press and hold MUTE/SETUP for rear camera: With CAMERA selected in the AUX3 setting, the picture from external devices. ) → MODE...
Owners Manual
Page 40
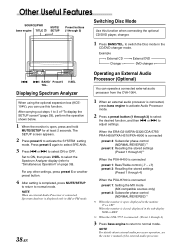
... open: displayed in the monitor 0° ↔ 180° When the monitor is connected: (Preset 1 through 3) to select the desired function, and then g or f to 3 of the external audio processor. Displaying Spectrum Analyzer When using the optional expansion box (KCE104V), you can operate a connected external audio processor from the CVA-1004. 1 When an external...
... open: displayed in the monitor 0° ↔ 180° When the monitor is connected: (Preset 1 through 3) to select the desired function, and then g or f to 3 of the external audio processor. Displaying Spectrum Analyzer When using the optional expansion box (KCE104V), you can operate a connected external audio processor from the CVA-1004. 1 When an external...
Owners Manual
Page 47
...OR DUST. Do not tap into this unit may result in damage to the speaker (-) terminal. If so, please contact your ALPINE dealer. • The CVA-1004 uses female RCA-type jacks for installation, take such precautions may result in fire, etc. IMPORTANT Please record the serial number ...of your CVA-1004. Failure to do so may result in doubt, consult your authorized ALPINE dealer for this unit. Using such parts could disable control of this unit requires special technical skill and...
...OR DUST. Do not tap into this unit may result in damage to the speaker (-) terminal. If so, please contact your ALPINE dealer. • The CVA-1004 uses female RCA-type jacks for installation, take such precautions may result in fire, etc. IMPORTANT Please record the serial number ...of your CVA-1004. Failure to do so may result in doubt, consult your authorized ALPINE dealer for this unit. Using such parts could disable control of this unit requires special technical skill and...
Owners Manual
Page 48
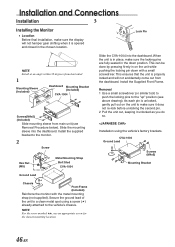
...screw marked , use an appropriate screw for the chosen mounting location. 46-EN Install the supplied bracket to the monitor. 2 Screw Hex Nut (M5) Metal Mounting Strap Bolt Stud CVA-1004 Slide the CVA-1004 into the dashboard. As each pin is in place, make sure the locking pins are fully seated in on... the mounting sleeve into the dashboard. Install the Supplied Front Frame. Installation using a screw ( ) already attached to the "up" position (see Removal Procedure below). CVA-1004 Ground Lead Screws (M4x5) Mounting Bracket Ground Lead Chassis Front Frame (Included) Reinforce the...
...screw marked , use an appropriate screw for the chosen mounting location. 46-EN Install the supplied bracket to the monitor. 2 Screw Hex Nut (M5) Metal Mounting Strap Bolt Stud CVA-1004 Slide the CVA-1004 into the dashboard. As each pin is in place, make sure the locking pins are fully seated in on... the mounting sleeve into the dashboard. Install the Supplied Front Frame. Installation using a screw ( ) already attached to the "up" position (see Removal Procedure below). CVA-1004 Ground Lead Screws (M4x5) Mounting Bracket Ground Lead Chassis Front Frame (Included) Reinforce the...

Owners Manual
Page 49
... directly to connect the foot brake lead, parking brake lead, etc. 1 2 Vehicle Cable Pinch Connector Pliers Monitor Cable Stopper CVA-1004 FOOT BRAKE (Yellow/Black) Pinch Connector PARKING BRAKE (Yellow/Blue) Pinch Connector Foot brake lamp Foot brake lead...if necessary) of the vehicle's battery, the CVA-1004 draws some current (several hundred milliamperes) even when its switch is not available) CVA-1004 (Red) (Yellow) IGNITION BATTERY SPST SW (Optional) NOTE If your dealer for further information. Your Alpine dealer carries various noise suppressors, contact them for ...
... directly to connect the foot brake lead, parking brake lead, etc. 1 2 Vehicle Cable Pinch Connector Pliers Monitor Cable Stopper CVA-1004 FOOT BRAKE (Yellow/Black) Pinch Connector PARKING BRAKE (Yellow/Blue) Pinch Connector Foot brake lamp Foot brake lead...if necessary) of the vehicle's battery, the CVA-1004 draws some current (several hundred milliamperes) even when its switch is not available) CVA-1004 (Red) (Yellow) IGNITION BATTERY SPST SW (Optional) NOTE If your dealer for further information. Your Alpine dealer carries various noise suppressors, contact them for ...

