
Quick Start Guide
Page 2
... an external hard drive. 2 Open the file and double-click the installer application: .exe (Windows) or .dmg (Mac OS X). 4. Follow the on your product. Download the VX Software Package. 3. Quickstart Guide (English) Introduction Box Contents VX49 USB Cable Software Installation Card Quickstart Guide Safety & Warranty Manual Important: Visit alesis.com and find the webpage for each selection. Note: By default, VIP will be prompted to use with VIP. Initial Setup 1. If...
... an external hard drive. 2 Open the file and double-click the installer application: .exe (Windows) or .dmg (Mac OS X). 4. Follow the on your product. Download the VX Software Package. 3. Quickstart Guide (English) Introduction Box Contents VX49 USB Cable Software Installation Card Quickstart Guide Safety & Warranty Manual Important: Visit alesis.com and find the webpage for each selection. Note: By default, VIP will be prompted to use with VIP. Initial Setup 1. If...
Quick Start Guide
Page 3
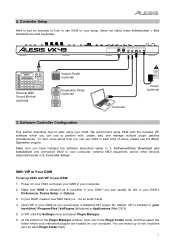
... your VX49, and open a standard VST plugin. Power on your computer, external MIDI equipment, and/or other devices (described earlier in your VX49. In your hard drive] \ Program Files \ VstPlugins (Windows) or Applications (Mac OS X). 5. By default, VIP is installed in 1. Controller Setup). Software/Driver Download and Installation) and connected VX49 to start using VX49 with the included VIP software which you have installed the software (described earlier in [your DAW, create a new MIDI track (i.e., not an audio track). 4. 2. Make sure...
... your VX49, and open a standard VST plugin. Power on your computer, external MIDI equipment, and/or other devices (described earlier in your VX49. In your hard drive] \ Program Files \ VstPlugins (Windows) or Applications (Mac OS X). 5. By default, VIP is installed in 1. Controller Setup). Software/Driver Download and Installation) and connected VX49 to start using VX49 with the included VIP software which you have installed the software (described earlier in [your DAW, create a new MIDI track (i.e., not an audio track). 4. 2. Make sure...
Quick Start Guide
Page 4
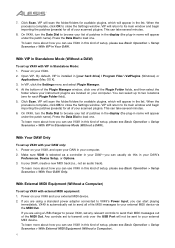
... Basic Operation > Setup Scenarios > With External MIDI Equipment (Without a Computer). 4 If you can usually do this kind of setup, please see Basic Operation > Setup Scenarios > With Your DAW Only. To learn more about how you can start playing immediately. On VX49, turn the Data Dial to its main window and begin importing the patches (presets) for all of patches in the display (the plug-in Standalone Mode...
... Basic Operation > Setup Scenarios > With External MIDI Equipment (Without a Computer). 4 If you can usually do this kind of setup, please see Basic Operation > Setup Scenarios > With Your DAW Only. To learn more about how you can start playing immediately. On VX49, turn the Data Dial to its main window and begin importing the patches (presets) for all of patches in the display (the plug-in Standalone Mode...
Quick Start Guide
Page 5
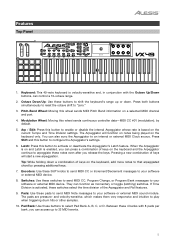
... your software or external MIDI device. Pitch-Bend Wheel: Moving this button to that arpeggiated chord by default. 5. Encoders: Use these switches select the time division of keys on the current Tempo and Time Division settings. Keyboard: This 49-note keyboard is activated, these 360º knobs to send MIDI CC or Increment/Decrement messages to "zero." 3. Pressing a new combination of keys on the keyboard only. Press both buttons simultaneously to reset the octave shift...
... your software or external MIDI device. Pitch-Bend Wheel: Moving this button to that arpeggiated chord by default. 5. Encoders: Use these switches select the time division of keys on the current Tempo and Time Division settings. Keyboard: This 49-note keyboard is activated, these 360º knobs to send MIDI CC or Increment/Decrement messages to "zero." 3. Pressing a new combination of keys on the keyboard only. Press both buttons simultaneously to reset the octave shift...
Quick Start Guide
Page 6
... Loop or Repeat feature in the display. 19. Transport Control Buttons: These three buttons are using the VX49 Preset named after your software. Also, make sure that you hit them. 13. While Time Division is for use with Avid® Pro Tools® Express only. Important: This feature does not work when the VX49 is for use this button to change parameter values, settings, etc. Data Dial: Use this full-color display to External...
... Loop or Repeat feature in the display. 19. Transport Control Buttons: These three buttons are using the VX49 Preset named after your software. Also, make sure that you hit them. 13. While Time Division is for use with Avid® Pro Tools® Express only. Important: This feature does not work when the VX49 is for use this button to change parameter values, settings, etc. Data Dial: Use this full-color display to External...
Quick Start Guide
Page 7
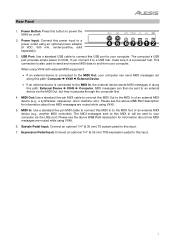
... expression pedal to this MIDI In to connect this input. 7 Rear Panel 1. USB Port: Use a standard USB cable to connect this MIDI Out to your computer. This connection is a powered hub. Please see the above USB Port description for information about how MIDI messages are routed while using VX49. 5. MIDI Out: Use a standard five-pin MIDI cable to connect this USB port to the MIDI In of an external MIDI device (e.g., another MIDI controller). MIDI messages can send MIDI messages...
... expression pedal to this MIDI In to connect this input. 7 Rear Panel 1. USB Port: Use a standard USB cable to connect this MIDI Out to your computer. This connection is a powered hub. Please see the above USB Port description for information about how MIDI messages are routed while using VX49. 5. MIDI Out: Use a standard five-pin MIDI cable to connect this USB port to the MIDI In of an external MIDI device (e.g., another MIDI controller). MIDI messages can send MIDI messages...
Quick Start Guide
Page 8
... use Control Edit Mode to assign some knobs to control VIP (see the Modes section for more information. VIP is routed to your computer's sound card instead of to your patches (presets) for VX49 to learn more information). This lets you get the most control and function out of VST parameters. We also recommend downloading the full User Guide to download the User Guide. This works...
... use Control Edit Mode to assign some knobs to control VIP (see the Modes section for more information. VIP is routed to your computer's sound card instead of to your patches (presets) for VX49 to learn more information). This lets you get the most control and function out of VST parameters. We also recommend downloading the full User Guide to download the User Guide. This works...
Quick Start Guide
Page 9
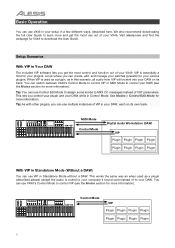
MIDI Mode Digital Audio Workstation (DAW) With External MIDI Equipment (Without a Computer) You can connect an external MIDI device (synth, drum machine, etc.) to VX49's MIDI Out, letting you use VX49 to control it, whether or not you aren't connected to a computer, though, remember to power VX49 externally (see Features > Rear Panel > Power Input). If you 're connected to move between the available pages in the display. Press and hold Shift and then press one...
MIDI Mode Digital Audio Workstation (DAW) With External MIDI Equipment (Without a Computer) You can connect an external MIDI device (synth, drum machine, etc.) to VX49's MIDI Out, letting you use VX49 to control it, whether or not you aren't connected to a computer, though, remember to power VX49 externally (see Features > Rear Panel > Power Input). If you 're connected to move between the available pages in the display. Press and hold Shift and then press one...
Quick Start Guide
Page 10
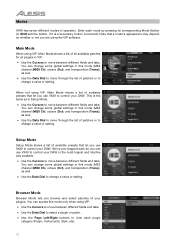
Setup Mode Setup Mode shows a list of your DAW. You can use VX49 to control your DAW in this mode (MIDI channel (MIDI Ch), octave (Oct), and transposition (Trans)), as well. • Use the Data Dial to move between different fields and tabs. Browser Mode Browser Mode lets you use VX49 to move between different fields and tabs. Note that let you browse and select patches of available presets that let...
Setup Mode Setup Mode shows a list of your DAW. You can use VX49 to control your DAW in this mode (MIDI channel (MIDI Ch), octave (Oct), and transposition (Trans)), as well. • Use the Data Dial to move between different fields and tabs. Browser Mode Browser Mode lets you use VX49 to move between different fields and tabs. Note that let you browse and select patches of available presets that let...

Quick Start Guide
Page 11
... that control type. • Use the Cursors to select the parameter you want to edit. • Use the Data Dial to their default settings once you power off your VX49. Control Edit Mode Control Edit Mode lets you edit the parameters of your DAW. • Press the Control Mode Button to view each set of controls (encoders, switches, and pads). • Use the Page Left/Right buttons to view each bank of VX49's controls in...
... that control type. • Use the Cursors to select the parameter you want to edit. • Use the Data Dial to their default settings once you power off your VX49. Control Edit Mode Control Edit Mode lets you edit the parameters of your DAW. • Press the Control Mode Button to view each set of controls (encoders, switches, and pads). • Use the Page Left/Right buttons to view each bank of VX49's controls in...
Quick Start Guide
Page 12
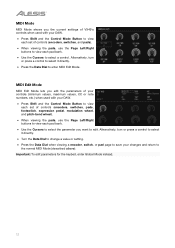
... set of VX49's controls when used with your changes and return to the normal MIDI Mode (described above). MIDI Mode MIDI Mode shows you want to edit. Alternatively, turn or press a control to select it directly. • Turn the Data Dial to change a value or setting. • Press the Data Dial when viewing a encoder, switch, or pad page to save your DAW. • Press Shift and the Control Mode Button to view each pad bank. • Use...
... set of VX49's controls when used with your changes and return to the normal MIDI Mode (described above). MIDI Mode MIDI Mode shows you want to edit. Alternatively, turn or press a control to select it directly. • Turn the Data Dial to change a value or setting. • Press the Data Dial when viewing a encoder, switch, or pad page to save your DAW. • Press Shift and the Control Mode Button to view each pad bank. • Use...

Quick Start Guide
Page 13
.... Repeat Steps 2-4 to add more plugins). o Use the Page Left/Right buttons to enter Browser Mode. 2. Press Browser to move between each slot when using a multi, you edit the various settings of each view of 4 slots. • Use the Cursors to select a slot. • Press a switch to solo a slot. • Press a pad to mute a slot. • Turn an encoder to adjust the volume of...
.... Repeat Steps 2-4 to add more plugins). o Use the Page Left/Right buttons to enter Browser Mode. 2. Press Browser to move between each slot when using a multi, you edit the various settings of each view of 4 slots. • Use the Cursors to select a slot. • Press a switch to solo a slot. • Press a pad to mute a slot. • Turn an encoder to adjust the volume of...

Quick Start Guide
Page 62
... 23 function switches, blue-backlit 4 directional cursor buttons 3.75" x 2.125" (95.3 mm x 54 mm) full-color LCD 1 1/4" (6.35 mm) TRS expression pedal input 1 1/4" (6.35 mm) TS sustain pedal input 1 5-pin MIDI input 1 5-pin MIDI output 1 USB port 1 power adapter input via USB or via 9 VDC, 500 mA, center-positive (power adapter sold separately) 37.6" x 12.4" x 5.5" 95.5 cm x 31.5 cm x 11.5 cm 9.5 lbs. 4.3 kg Specifications are trademarks of their respective owners. 62...
... 23 function switches, blue-backlit 4 directional cursor buttons 3.75" x 2.125" (95.3 mm x 54 mm) full-color LCD 1 1/4" (6.35 mm) TRS expression pedal input 1 1/4" (6.35 mm) TS sustain pedal input 1 5-pin MIDI input 1 5-pin MIDI output 1 USB port 1 power adapter input via USB or via 9 VDC, 500 mA, center-positive (power adapter sold separately) 37.6" x 12.4" x 5.5" 95.5 cm x 31.5 cm x 11.5 cm 9.5 lbs. 4.3 kg Specifications are trademarks of their respective owners. 62...


