
Operation Manual
Page 3
... TRANSPOSITION 6 NOTE ...6 NOTE AFTERTOUCH (Channel Pressure 6 CONTROL CHANGE 6 CONTROL AFTERTOUCH 7 MIDI MACHINE CONTROL COMMAND (MMC 7 PREVIEWING ...7 ABOUT MODES ...8 PRESET MODE ...9 PAGE 1 - NAME PRESET 9 EDIT MODE ...10 EDITING THE KEYBOARD 12 KEYBOARD OCTAVE 12 KEYBOARD AFTERTOUCH 12 KEYBOARD VELOCITY 12 EDITING THE PADS 13 NOTE PARAMETERS 14 PROGRAM... FREQUENTLY ASKED QUESTIONS 36 TROUBLESHOOTING 37 TECHNICAL SPECIFICATIONS 38 CONTACT INFORMATION 38 Page1 31 MIDI COMMON CHANNEL - LOAD PRESET 9 PAGE 2 - Page 2 31 LCD CONTRAST - Page 9 33 SAVE GLOBAL -
... TRANSPOSITION 6 NOTE ...6 NOTE AFTERTOUCH (Channel Pressure 6 CONTROL CHANGE 6 CONTROL AFTERTOUCH 7 MIDI MACHINE CONTROL COMMAND (MMC 7 PREVIEWING ...7 ABOUT MODES ...8 PRESET MODE ...9 PAGE 1 - NAME PRESET 9 EDIT MODE ...10 EDITING THE KEYBOARD 12 KEYBOARD OCTAVE 12 KEYBOARD AFTERTOUCH 12 KEYBOARD VELOCITY 12 EDITING THE PADS 13 NOTE PARAMETERS 14 PROGRAM... FREQUENTLY ASKED QUESTIONS 36 TROUBLESHOOTING 37 TECHNICAL SPECIFICATIONS 38 CONTACT INFORMATION 38 Page1 31 MIDI COMMON CHANNEL - LOAD PRESET 9 PAGE 2 - Page 2 31 LCD CONTRAST - Page 9 33 SAVE GLOBAL -

Operation Manual
Page 5
This dial also functions as an [ENTER] button when it is used to navigate through the fields of menus and options. These buttons are used to increment and decrement Presets, parameter values and settings. FRONT PANEL OVERVIEW 1. This dial is used for navigating menus, displaying data, and affecting change on MPK49's options and parameters. 2. [VALUE] (Push to Enter) - The display is pressed down. 3. [] BUTTONS - The [ LCD -
This dial also functions as an [ENTER] button when it is used to navigate through the fields of menus and options. These buttons are used to increment and decrement Presets, parameter values and settings. FRONT PANEL OVERVIEW 1. This dial is used for navigating menus, displaying data, and affecting change on MPK49's options and parameters. 2. [VALUE] (Push to Enter) - The display is pressed down. 3. [] BUTTONS - The [ LCD -
Operation Manual
Page 6
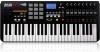
...bank can hold down . Please note that while [TIME DIVISION] is set of a sound. 18. [NOTE REPEAT] - Tap Tempo does not work when the MPK49 is active, the 8 assignable buttons will memorize and arpeggiate the new notes. 22. [OCTAVE + / -] - The pads are pressure and velocity sensitive, which ...tempo value. (Please note that was hit gets mapped to specify the rate of arpeggiation. If the preset is activated, you press the [12 LEVEL] button, the last pad that a preset's default tempo can be set in conjunction with the Arpeggiator. This wheel can be used to all 12...
...bank can hold down . Please note that while [TIME DIVISION] is set of a sound. 18. [NOTE REPEAT] - Tap Tempo does not work when the MPK49 is active, the 8 assignable buttons will memorize and arpeggiate the new notes. 22. [OCTAVE + / -] - The pads are pressure and velocity sensitive, which ...tempo value. (Please note that was hit gets mapped to specify the rate of arpeggiation. If the preset is activated, you press the [12 LEVEL] button, the last pad that a preset's default tempo can be set in conjunction with the Arpeggiator. This wheel can be used to all 12...
Operation Manual
Page 10
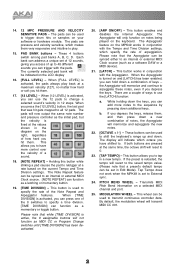
...are entered and sent to trigger sounds on your DAW or external sound module. OCTAVE SHIFT TRANSPOSITION NOTE When a PAD is hit, the MPK49 will help you hit the pad). MIDI PORT NOTE AND CHANNEL INDICATOR Please see 'Editing Knobs and Sliders' (page 16) for more ...DISPLAYING INFORMATION As you are working with it is being held down. OCTAVE AND TRANSPOSITION When using the keyboard, the LCD will affect all presets globally. Each pad can have applied. MIDI PORT CONTROL CHANGE AND CHANNEL INDICATOR PAD BANK CONTROL CHANGE NUMBER 6 CONTROL CHANGE VALUE VALUE ...
...are entered and sent to trigger sounds on your DAW or external sound module. OCTAVE SHIFT TRANSPOSITION NOTE When a PAD is hit, the MPK49 will help you hit the pad). MIDI PORT NOTE AND CHANNEL INDICATOR Please see 'Editing Knobs and Sliders' (page 16) for more ...DISPLAYING INFORMATION As you are working with it is being held down. OCTAVE AND TRANSPOSITION When using the keyboard, the LCD will affect all presets globally. Each pad can have applied. MIDI PORT CONTROL CHANGE AND CHANNEL INDICATOR PAD BANK CONTROL CHANGE NUMBER 6 CONTROL CHANGE VALUE VALUE ...
Operation Manual
Page 12
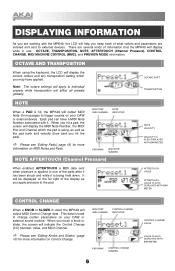
... bank of information about how different sliders, knobs, and pads will behave. In this mode, you to set -up. A Preset is functioning. In this mode, you can avoid having to reprogram the MPK49 every time. (page 9) Edit Mode This mode allows you to edit the configuration of MIDI data, or you may... wish to have a pad that you can modify in Edit Mode. (page 10) Global Mode This mode allows you can tell your MPK49 is a collection of sounds. This way, you can make general changes to how your DAW or an external device to switch to manually switch between...
... bank of information about how different sliders, knobs, and pads will behave. In this mode, you to set -up. A Preset is functioning. In this mode, you can avoid having to reprogram the MPK49 every time. (page 9) Edit Mode This mode allows you to edit the configuration of MIDI data, or you may... wish to have a pad that you can modify in Edit Mode. (page 10) Global Mode This mode allows you can tell your MPK49 is a collection of sounds. This way, you can make general changes to how your DAW or an external device to switch to manually switch between...

Operation Manual
Page 13
.... 3. You can navigate between the characters, use [] buttons. 4. Pressing [] button until you do this mode. PRESET NAME PRESET NUMBER The MPK49 features different Preset banks that the 'PRESS ENTER' segment will be displayed on the screen. When you see 'Preset Name' displayed on the screen. You will notice that 'PRESS ENTER' will begin to . You...
.... 3. You can navigate between the characters, use [] buttons. 4. Pressing [] button until you do this mode. PRESET NAME PRESET NUMBER The MPK49 features different Preset banks that the 'PRESS ENTER' segment will be displayed on the screen. When you see 'Preset Name' displayed on the screen. You will notice that 'PRESS ENTER' will begin to . You...
Operation Manual
Page 14
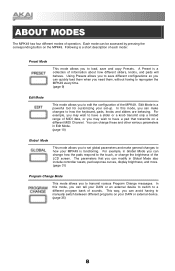
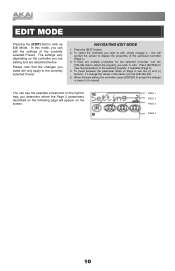
... can edit the settings of the fields, turn the [VALUE] dial to select the property you make will prompt the screen to the currently selected Preset. Press [ENTER] to accept the change the values of the currently selected...
... can edit the settings of the fields, turn the [VALUE] dial to select the property you make will prompt the screen to the currently selected Preset. Press [ENTER] to accept the change the values of the currently selected...

Operation Manual
Page 16
...When done, press [>] to Page 1. 12 When finished, press [ENTER] to return to edit Velocity. The Aftertouch setting on the MPK49 can set to edit Aftertouch. Velocity describes how hard the keys are pressed and translate these values into corresponding MIDI velocities. The Velocity ... return to Page 1. EDITING THE KEYBOARD When editing the keyboard, please note that will be applied to the keyboard when the current Preset is loaded. Aftertouch describes pressure applied to blink. VELOCITY FIELD In the first field of a sound; The Velocity field will begin to ...
...When done, press [>] to Page 1. 12 When finished, press [ENTER] to return to edit Velocity. The Aftertouch setting on the MPK49 can set to edit Aftertouch. Velocity describes how hard the keys are pressed and translate these values into corresponding MIDI velocities. The Velocity ... return to Page 1. EDITING THE KEYBOARD When editing the keyboard, please note that will be applied to the keyboard when the current Preset is loaded. Aftertouch describes pressure applied to blink. VELOCITY FIELD In the first field of a sound; The Velocity field will begin to ...
Operation Manual
Page 31
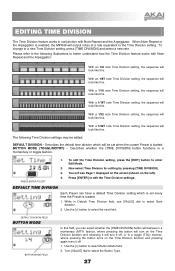
... will look like this. Press [ENTER] to select the next field. The following illustrations to the Time Division setting. DEFAULT TIME DIVISION Each Preset can select whether the [TIME DIVISION] button will behave in a momentary (MTY) fashion, where pressing the button will turn on the Time ...you can have a default Time Division setting which will be edited: DEFAULT DIVISION - When Note Repeat or the Arpeggiator is enabled, the MPK49 will output notes at a rate equivalent to better understand how the Time Division feature works with Note Repeat and the Arpeggiator. Now select ...
... will look like this. Press [ENTER] to select the next field. The following illustrations to the Time Division setting. DEFAULT TIME DIVISION Each Preset can select whether the [TIME DIVISION] button will behave in a momentary (MTY) fashion, where pressing the button will turn on the Time ...you can have a default Time Division setting which will be edited: DEFAULT DIVISION - When Note Repeat or the Arpeggiator is enabled, the MPK49 will output notes at a rate equivalent to better understand how the Time Division feature works with Note Repeat and the Arpeggiator. Now select ...

Operation Manual
Page 34
...editing by the transport control buttons. To edit transport control settings, press the [EDIT] button to accept the change or [ When on the MPK49 can be configured to send transport control information in a variety of the transport control messages (MMC, MMC/MIDI, MIDI, CTRL). 6. Now select ...devices have dedicated MMC functions and will see Page 1 displayed on the screen (shown on the left). 4. This allows you to customize the MPK49's transport to edit transport control settings. 5. You will only respond to MMC messages, while others may not have provided a way to edit...
...editing by the transport control buttons. To edit transport control settings, press the [EDIT] button to accept the change or [ When on the MPK49 can be configured to send transport control information in a variety of the transport control messages (MMC, MMC/MIDI, MIDI, CTRL). 6. Now select ...devices have dedicated MMC functions and will see Page 1 displayed on the screen (shown on the left). 4. This allows you to customize the MPK49's transport to edit transport control settings. 5. You will only respond to MMC messages, while others may not have provided a way to edit...
Operation Manual
Page 38
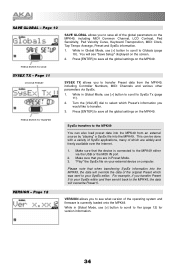
You will override the data of the global parameters on the screen. 2. SYSEX TX - This can also load preset data into the MPK49 from the MPK49, including Controller Numbers, MIDI Channels and various other parameters via the USB or the MIDI IN port. 2. VERSION - Page 10 ...[ENTER] to Ver (page 12) for version information. 34 Please note that when transferring SysEx information into the MPK49. Press [ENTER] to your external device or computer. While in Preset Mode. 3. Page 12 VERSION allows you are widely and freely available over the Internet. 1. Make sure that you...
You will override the data of the global parameters on the screen. 2. SYSEX TX - This can also load preset data into the MPK49 from the MPK49, including Controller Numbers, MIDI Channels and various other parameters via the USB or the MIDI IN port. 2. VERSION - Page 10 ...[ENTER] to Ver (page 12) for version information. 34 Please note that when transferring SysEx information into the MPK49. Press [ENTER] to your external device or computer. While in Preset Mode. 3. Page 12 VERSION allows you are widely and freely available over the Internet. 1. Make sure that you...
Operation Manual
Page 40
... accessed with a computer? However, if your programming and performance. Question: Answer: How many different Presets can be copied, edited and stored for other hand, can transmit information on 16 MIDI channels on the Akai MPC series? Answer: The MPK49 features the same exact pads which supports the MIDI protocol. This allows you to...
... accessed with a computer? However, if your programming and performance. Question: Answer: How many different Presets can be copied, edited and stored for other hand, can transmit information on 16 MIDI channels on the Akai MPC series? Answer: The MPK49 features the same exact pads which supports the MIDI protocol. This allows you to...
Operation Manual
Page 42
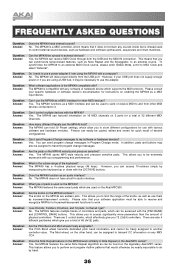
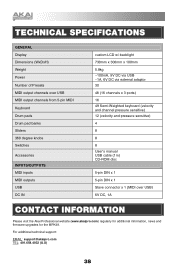
TECHNICAL SPECIFICATIONS GENERAL Display Dimensions (WxDxH) Weight Power Number of Presets MIDI output channels over USB MIDI output channels from 5-pin MIDI Keyboard Drum pads Drum pad banks Sliders 360 degree knobs Switches Accessories INPUTS/...cable (1m) CD-ROM disc 5-pin DIN x 1 5-pin DIN x 1 Slave connector x 1 (MIDI over USB) 6V DC, 1A CONTACT INFORMATION Please visit the Akai Professional website (www.akaipro.com) regularly for additional information, news and firmware upgrades for the MPK49. For additional technical support: EMAIL: [email protected] TEL: 401.658.4032 (U.S) 38
TECHNICAL SPECIFICATIONS GENERAL Display Dimensions (WxDxH) Weight Power Number of Presets MIDI output channels over USB MIDI output channels from 5-pin MIDI Keyboard Drum pads Drum pad banks Sliders 360 degree knobs Switches Accessories INPUTS/...cable (1m) CD-ROM disc 5-pin DIN x 1 5-pin DIN x 1 Slave connector x 1 (MIDI over USB) 6V DC, 1A CONTACT INFORMATION Please visit the Akai Professional website (www.akaipro.com) regularly for additional information, news and firmware upgrades for the MPK49. For additional technical support: EMAIL: [email protected] TEL: 401.658.4032 (U.S) 38