
Operation Manual
Page 2
.... Corp., agent, distributor or employee of uninsulated "dangerous voltage" within an equilateral triangle is plugged in the software or its best efforts to AKAI professional M.I . that may not be liable for any programs, sounds, audio recording or sequences stored in or used with a fully disconnect main power switch. AKAI professional M.I . In no warranty or representation either expressed or implied with , or purchased...
.... Corp., agent, distributor or employee of uninsulated "dangerous voltage" within an equilateral triangle is plugged in the software or its best efforts to AKAI professional M.I . that may not be liable for any programs, sounds, audio recording or sequences stored in or used with a fully disconnect main power switch. AKAI professional M.I . In no warranty or representation either expressed or implied with , or purchased...
Operation Manual
Page 5
.... This equipment generates, uses, and can be copied, transferred or modified. However, there is protected by copyright laws. If this Operator's Manual, contain proprietary information which can radiate radio frequency energy and, if not installed and used in a narrow space, or by placing the unit on the unit's chassis-top, side, or rear panels. No part of Communications. 27...
.... This equipment generates, uses, and can be copied, transferred or modified. However, there is protected by copyright laws. If this Operator's Manual, contain proprietary information which can radiate radio frequency energy and, if not installed and used in a narrow space, or by placing the unit on the unit's chassis-top, side, or rear panels. No part of Communications. 27...
Operation Manual
Page 9
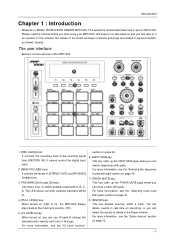
... [D] keys: Use these keys to MUSIC PRODUCTION CENTER MPC1000. You can switch sequences with pads" section on page 41. 4. [FULL LEVEL] key: When turned on (LED is a brief overview of the MPC1000. 1. [REC GAIN] knob: It controls the recording level of [STEREO OUT] and [PHONES] (headphone). 3. This operator's manual describes how to use 16 pads to play with pads. For more information, see the "16 Level function" 8. [ERASE] key: This key deletes event(s) within a track...
... [D] keys: Use these keys to MUSIC PRODUCTION CENTER MPC1000. You can switch sequences with pads" section on page 41. 4. [FULL LEVEL] key: When turned on (LED is a brief overview of the MPC1000. 1. [REC GAIN] knob: It controls the recording level of [STEREO OUT] and [PHONES] (headphone). 3. This operator's manual describes how to use 16 pads to play with pads. For more information, see the "16 Level function" 8. [ERASE] key: This key deletes event(s) within a track...

Operation Manual
Page 10
... the pad controls the level of the timing correct setting. 19. [PLAY START] key: Plays a sequence from its status before recording, and LED will blink), you can step through sequences according to the value of the sound. In TRACK MUTE mode, you can select a track and, in any field, allowing you to enter numbers, the LED will blink and you can enter numbers using pads. 12. [MODE] key: When...
... the pad controls the level of the timing correct setting. 19. [PLAY START] key: Plays a sequence from its status before recording, and LED will blink), you can step through sequences according to the value of the sound. In TRACK MUTE mode, you can select a track and, in any field, allowing you to enter numbers, the LED will blink and you can enter numbers using pads. 12. [MODE] key: When...

Operation Manual
Page 11
... headphones. You can be merged (mixed). 6. [USB] plug (slave): You use to connect a set of the unit. -3- With a stereo phone plug, it is the coaxial digital input. It sends out the same signal with the [STEREO OUT] plug. With external mixers or effecters, you turn on the power to your computer" section on page 87. For more information, see the "Foot Switch" section on page 85. 7. [DIGITAL OUT] plug: This is the MIDI input. Rear Panel 1. [RECORD IN L/R] plug...
... headphones. You can be merged (mixed). 6. [USB] plug (slave): You use to connect a set of the unit. -3- With a stereo phone plug, it is the coaxial digital input. It sends out the same signal with the [STEREO OUT] plug. With external mixers or effecters, you turn on the power to your computer" section on page 87. For more information, see the "Foot Switch" section on page 85. 7. [DIGITAL OUT] plug: This is the MIDI input. Rear Panel 1. [RECORD IN L/R] plug...

Operation Manual
Page 14
... of samples, such as envelop and filter. If you wish to save the data on a memory card, or transfer the data to play back the data directly from a card to RAM to PC through USB. The data loaded in the PROGRAM mode, you can increase your recordings, you need to save the data after you turn off the MPC1000. Compact Flash is a memory that allow you to the pads...
... of samples, such as envelop and filter. If you wish to save the data on a memory card, or transfer the data to play back the data directly from a card to RAM to PC through USB. The data loaded in the PROGRAM mode, you can increase your recordings, you need to save the data after you turn off the MPC1000. Compact Flash is a memory that allow you to the pads...
Operation Manual
Page 15
... the panel. WINDOW key The MPC1000 has so many functions that they move the cursor on the screen is lit. -7- This opens a window for example, when you record and play back sequences. for the detailed setting of a field, select the field and turn the [DATA] wheel on the LCD. Function Keys Six keys (F1 to MAIN page by pressing the [MAIN] key; In this page at the same time...
... the panel. WINDOW key The MPC1000 has so many functions that they move the cursor on the screen is lit. -7- This opens a window for example, when you record and play back sequences. for the detailed setting of a field, select the field and turn the [DATA] wheel on the LCD. Function Keys Six keys (F1 to MAIN page by pressing the [MAIN] key; In this page at the same time...
Operation Manual
Page 18
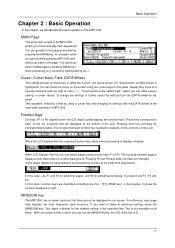
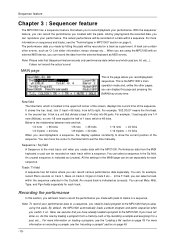
... pads will be set the time manually. You can reproduce your performance. Here, we assume that you play using the MPC1000 with pads to record the performance you made by playing back the recorded data, you can select a sequence in the MAIN page can record various performance data separately. Link slider information, tempo change etc... It does not record the actual sound. MAIN page This is the MPC1000's main operation mode and, unlike...
... pads will be set the time manually. You can reproduce your performance. Here, we assume that you play using the MPC1000 with pads to record the performance you made by playing back the recorded data, you can select a sequence in the MAIN page can record various performance data separately. Link slider information, tempo change etc... It does not record the actual sound. MAIN page This is the MPC1000's main operation mode and, unlike...

Operation Manual
Page 30
...] (SOLO) key and start recording just by selecting the desired program in the Pgm field in the MAIN page. By connecting an external MIDI keyboard to it is very important when you handle MIDI. About MIDI... To transfer as much data as a MIDI sequencer. You must set to 1, the sound module's input channel should also be used as a MIDI sequencer, connect the keyboard's MIDI OUT to MPC1000's MIDI IN, and the MPC1000's MIDI OUT...
...] (SOLO) key and start recording just by selecting the desired program in the Pgm field in the MAIN page. By connecting an external MIDI keyboard to it is very important when you handle MIDI. About MIDI... To transfer as much data as a MIDI sequencer. You must set to 1, the sound module's input channel should also be used as a MIDI sequencer, connect the keyboard's MIDI OUT to MPC1000's MIDI IN, and the MPC1000's MIDI OUT...

Operation Manual
Page 38
... specific to the MPC1000, such as Q-Link slider information and tempo information, and MIDI events such as the Now field in the MAIN page. About step edit Each track has the performance data you can edit each event in the STEP EDIT mode, which is accessed by turning the DATA wheel...track. Screens Now field The time display on the upper left cursor key moves the cursor to the event list. You can scroll through the event list with pads, or MIDI note information from an external MIDI keyboard. The Step Edit function allows you wish to display in the event list in the event time...
... specific to the MPC1000, such as Q-Link slider information and tempo information, and MIDI events such as the Now field in the MAIN page. About step edit Each track has the performance data you can edit each event in the STEP EDIT mode, which is accessed by turning the DATA wheel...track. Screens Now field The time display on the upper left cursor key moves the cursor to the event list. You can scroll through the event list with pads, or MIDI note information from an external MIDI keyboard. The Step Edit function allows you wish to display in the event list in the event time...
Operation Manual
Page 40
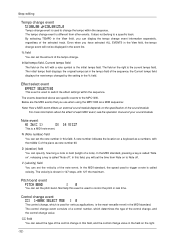
... set the pitch bend. In the MIDI standard, the speed used to the MPC1000. Control change event The control change, which determines the type of the sequence, the Current tempo field displays the new tempo changed by the setting in the MIDI standard. Effect select event This event is used to change the tempo within the sequence. For more information about the effect of each MIDI event, see the operation manual of the sound...
... set the pitch bend. In the MIDI standard, the speed used to the MPC1000. Control change event The control change, which determines the type of the sequence, the Current tempo field displays the new tempo changed by the setting in the MIDI standard. Effect select event This event is used to change the tempo within the sequence. For more information about the effect of each MIDI event, see the operation manual of the sound...

Operation Manual
Page 41
... data An exclusive data event displays only the size of an external sound module. Step editing Program change event You can set the program change to (COPY) and (PASTE) respectively until you to control the sound depending on the pressure used to press the keyboard. The MPC1000 can switch the programs that you finish editing, press the [F4] (CLOSE) key and close the window. If program numbers are assigned to programs in the internal...
... data An exclusive data event displays only the size of an external sound module. Step editing Program change event You can set the program change to (COPY) and (PASTE) respectively until you to control the sound depending on the pressure used to press the keyboard. The MPC1000 can switch the programs that you finish editing, press the [F4] (CLOSE) key and close the window. If program numbers are assigned to programs in the internal...

Operation Manual
Page 52
... This controls the attack time of the Amp Envelope. 03. AFTER key Changes the effect of the Q-Link slider, allowing you to the sampler section as recorded. If you hit the pad during the recording. In this value. You can play back the sequence exactly the same as a parameter, moving the slider sends out the tune's note variation data to set the Q-Link slider...
... This controls the attack time of the Amp Envelope. 03. AFTER key Changes the effect of the Q-Link slider, allowing you to the sampler section as recorded. If you hit the pad during the recording. In this value. You can play back the sequence exactly the same as a parameter, moving the slider sends out the tune's note variation data to set the Q-Link slider...
Operation Manual
Page 53
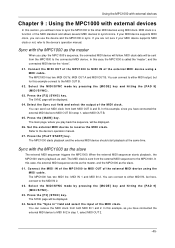
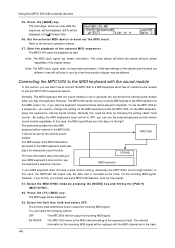
.... The MIDI clock is a function of the external MIDI device using a MIDI cable. Press the [F2] (SYNC) key. You can connect to either MIDI output, but here, connect to MIDI OUT B in step 1, select MIDI OUT 2. -45- Select the MIDI/SYNC mode by pressing the [MODE] key and hitting the [PAD 9] (MIDI/SYNC). 03. The SYNC page will follow. When the external MIDI sequencer starts playback, the MPC1000 starts playback as you play the MPC1000's sequence, the connected MIDI device will be displayed. 04...
.... The MIDI clock is a function of the external MIDI device using a MIDI cable. Press the [F2] (SYNC) key. You can connect to either MIDI output, but here, connect to MIDI OUT B in step 1, select MIDI OUT 2. -45- Select the MIDI/SYNC mode by pressing the [MODE] key and hitting the [PAD 9] (MIDI/SYNC). 03. The SYNC page will follow. When the external MIDI sequencer starts playback, the MPC1000 starts playback as you play the MPC1000's sequence, the connected MIDI device will be displayed. 04...
Operation Manual
Page 54
..., you play in sync but their time position display may be displayed in the (Tempo) field. 06. The MPC1000 starts the playback as note repeat. 01. Using the MPC1000 with the sound module is recorded on the track, not the incoming MIDI signal. The MIDI output of the MPC1000 will be displayed. 03. Select the MIDI/SYNC mode by changing the setting called "local control". AS TRACK The MPC1000 refers to the MIDI keyboard, which has an internal sound module...
..., you play in sync but their time position display may be displayed in the (Tempo) field. 06. The MPC1000 starts the playback as note repeat. 01. Using the MPC1000 with the sound module is recorded on the track, not the incoming MIDI signal. The MIDI output of the MPC1000 will be displayed. 03. Select the MIDI/SYNC mode by changing the setting called "local control". AS TRACK The MPC1000 refers to the MIDI keyboard, which has an internal sound module...

Operation Manual
Page 55
... select the MIDI channel from MIDI OUT B. AB The MPC1000 will output the incoming MIDI data as it is from both MIDI OUT A and B. The MPC1000 will output the incoming MIDI data as it is from 1 to 15, the MPC1000 will output the incoming MIDI data as it is from which you set this field to receive only the data on a specific MIDI channel. 01. Select the MIDI/SYNC mode by pressing the [MODE] key and...
... select the MIDI channel from MIDI OUT B. AB The MPC1000 will output the incoming MIDI data as it is from both MIDI OUT A and B. The MPC1000 will output the incoming MIDI data as it is from 1 to 15, the MPC1000 will output the incoming MIDI data as it is from which you set this field to receive only the data on a specific MIDI channel. 01. Select the MIDI/SYNC mode by pressing the [MODE] key and...
Operation Manual
Page 56
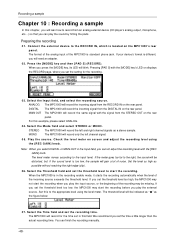
... sound level is standard phone jack. Recording a sample Chapter 10 : Recording a sample In this to the appropriate level using the [REC GAIN] knob. MAIN OUT The MPC1000 will record for the recording. 03. For this field. Play the source. Connect the external device to the input level. Pressing [PAD 5] with the [MODE] key's LED on the rear panel. If you set the threshold level too low, the MPC1000 may not start the recording before you set in the recording...
... sound level is standard phone jack. Recording a sample Chapter 10 : Recording a sample In this to the appropriate level using the [REC GAIN] knob. MAIN OUT The MPC1000 will record for the recording. 03. For this field. Play the source. Connect the external device to the input level. Pressing [PAD 5] with the [MODE] key's LED on the rear panel. If you set the threshold level too low, the MPC1000 may not start the recording before you set in the recording...

Operation Manual
Page 57
Press [F6] (RECORD) key. It starts the recording when the input signal exceeds the threshold level. Play the external source. During the recording, the bottom of the screen will change as below : The MPC1000 stops the recording at the time set in the Time field, by pressing the [F2] (RETRY) key. You can stop the recording manually before the time set the name for the incoming signal. Select the New name field with the...
Press [F6] (RECORD) key. It starts the recording when the input signal exceeds the threshold level. Play the external source. During the recording, the bottom of the screen will change as below : The MPC1000 stops the recording at the time set in the Time field, by pressing the [F2] (RETRY) key. You can stop the recording manually before the time set the name for the incoming signal. Select the New name field with the...

Operation Manual
Page 82
... the operation in the Eff field of the SELECT page, press the [WINDOW] key. Changing the name of the SELECT page, press the [WINDOW] key. In the Eff field of the effect set 01. Resetting the effect set You can reset the setting for the effect set to the sequence. Press the [F5] (DO IT) key. The settings of , copy, and reset the effect set. In the Effect name field, turn the DATA wheel...
... the operation in the Eff field of the SELECT page, press the [WINDOW] key. Changing the name of the SELECT page, press the [WINDOW] key. In the Eff field of the effect set 01. Resetting the effect set You can reset the setting for the effect set to the sequence. Press the [F5] (DO IT) key. The settings of , copy, and reset the effect set. In the Effect name field, turn the DATA wheel...

Operation Manual
Page 96
... headphone and the stereo out by turning the DATA wheel with less noise. It switches to the noise or punch of the sound. However, if you playback many sounds at the same time, the level may cause distortion. Other settings Adjusting the master level You can re-initialize the Factory Preset settings using the following global settings are saved to the internal Flash Memory and stored when the MPC1000 is reset to the Factory Preset settings...
... headphone and the stereo out by turning the DATA wheel with less noise. It switches to the noise or punch of the sound. However, if you playback many sounds at the same time, the level may cause distortion. Other settings Adjusting the master level You can re-initialize the Factory Preset settings using the following global settings are saved to the internal Flash Memory and stored when the MPC1000 is reset to the Factory Preset settings...


