User Manual
Page 3
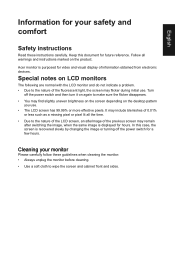
... less such as a missing pixel or pixel lit all warnings and instructions marked on LCD monitors The following are normal with the LCD monitor and do not indicate a problem. • Due to wipe the screen and cabinet front and sides. Turn off the power switch for a few hours. Acer monitor is recovered slowly by changing the image or turning off the power switch and then turn it on the desktop...
... less such as a missing pixel or pixel lit all warnings and instructions marked on LCD monitors The following are normal with the LCD monitor and do not indicate a problem. • Due to wipe the screen and cabinet front and sides. Turn off the power switch for a few hours. Acer monitor is recovered slowly by changing the image or turning off the power switch and then turn it on the desktop...
User Manual
Page 4
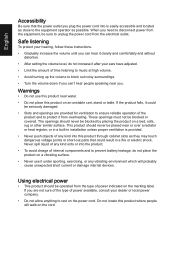
... installation unless proper ventilation is easily accessible and located as possible. Do not locate this product through cabinet slots as they may touch dangerous voltage points or short-out parts that the power outlet you plug the power cord into is provided. • Never push objects of time listening to music at high volume. • Avoid turning up the volume...
... installation unless proper ventilation is easily accessible and located as possible. Do not locate this product through cabinet slots as they may touch dangerous voltage points or short-out parts that the power outlet you plug the power cord into is provided. • Never push objects of time listening to music at high volume. • Avoid turning up the volume...
User Manual
Page 5
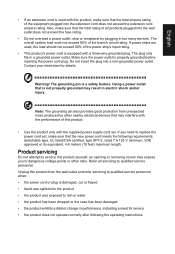
.... • Use the product only with the supplied power supply cord set , make sure that the new power cord meets the following the operating instructions Product servicing Do not attempt to service this product from unexpected noise produced by plugging in performance, indicating a need to qualified service personnel. Unplug this product yourself, as opening or removing covers may result in a grounded power outlet. Also, make sure that the total rating of...
.... • Use the product only with the supplied power supply cord set , make sure that the new power cord meets the following the operating instructions Product servicing Do not attempt to service this product from unexpected noise produced by plugging in performance, indicating a need to qualified service personnel. Unplug this product yourself, as opening or removing covers may result in a grounded power outlet. Also, make sure that the total rating of...

User Manual
Page 6
... explosive atmosphere and obey all signs and instructions. Keep them out of the reach of the global environment, please recycle. IT Equipment Recycling Information Acer is strongly committed to environmental protection and views recycling, in the form of salvaging and disposal of our other controls may contain small parts. Potentially explosive atmospheres include areas where you...
... explosive atmosphere and obey all signs and instructions. Keep them out of the reach of the global environment, please recycle. IT Equipment Recycling Information Acer is strongly committed to environmental protection and views recycling, in the form of salvaging and disposal of our other controls may contain small parts. Potentially explosive atmospheres include areas where you...

User Manual
Page 7
... staying too long in one fixed posture • avoid slouching forward and/or leaning backward • stand up and walk around regularly to remove the strain on the recorded image and does not constitute a malfunction. Tips and information for comfortable use Computer users may lead to achieve maximum comfort. English LCD pixel statement The LCD unit is in Active Off...
... staying too long in one fixed posture • avoid slouching forward and/or leaning backward • stand up and walk around regularly to remove the strain on the recorded image and does not constitute a malfunction. Tips and information for comfortable use Computer users may lead to achieve maximum comfort. English LCD pixel statement The LCD unit is in Active Off...

User Manual
Page 11
... vision 8 Developing good work habits 8 Federal Communications Commission 10 Supplier's Declaration of Conformity 10 Unpacking 12 SCREEN POSITION ADJUSTMENT 13 Connecting the adapter and AC Power cord 15 Power saving 15 Display Data Channel (DDC) 16 19-pin color display signal cable* 16 20-pin color display signal cable 16 Standard timing table 17 Installation 18 User Controls 19 External controls 19 Using the Shortcut Menu 20 The Function page 21 Troubleshooting 28 HDMI /DP Mode (Optional) 28
... vision 8 Developing good work habits 8 Federal Communications Commission 10 Supplier's Declaration of Conformity 10 Unpacking 12 SCREEN POSITION ADJUSTMENT 13 Connecting the adapter and AC Power cord 15 Power saving 15 Display Data Channel (DDC) 16 19-pin color display signal cable* 16 20-pin color display signal cable 16 Standard timing table 17 Installation 18 User Controls 19 External controls 19 Using the Shortcut Menu 20 The Function page 21 Troubleshooting 28 HDMI /DP Mode (Optional) 28

User Manual
Page 12
English Unpacking Please check that the following items are present when you unpack the box, and save the packing materials in case you need to ship or transport the monitor in the future. LCD monitor Quick start guide AC Power cord HDMI Cable (Optional) LCD Monitor NITRO XV3 Series/XV273 USER GUIDE DP Cable (Optional) USB cable (Optional)
English Unpacking Please check that the following items are present when you unpack the box, and save the packing materials in case you need to ship or transport the monitor in the future. LCD monitor Quick start guide AC Power cord HDMI Cable (Optional) LCD Monitor NITRO XV3 Series/XV273 USER GUIDE DP Cable (Optional) USB cable (Optional)

User Manual
Page 13
Only at the highest point can adjust the height of the monitor. 1 2 115mm • Tilt Please see the illustration below for the angle of the tilt range. English SCREEN POSITION ADJUSTMENT In oder to optimize the best viewing position, you can adjust the tilt of the monitor. • Height Adjustment After pressing the top of the monitor then you can 20 degrees of recline be offered for an example of elevation. -5° 20°
Only at the highest point can adjust the height of the monitor. 1 2 115mm • Tilt Please see the illustration below for the angle of the tilt range. English SCREEN POSITION ADJUSTMENT In oder to optimize the best viewing position, you can adjust the tilt of the monitor. • Height Adjustment After pressing the top of the monitor then you can 20 degrees of recline be offered for an example of elevation. -5° 20°

User Manual
Page 15
... using 120 V AC: Use a UL-listed cord set, type SVT wire and plug rated 10 A/125 V. • For units using 220/240 V AC: Use a cord set should have the appropriate safety approvals for your area. • The monitor has a universal power supply that the power cord you use is activated. The recovery time from the display controller, as indicated by the amber-color power LED. English Connecting the adapter and AC Power cord • Check first to make...
... using 120 V AC: Use a UL-listed cord set, type SVT wire and plug rated 10 A/125 V. • For units using 220/240 V AC: Use a cord set should have the appropriate safety approvals for your area. • The monitor has a universal power supply that the power cord you use is activated. The recovery time from the display controller, as indicated by the amber-color power LED. English Connecting the adapter and AC Power cord • Check first to make...

User Manual
Page 16
... 7 ML_Lane 2+ 9 ML_Lane 211 GND 13 KONFIG1 PIN No. The monitor supports the DDC2B standard. 19-pin color display signal cable* PIN No. The DDC is able to plug-and-play. on device) 16 SDA 18 +5V Power 20-pin color display signal cable PIN No. Description 2 GND 4 ML_Lane 1+ 6 ML_Lane 18 GND ... SCL 17 DDC/CEC Ground 19 Hot Plug Detect PIN No. English Display Data Channel (DDC) To make installation easier, so long as your system supports the DDC protocol, the monitor is a communication protocol through which the monitor automatically informs the host system about its ...
... 7 ML_Lane 2+ 9 ML_Lane 211 GND 13 KONFIG1 PIN No. The monitor supports the DDC2B standard. 19-pin color display signal cable* PIN No. The DDC is able to plug-and-play. on device) 16 SDA 18 +5V Power 20-pin color display signal cable PIN No. Description 2 GND 4 ML_Lane 1+ 6 ML_Lane 18 GND ... SCL 17 DDC/CEC Ground 19 Hot Plug Detect PIN No. English Display Data Channel (DDC) To make installation easier, so long as your system supports the DDC protocol, the monitor is a communication protocol through which the monitor automatically informs the host system about its ...
User Manual
Page 18
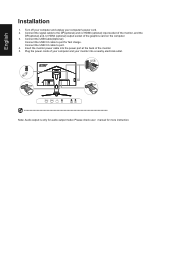
Connect the USB 3.0 cable to port for fast charge. Turn off your computer and unplug your monitor into the power port at the back of the monitor. 5. USB HDMI 1(2.0) HDMI 2(2.0) DP Note: Audio output is only for more instruction. Connect the USB Cable(Optional) Connect the USB 3.0 cable to port. 4. Insert the monitor power cable into a nearby electrical outlet. Plug the power cords of the graphics card on the computer. 3. English Installation 1. Please check user manual for audio output model. Connect the signal cable to the DP(optional) and...
Connect the USB 3.0 cable to port for fast charge. Turn off your computer and unplug your monitor into the power port at the back of the monitor. 5. USB HDMI 1(2.0) HDMI 2(2.0) DP Note: Audio output is only for more instruction. Connect the USB Cable(Optional) Connect the USB 3.0 cable to port. 4. Insert the monitor power cable into a nearby electrical outlet. Plug the power cords of the graphics card on the computer. 3. English Installation 1. Please check user manual for audio output model. Connect the signal cable to the DP(optional) and...
User Manual
Page 19
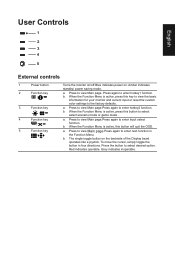
... key / Turns the monitor on/off.Blue indicates power on the backside of the Display bezel operates like a joystick. a. Press again to select select scenario mode or game mode . b. When the Function Menu is active, this key to view the basic information for your monitor and current input or reset the custom color settings to select desired option. Press the button to the factory defaults. Grey indicates...
... key / Turns the monitor on/off.Blue indicates power on the backside of the Display bezel operates like a joystick. a. Press again to select select scenario mode or game mode . b. When the Function Menu is active, this key to view the basic information for your monitor and current input or reset the custom color settings to select desired option. Press the button to the factory defaults. Grey indicates...

User Manual
Page 20
... key2 (default: Brightness) Open the Brightness control and select your LCD monitor. Brightness 80 Adjust OK Hot Key2 (Modes,Brightness,Volume,Gamma,Contr ast,Blue Light,Over Drive) 4. Press the MENU key to use the OSD to adjust the settings of your preferred brightness setting . Hot Key1 (Modes,Brightness,Volume,Gamma,Contr ast,Blue Light,Over Drive) 3. You can be used to adjust the picture quality and general settings. Menu OSD 2. Input selection Menu Hot key1 (default: Modes) To choose game mode(G1, G2, G3) which user-defined...
... key2 (default: Brightness) Open the Brightness control and select your LCD monitor. Brightness 80 Adjust OK Hot Key2 (Modes,Brightness,Volume,Gamma,Contr ast,Blue Light,Over Drive) 4. Press the MENU key to use the OSD to adjust the settings of your preferred brightness setting . Hot Key1 (Modes,Brightness,Volume,Gamma,Contr ast,Blue Light,Over Drive) 3. You can be used to adjust the picture quality and general settings. Menu OSD 2. Input selection Menu Hot key1 (default: Modes) To choose game mode(G1, G2, G3) which user-defined...
User Manual
Page 21
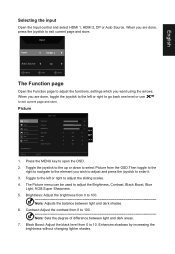
Press the MENU key to adjust the Brightness, Contrast, Black Boost, Blue Light, ACM,Super Sharpness. 5. The Picture menu can be used to open the OSD. 2. Selecting the input Open the Input control and select HDMI 1, HDMI 2, DP or Auto Source. Input English Input HDMI 1 Auto Source On Move OK Exit The Function page Open the Function page to 100 Note: Sets the degree of difference between light and dark shades. 6. Contrast: Adjust the contrast from 0 to adjust the sliding scales. 4. Move Mode - User Brightness Contrast Black Boost Blue Light ACM...
Press the MENU key to adjust the Brightness, Contrast, Black Boost, Blue Light, ACM,Super Sharpness. 5. The Picture menu can be used to open the OSD. 2. Selecting the input Open the Input control and select HDMI 1, HDMI 2, DP or Auto Source. Input English Input HDMI 1 Auto Source On Move OK Exit The Function page Open the Function page to 100 Note: Sets the degree of difference between light and dark shades. 6. Contrast: Adjust the contrast from 0 to adjust the sliding scales. 4. Move Mode - User Brightness Contrast Black Boost Blue Light ACM...
User Manual
Page 22
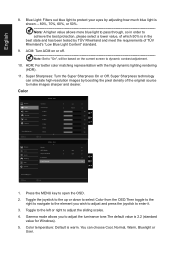
... high-resolution images by TÜV Rheinland and meet the requirements of the original source to adjust the luminance tone.The default value is warm. ACM: Turn ACM on or off Note: Set to "On", will be based on the current screen to ... Gamma mode allows you wish to adjust and press the joystick to adjust the sliding scales. 4. English 8. Move Picture Color Audio Gaming OSD System Mode - User Gamma Color...
... high-resolution images by TÜV Rheinland and meet the requirements of the original source to adjust the luminance tone.The default value is warm. ACM: Turn ACM on or off Note: Set to "On", will be based on the current screen to ... Gamma mode allows you wish to adjust and press the joystick to adjust the sliding scales. 4. English 8. Move Picture Color Audio Gaming OSD System Mode - User Gamma Color...
User Manual
Page 24
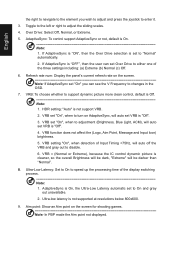
...", when to adjustment (Brightness, Blue Light, ACM), will auto set to changes in the OSD. 7. VRB set "On", when to turn on the screen Note: If AdaptiveSync set Over Drive to enter it. 3. Toggle to the left or right to support dynamic picture more clean control, default is "OFF", then the user can see the V Frequency to "Normal" automatically. 2. VRB: To choose whether to adjust the sliding scales. 4. English the right...
...", when to adjustment (Brightness, Blue Light, ACM), will auto set to changes in the OSD. 7. VRB set "On", when to turn on the screen Note: If AdaptiveSync set Over Drive to enter it. 3. Toggle to the left or right to support dynamic picture more clean control, default is "OFF", then the user can see the V Frequency to "Normal" automatically. 2. VRB: To choose whether to adjust the sliding scales. 4. English the right...
User Manual
Page 25
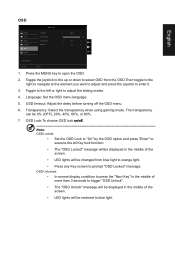
... wish to adjust and press the joystick to prompt "OSD Locked" message. Press the MENU key to blue light. Toggle the joystick to the up or down to select OSD from blue light to orange light. • Press any Key screen to enter it. 3. Language: Set the OSD menu language. 5. OSD Lock:To choose OSD lock on/off the OSD menu. 6. Move Enter 1. The transparency can be restored to open the OSD. 2. English OSD Picture Color Audio Gaming OSD System Mode -
... wish to adjust and press the joystick to prompt "OSD Locked" message. Press the MENU key to blue light. Toggle the joystick to the up or down to select OSD from blue light to orange light. • Press any Key screen to enter it. 3. Language: Set the OSD menu language. 5. OSD Lock:To choose OSD lock on/off the OSD menu. 6. Move Enter 1. The transparency can be restored to open the OSD. 2. English OSD Picture Color Audio Gaming OSD System Mode -
User Manual
Page 26
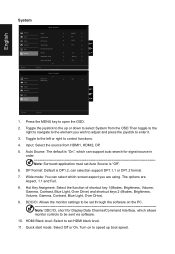
... via software. 10. Standard Picture Color Audio Gaming OSD System Power-off USB Charge Off X Move Enter Quick Start Mode 1. Wide mode: You can selection support DP1.1,1 or DP1.2 format. 7. Note: DDC/CI, short for signal source in order Note: Surround application must set through the software on to enter it. 3. The options are using. English System Picture Color Audio Gaming OSD System Mode - Standard Input Auto Source DP Format Wide Mode Hot Key Assignment DDC/CI HDMI Black Level Quick Start Mode HDMI1...
... via software. 10. Standard Picture Color Audio Gaming OSD System Power-off USB Charge Off X Move Enter Quick Start Mode 1. Wide mode: You can selection support DP1.1,1 or DP1.2 format. 7. Note: DDC/CI, short for signal source in order Note: Surround application must set through the software on to enter it. 3. The options are using. English System Picture Color Audio Gaming OSD System Mode - Standard Input Auto Source DP Format Wide Mode Hot Key Assignment DDC/CI HDMI Black Level Quick Start Mode HDMI1...
User Manual
Page 27
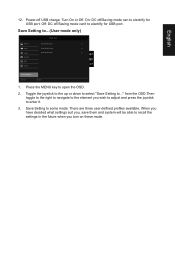
User Picture Game Mode Action Color Audio Game Mode Racing Game Mode Sports Gaming OSD X System Save Settings to ..." Toggle the joystick to the up or down to select "Save Setting to ... English 12. Press the MENU key to electrify for USB port. Off: DC off/Saving mode can to enter it. 3. When you have decided what settings suit you, save them and system will be able to ...(User mode only) Mode - Save Setting to recall...
User Picture Game Mode Action Color Audio Game Mode Racing Game Mode Sports Gaming OSD X System Save Settings to ..." Toggle the joystick to the up or down to select "Save Setting to ... English 12. Press the MENU key to electrify for USB port. Off: DC off/Saving mode can to enter it. 3. When you have decided what settings suit you, save them and system will be able to ...(User mode only) Mode - Save Setting to recall...
User Manual
Page 28
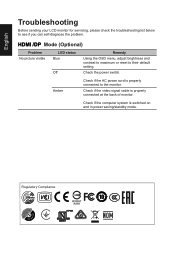
Amber Check if the AC power cord is properly connected to their default setting. Check if the video signal cable is switched on and in power saving/standby mode. Check if the computer system is properly connected at the back of monitor. Check the power switch. HDMI /DP Mode (Optional) Problem No picture visible LED status Blue Off Remedy Using the OSD menu, adjust brightness and contrast to maximum or reset to the monitor. Regulatory Compliance 217186 60950-1 English Troubleshooting Before sending your LCD monitor for servicing, please check the troubleshooting list...
Amber Check if the AC power cord is properly connected to their default setting. Check if the video signal cable is switched on and in power saving/standby mode. Check if the computer system is properly connected at the back of monitor. Check the power switch. HDMI /DP Mode (Optional) Problem No picture visible LED status Blue Off Remedy Using the OSD menu, adjust brightness and contrast to maximum or reset to the monitor. Regulatory Compliance 217186 60950-1 English Troubleshooting Before sending your LCD monitor for servicing, please check the troubleshooting list...


