
User Manual
Page 4
...; Never use this product, make sure that could be blocked or covered. If you can hear it clearly and comfortably and without distortion. • After setting the volume level, do not place the product on a bed, sofa, rug or other similar surface. If the product falls, it could result in installation...
...; Never use this product, make sure that could be blocked or covered. If you can hear it clearly and comfortably and without distortion. • After setting the volume level, do not place the product on a bed, sofa, rug or other similar surface. If the product falls, it could result in installation...
User Manual
Page 5
...by other risks. Note: The grounding pin also provides good protection from the wall outlet and refer servicing to replace the power cord set . If you to qualified service personnel. Also, make sure that the total rating of all servicing to dangerous voltage points or other... nearby electrical devices that is equipped with the supplied power supply cord set , make sure that the new power cord meets the following the operating instructions v ampere rating of the equipment plugged into a non-...
...by other risks. Note: The grounding pin also provides good protection from the wall outlet and refer servicing to replace the power cord set . If you to qualified service personnel. Also, make sure that the total rating of all servicing to dangerous voltage points or other... nearby electrical devices that is equipped with the supplied power supply cord set , make sure that the new power cord meets the following the operating instructions v ampere rating of the equipment plugged into a non-...
User Manual
Page 15
... before cleaning. Use a soft cloth to make sure that allows operation in either 100/120V AC or 220/240 V AC voltage area. The cord set should have the appropriate safety approvals for the country in a place where there is the correct type required for damage resulting from giving shock or...DIRECTLY ONTO THE SCREEN OR CASE. PLEASE DO NOT USE ANY AMMONIA OR ALCOHOL-BASED CLEANERS ON THE LCD DISPLAY SCREEN OR CASE. Acer will be liable for your area. This monitor has a universal power supply that the power cord you use of any other heavy object, on...
... before cleaning. Use a soft cloth to make sure that allows operation in either 100/120V AC or 220/240 V AC voltage area. The cord set should have the appropriate safety approvals for the country in a place where there is the correct type required for damage resulting from giving shock or...DIRECTLY ONTO THE SCREEN OR CASE. PLEASE DO NOT USE ANY AMMONIA OR ALCOHOL-BASED CLEANERS ON THE LCD DISPLAY SCREEN OR CASE. Acer will be liable for your area. This monitor has a universal power supply that the power cord you use of any other heavy object, on...

User Manual
Page 22
... open the Modes control and select which user-defined profile to use the Hot Key Assignment function to set these buttons to adjust the picture quality, OSD position and general settings. You can use the OSD to your LCD Monitor. EN-13 Input 4. Volume 3. The OSD ...2 are Modes and Volume. You can use (please see the OSD section for adjusting the settings of your preferred functions. 1. For advanced settings, please refer to open the OSD. Adjusting the OSD settings Note: The following page: Main Page The default function for general reference only. Actual product ...
... open the Modes control and select which user-defined profile to use the Hot Key Assignment function to set these buttons to adjust the picture quality, OSD position and general settings. You can use the OSD to your LCD Monitor. EN-13 Input 4. Volume 3. The OSD ...2 are Modes and Volume. You can use (please see the OSD section for adjusting the settings of your preferred functions. 1. For advanced settings, please refer to open the OSD. Adjusting the OSD settings Note: The following page: Main Page The default function for general reference only. Actual product ...

User Manual
Page 23
EN-14 Selecting the input Open the Input control and select the desired input. When you are done, press the Navi/OK button go back one level. Adjusting the volume Open the Volume control and select the volume setting using the Navi/OK button. When you are done, press the Navi/OK button to go back one level.
EN-14 Selecting the input Open the Input control and select the desired input. When you are done, press the Navi/OK button go back one level. Adjusting the volume Open the Volume control and select the volume setting using the Navi/OK button. When you are done, press the Navi/OK button to go back one level.
User Manual
Page 24
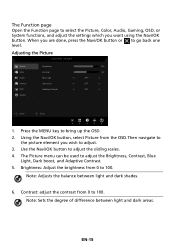
... you want using the Navi/OK button. The Function page Open the Function page to 100. Adjusting the Picture 1. Note: Sets the degree of difference between light and dark shades. 6. Press the MENU key to 100. Contrast: adjust the contrast from the OSD.Then navigate to ...
... you want using the Navi/OK button. The Function page Open the Function page to 100. Adjusting the Picture 1. Note: Sets the degree of difference between light and dark shades. 6. Press the MENU key to 100. Contrast: adjust the contrast from the OSD.Then navigate to ...
User Manual
Page 25
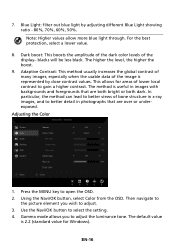
... boost. 9. Adaptive Contrast: This method usually increases the global contrast of many images, especially when the usable data of lower local contrast to select the setting. 4. EN-16 7. Blue Light: filter out blue light by close contrast values. Then navigate to the picture element you to adjust. 3. Gamma mode allows you...
... boost. 9. Adaptive Contrast: This method usually increases the global contrast of many images, especially when the usable data of lower local contrast to select the setting. 4. EN-16 7. Blue Light: filter out blue light by close contrast values. Then navigate to the picture element you to adjust. 3. Gamma mode allows you...
User Manual
Page 26
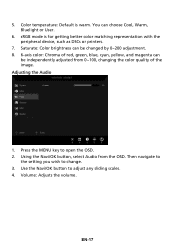
... can choose Cool, Warm, Bluelight or User. 6. Saturate: Color brightness can be independently adjusted from the OSD. Volume: Adjusts the volume. Then navigate to the setting you wish to adjust any sliding scales. 4. Color temperature: Default is for getting better color matching representation with the peripheral device, such as DSCs or...
... can choose Cool, Warm, Bluelight or User. 6. Saturate: Color brightness can be independently adjusted from the OSD. Volume: Adjusts the volume. Then navigate to the setting you wish to adjust any sliding scales. 4. Color temperature: Default is for getting better color matching representation with the peripheral device, such as DSCs or...
User Manual
Page 27
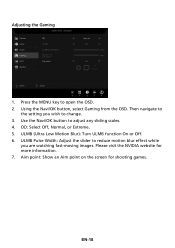
Aim point: Show an Aim point on the screen for more information. 7. ULMB Pulse Width: Adjust the slider to reduce motion blur effect while you wish to the setting you are watching fast-moving images. Please visit the NVIDIA website for shooting games. EN-18 Using the Navi/OK button, select Gaming from the OSD. Then navigate to change. 3. ULMB (Ultra Low Motion Blur): Turn ULMB function On or Off. 6. Use the Navi/OK button to open the OSD. 2. OD: Select Off, Normal, or Extreme. 5. Press the MENU key to adjust any sliding scales. 4. Adjusting the Gaming 1.
Aim point: Show an Aim point on the screen for more information. 7. ULMB Pulse Width: Adjust the slider to reduce motion blur effect while you wish to the setting you are watching fast-moving images. Please visit the NVIDIA website for shooting games. EN-18 Using the Navi/OK button, select Gaming from the OSD. Then navigate to change. 3. ULMB (Ultra Low Motion Blur): Turn ULMB function On or Off. 6. Use the Navi/OK button to open the OSD. 2. OD: Select Off, Normal, or Extreme. 5. Press the MENU key to adjust any sliding scales. 4. Adjusting the Gaming 1.
User Manual
Page 28
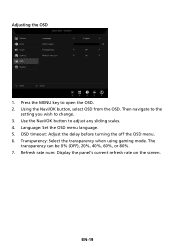
Language: Set the OSD menu language. 5. Using the Navi/OK button, select OSD from the OSD. Refresh rate num: Display the panel's current refresh rate on the screen. Transparency: Select the transparency when using gaming mode. Then navigate to the setting you wish to adjust any sliding scales. 4. EN-19 Use the Navi/OK button to change. 3. Adjusting the OSD 1. OSD timeout: Adjust the delay before turning the off the OSD menu. 6. The transparency can be 0% (OFF), 20%, 40%, 60%, or 80%. 7. Press the MENU key to open the OSD. 2.
Language: Set the OSD menu language. 5. Using the Navi/OK button, select OSD from the OSD. Refresh rate num: Display the panel's current refresh rate on the screen. Transparency: Select the transparency when using gaming mode. Then navigate to the setting you wish to adjust any sliding scales. 4. EN-19 Use the Navi/OK button to change. 3. Adjusting the OSD 1. OSD timeout: Adjust the delay before turning the off the OSD menu. 6. The transparency can be 0% (OFF), 20%, 40%, 60%, or 80%. 7. Press the MENU key to open the OSD. 2.

User Manual
Page 29
Using the Navi/OK button, select System from DP In or HDMI. 6. Wide Mode: You can select which screen aspect you wish to the setting you are Aspect and 1:1. 8. Quick Start Mode: Enable monitor rapidly. 10. Then navigate to adjust. 4. Hot Key Assignment: Select the function of time, or if ...: Turn On or Off. Adjusting the System 1. Use the Navi/OK button to open the OSD. 3. EN-20 Press the MENU key to select the setting. 5. Input: Select the source from the OSD. Deep Sleep: When Deep Sleep function is on the monitor may also wake up the monitor after it...
Using the Navi/OK button, select System from DP In or HDMI. 6. Wide Mode: You can select which screen aspect you wish to the setting you are Aspect and 1:1. 8. Quick Start Mode: Enable monitor rapidly. 10. Then navigate to adjust. 4. Hot Key Assignment: Select the function of time, or if ...: Turn On or Off. Adjusting the System 1. Use the Navi/OK button to open the OSD. 3. EN-20 Press the MENU key to select the setting. 5. Input: Select the source from the OSD. Deep Sleep: When Deep Sleep function is on the monitor may also wake up the monitor after it...
User Manual
Page 30
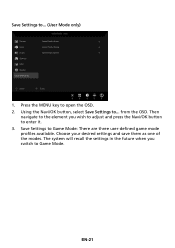
Save Settings to ... Using the Navi/OK button, select Save Settings to ... (User Mode only) 1. Save Settings to open the OSD. 2. Choose your desired settings and save them as one of the modes. EN-21 Press the MENU key to Game Mode: There are three user-defined game mode profiles available. Then navigate to the element you switch to enter it. 3. The system will recall the settings in the future when you wish to adjust and press the Navi/OK button to Game Mode. from the OSD.
Save Settings to ... Using the Navi/OK button, select Save Settings to ... (User Mode only) 1. Save Settings to open the OSD. 2. Choose your desired settings and save them as one of the modes. EN-21 Press the MENU key to Game Mode: There are three user-defined game mode profiles available. Then navigate to the element you switch to enter it. 3. The system will recall the settings in the future when you wish to adjust and press the Navi/OK button to Game Mode. from the OSD.
User Manual
Page 31
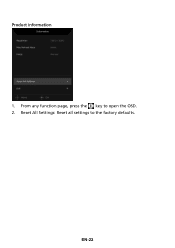
Product information 1. Reset All Settings: Reset all settings to open the OSD. 2. EN-22 From any function page, press the key to the factory defaults.
Product information 1. Reset All Settings: Reset all settings to open the OSD. 2. EN-22 From any function page, press the key to the factory defaults.
User Manual
Page 33
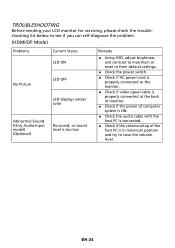
... model) (Optional) No sound, or sound level is too low Remedy Using OSD, adjust brightness and contrast to maximum or reset to their default settings. Check the power switch. Check if AC power cord is properly connected to the monitor. Check if video signal cable is properly...
... model) (Optional) No sound, or sound level is too low Remedy Using OSD, adjust brightness and contrast to maximum or reset to their default settings. Check the power switch. Check if AC power cord is properly connected to the monitor. Check if video signal cable is properly...


