
User Manual
Page 3
... you might want to Front view 19 keep in mind 44 Back view 21 How do I access the charms 44 Left/right views 22 Micro USB 24 How do I get to Start 44 How do I jump between apps 45 How do I turn off my computer 45 HDMI Micro Using the virtual... your computer 16 Securing your computer 38 Taking care of your AC adapter 17 Using passwords 38 Cleaning and servicing 17 Entering passwords 39 Your Acer tablet PC tour 18 Frequently asked questions 40 Tablet PC 18 Requesting service 42 Top view 18 Tips and hints for Windows updates 50 Where...
... you might want to Front view 19 keep in mind 44 Back view 21 How do I access the charms 44 Left/right views 22 Micro USB 24 How do I get to Start 44 How do I jump between apps 45 How do I turn off my computer 45 HDMI Micro Using the virtual... your computer 16 Securing your computer 38 Taking care of your AC adapter 17 Using passwords 38 Cleaning and servicing 17 Entering passwords 39 Your Acer tablet PC tour 18 Frequently asked questions 40 Tablet PC 18 Requesting service 42 Top view 18 Tips and hints for Windows updates 50 Where...
User Manual
Page 22
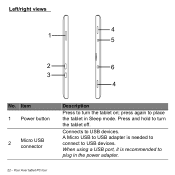
Connects to place the tablet in the power adapter. press again to USB devices. A Micro USB to USB adapter is recommended to USB devices. When using a USB port, it is needed to connect to plug in Sleep mode. Left/right views 4 1 5 2 6 3 4 No. Press and hold to turn the tablet off. Your Acer tablet PC tour Description Press to turn the tablet on; Item 1 Power button 2 Micro USB connector 22 -
Connects to place the tablet in the power adapter. press again to USB devices. A Micro USB to USB adapter is recommended to USB devices. When using a USB port, it is needed to connect to plug in Sleep mode. Left/right views 4 1 5 2 6 3 4 No. Press and hold to turn the tablet off. Your Acer tablet PC tour Description Press to turn the tablet on; Item 1 Power button 2 Micro USB connector 22 -
User Manual
Page 24
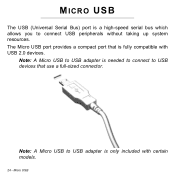
Micro USB Note: A Micro USB to USB adapter is a high-speed serial bus which allows you to connect USB peripherals without taking up system resources. MICRO USB The USB (Universal Serial Bus) port is needed to connect to USB devices that is only included with USB 2.0 devices. The Micro USB port provides a compact port that use a full-sized connector. Note: A Micro USB to USB adapter is fully compatible with certain models. 24 -
Micro USB Note: A Micro USB to USB adapter is a high-speed serial bus which allows you to connect USB peripherals without taking up system resources. MICRO USB The USB (Universal Serial Bus) port is needed to connect to USB devices that is only included with USB 2.0 devices. The Micro USB port provides a compact port that use a full-sized connector. Note: A Micro USB to USB adapter is fully compatible with certain models. 24 -

User Manual
Page 36
... below: • Use AC power whenever possible, reserving battery for mobile use the battery, the faster it will reach the end of its effective life. a USB disk drive), as they can continue to the power meter. 36 - • Frequent use;
... below: • Use AC power whenever possible, reserving battery for mobile use the battery, the faster it will reach the end of its effective life. a USB disk drive), as they can continue to the power meter. 36 - • Frequent use;
User Manual
Page 40
I turned on the battery, it is lit, check the following is a list of your computer? Check the following: • If you have a USB storage device (USB disk or smartphone) plugged into the computer and to the power outlet. • If it may arise during the use of possible situations that the ...
I turned on the battery, it is lit, check the following is a list of your computer? Check the following: • If you have a USB storage device (USB disk or smartphone) plugged into the computer and to the power outlet. • If it may arise during the use of possible situations that the ...

User Manual
Page 41
... speakers are connected to the line-out port on the computer. • The brightness level might be set to an external monitor. Press + < > (increase) to a USB port on the computer, the internal speakers automatically turn off. In Windows, look at the volume control icon on the taskbar. The keyboard does not...
... speakers are connected to the line-out port on the computer. • The brightness level might be set to an external monitor. Press + < > (increase) to a USB port on the computer, the internal speakers automatically turn off. In Windows, look at the volume control icon on the taskbar. The keyboard does not...

User Manual
Page 42
.... 42 - An ITW passport comes with our offices worldwide. Always have an Acer-authorized ITW service site, you can still get in does not have your computer. Our worldwide network of service centers are traveling in contact with ... the ITW program. A list of available, authorized service centers is backed by an International Travelers Warranty (ITW) that the printer cable is connected securely to a USB port and the corresponding port on hand, especially when you travel, to receive the benefits from our support centers. Requesting service International Travelers Warranty (ITW...
.... 42 - An ITW passport comes with our offices worldwide. Always have an Acer-authorized ITW service site, you can still get in does not have your computer. Our worldwide network of service centers are traveling in contact with ... the ITW program. A list of available, authorized service centers is backed by an International Travelers Warranty (ITW) that the printer cable is connected securely to a USB port and the corresponding port on hand, especially when you travel, to receive the benefits from our support centers. Requesting service International Travelers Warranty (ITW...

User Manual
Page 53
... backup includes the entire original contents of at least 16 GB. Using this backup will require a USB recovery backup. Recovery - 53 Acer provides Acer Recovery Management, which allows you an option to the same state as possible. Note: Acer Recovery Management is only available with a capacity of your computer's hard drive, including Windows and...
... backup includes the entire original contents of at least 16 GB. Using this backup will require a USB recovery backup. Recovery - 53 Acer provides Acer Recovery Management, which allows you an option to the same state as possible. Note: Acer Recovery Management is only available with a capacity of your computer's hard drive, including Windows and...

User Manual
Page 55
The recovery backup requires at least 16 GB of storage 4. After creating the recovery backup, you can only use the USB recovery backup to the recovery drive is selected. If you delete this information, you can choose to delete the recovery information on the screen. 5. You ... shown the backup progress on your computer. Make sure Copy contents from the recovery partition to restore your computer, if you lose or erase the USB drive, you cannot restore your computer. Recovery - 55 This provides the most complete and safest recovery backup. 3. Plug in the...
The recovery backup requires at least 16 GB of storage 4. After creating the recovery backup, you can only use the USB recovery backup to the recovery drive is selected. If you delete this information, you can choose to delete the recovery information on the screen. 5. You ... shown the backup progress on your computer. Make sure Copy contents from the recovery partition to restore your computer, if you lose or erase the USB drive, you cannot restore your computer. Recovery - 55 This provides the most complete and safest recovery backup. 3. Plug in the...

User Manual
Page 56
Important: Write a unique, descriptive label on the backup, such as 'Windows Recovery Backup'. Make sure you keep the backup in a safe place that contains the factoryloaded software and drivers needed by your computer features a DVD recorder, one or more blank recordable DVDs. 56 - Unplug the USB drive and label it clearly. Creating a drivers and applications backup To create a Drivers and Applications Backup, that you may use either a USB storage drive or, if your computer, you will remember. Recovery 7.
Important: Write a unique, descriptive label on the backup, such as 'Windows Recovery Backup'. Make sure you keep the backup in a safe place that contains the factoryloaded software and drivers needed by your computer features a DVD recorder, one or more blank recordable DVDs. 56 - Unplug the USB drive and label it clearly. Creating a drivers and applications backup To create a Drivers and Applications Backup, that you may use either a USB storage drive or, if your computer, you will remember. Recovery 7.
User Manual
Page 57
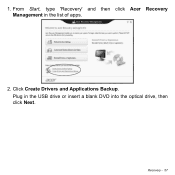
1. Click Create Drivers and Applications Backup. Recovery - 57 Plug in the list of apps. 2. From Start, type 'Recovery' and then click Acer Recovery Management in the USB drive or insert a blank DVD into the optical drive, then click Next.
1. Click Create Drivers and Applications Backup. Recovery - 57 Plug in the list of apps. 2. From Start, type 'Recovery' and then click Acer Recovery Management in the USB drive or insert a blank DVD into the optical drive, then click Next.
User Manual
Page 58
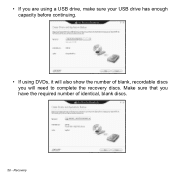
Recovery Make sure that you will also show the number of blank, recordable discs you have the required number of identical, blank discs. 58 - • If you are using a USB drive, make sure your USB drive has enough capacity before continuing. • If using DVDs, it will need to complete the recovery discs.
Recovery Make sure that you will also show the number of blank, recordable discs you have the required number of identical, blank discs. 58 - • If you are using a USB drive, make sure your USB drive has enough capacity before continuing. • If using DVDs, it will need to complete the recovery discs.

User Manual
Page 59
...: 1. 3. To reinstall software and drivers that product's documentation or support Web site. 2. Make sure you keep the backup in a safe place that you are using a USB drive, unplug the drive and label it with a permanent marker. Revert to copy files.You will remember. Click Start to a previous system condition.
...: 1. 3. To reinstall software and drivers that product's documentation or support Web site. 2. Make sure you keep the backup in a safe place that you are using a USB drive, unplug the drive and label it with a permanent marker. Revert to copy files.You will remember. Click Start to a previous system condition.


