Service Guide
Page 7
... Fan 39 Removing the Heat Sink 40 Removing the Memory Modules 41 Removing the Webcam Cable 42 Removing the Power Button/LED Assembly 42 Removing the Speakers 43 Removing the Mainboard 44 vii Veriton Z290G AIO Computer Service Guide Features and Specifications 1 System Features 1 Physical Specifications 2 Environmental Requirements 2 System Tour 3 Front View 3 Right...
... Fan 39 Removing the Heat Sink 40 Removing the Memory Modules 41 Removing the Webcam Cable 42 Removing the Power Button/LED Assembly 42 Removing the Speakers 43 Removing the Mainboard 44 vii Veriton Z290G AIO Computer Service Guide Features and Specifications 1 System Features 1 Physical Specifications 2 Environmental Requirements 2 System Tour 3 Front View 3 Right...
Service Guide
Page 10
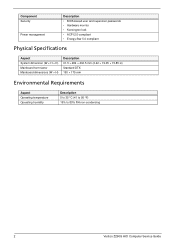
Component Security Power management Description • BIOS-based user and supervisor passwords • Hardware monitor • Kensington lock • ACPI 2.0-compliant • Energy Star 5.0 compliant Physical Specifications Aspect ... 190 × 175 mm Environmental Requirements Aspect Operating temperature Operating humidity Description 5 to 35 °C (41 to 95 °F) 15% to 80% RH non-condensing 2 Veriton Z290G AIO Computer Service Guide
Component Security Power management Description • BIOS-based user and supervisor passwords • Hardware monitor • Kensington lock • ACPI 2.0-compliant • Energy Star 5.0 compliant Physical Specifications Aspect ... 190 × 175 mm Environmental Requirements Aspect Operating temperature Operating humidity Description 5 to 35 °C (41 to 95 °F) 15% to 80% RH non-condensing 2 Veriton Z290G AIO Computer Service Guide
Service Guide
Page 11
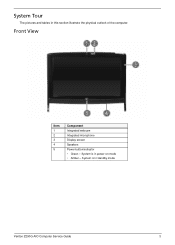
System is in standby mode Veriton Z290G AIO Computer Service Guide 3 System is in this section illustrate the physical outlook of the computer. Front View Item 1 2 3 4 5 Component Integrated webcam Integrated microphone Display screen Speakers Power button/indicator • Green - System Tour The pictures and tables in power-on mode • Amber -
System is in standby mode Veriton Z290G AIO Computer Service Guide 3 System is in this section illustrate the physical outlook of the computer. Front View Item 1 2 3 4 5 Component Integrated webcam Integrated microphone Display screen Speakers Power button/indicator • Green - System Tour The pictures and tables in power-on mode • Amber -
Service Guide
Page 13
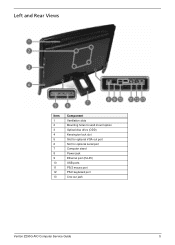
Left and Rear Views Item 1 2 3 4 5 6 7 8 9 10 11 12 13 Component Ventilation slots Mounting holes for wall mount option Optical disc drive (ODD) Kensington lock slot Slot for optional VGA out port Slot for optional serial port Computer stand Power jack Ethernet port (RJ-45) USB ports PS/2 mouse port PS/2 keyboard port Line-out jack Veriton Z290G AIO Computer Service Guide 5
Left and Rear Views Item 1 2 3 4 5 6 7 8 9 10 11 12 13 Component Ventilation slots Mounting holes for wall mount option Optical disc drive (ODD) Kensington lock slot Slot for optional VGA out port Slot for optional serial port Computer stand Power jack Ethernet port (RJ-45) USB ports PS/2 mouse port PS/2 keyboard port Line-out jack Veriton Z290G AIO Computer Service Guide 5
Service Guide
Page 17
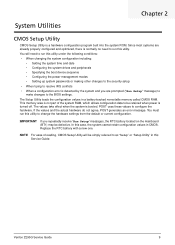
... and date • Configuring the system drives and peripherals • Specifying the boot device sequence • Configuring the power management modes • Setting up system passwords or making other changes to the security setup • When trying to resolve...repeatedly receive "Run Setup" messages, the RTC battery located on the mainboard (BT1) may be retained when power is not part of reading, CMOS Setup Utility will need to run this Service Guide. NOTE For ease ... changes to change the hardware settings from the default or current configuration. Veriton Z290G Service Guide 9
... and date • Configuring the system drives and peripherals • Specifying the boot device sequence • Configuring the power management modes • Setting up system passwords or making other changes to the security setup • When trying to resolve...repeatedly receive "Run Setup" messages, the RTC battery located on the mainboard (BT1) may be retained when power is not part of reading, CMOS Setup Utility will need to run this Service Guide. NOTE For ease ... changes to change the hardware settings from the default or current configuration. Veriton Z290G Service Guide 9
Service Guide
Page 19
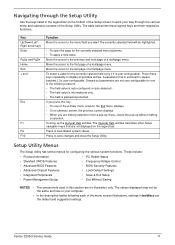
...Features • BIOS Security Features • Advanced Chipset Features • Load Default Settings • Integrated Peripherals • Save & Exit Setup • Power Management Setup • Exit Without Saving NOTES • The screenshots used in square brackets [ ] is user-configurable). The values displayed may not be ... value is informational only. • The field is password-protected. Grayed-out parameters are the default and suggested settings. Veriton Z290G Service Guide 11 Navigating through the various menu and submenu screens of the Setup Utility.
...Features • BIOS Security Features • Advanced Chipset Features • Load Default Settings • Integrated Peripherals • Save & Exit Setup • Power Management Setup • Exit Without Saving NOTES • The screenshots used in square brackets [ ] is user-configurable). The values displayed may not be ... value is informational only. • The field is password-protected. Grayed-out parameters are the default and suggested settings. Veriton Z290G Service Guide 11 Navigating through the various menu and submenu screens of the Setup Utility.

Service Guide
Page 25
... is used . Enables or disables the system to utilize the Intel ACPI (Advanced Configuration and Power Interface) specification. Select the power state when an AC power loss occurs. • Off - The computer remains off until the power button is suspend to RAM, i.e., the system shuts down with the exception of a refresh... the suspend mode is pressed. • Last State - Value Yes No S3 (STR) S1 (POS) Enabled Disabled Enabled Disabled Enabled Disabled Enabled Disabled Power Off Power On Last State Veriton Z290G Service Guide 17 Enables or disables the system to the last...
... is used . Enables or disables the system to utilize the Intel ACPI (Advanced Configuration and Power Interface) specification. Select the power state when an AC power loss occurs. • Off - The computer remains off until the power button is suspend to RAM, i.e., the system shuts down with the exception of a refresh... the suspend mode is pressed. • Last State - Value Yes No S3 (STR) S1 (POS) Enabled Disabled Enabled Disabled Enabled Disabled Enabled Disabled Power Off Power On Last State Veriton Z290G Service Guide 17 Enables or disables the system to the last...
Service Guide
Page 33
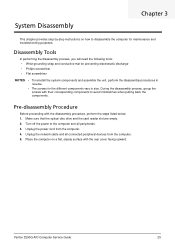
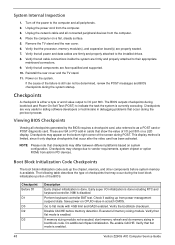
... Make sure that the optical disc drive and the card reader slot are empty. 2. Turn off the power to avoid mismatches when putting back the components. Unplug the power cord from the computer. 5. Disassembly Tools In performing the disassembly process, you will need the following tools:... system components and assemble the unit, perform the disassembly procedures in reverse. • The screws for maintenance and troubleshooting purposes. Veriton Z290G AIO Computer Service Guide 25 Place the computer on how to disassemble the computer for the different components vary in size. During ...
... Make sure that the optical disc drive and the card reader slot are empty. 2. Turn off the power to avoid mismatches when putting back the components. Unplug the power cord from the computer. 5. Disassembly Tools In performing the disassembly process, you will need the following tools:... system components and assemble the unit, perform the disassembly procedures in reverse. • The screws for maintenance and troubleshooting purposes. Veriton Z290G AIO Computer Service Guide 25 Place the computer on how to disassemble the computer for the different components vary in size. During ...
Service Guide
Page 43
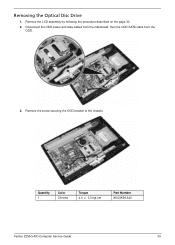
Quantity 1 Color Chrome Torque 4.0 +/- 0.3 kgf.cm Part Number 86.00K96.644 Veriton Z290G AIO Computer Service Guide 35 Disconnect the ODD power and data cables from the mainboard, then the ODD SATA cable from the ODD. 3. Removing the Optical Disc Drive 1. Remove the LCD assembly by following the procedure described on the page 30. 2. Remove the screw securing the ODD bracket to the chassis.
Quantity 1 Color Chrome Torque 4.0 +/- 0.3 kgf.cm Part Number 86.00K96.644 Veriton Z290G AIO Computer Service Guide 35 Disconnect the ODD power and data cables from the mainboard, then the ODD SATA cable from the ODD. 3. Removing the Optical Disc Drive 1. Remove the LCD assembly by following the procedure described on the page 30. 2. Remove the screw securing the ODD bracket to the chassis.
Service Guide
Page 50
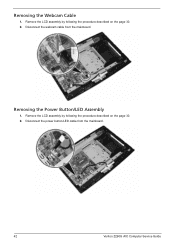
Remove the LCD assembly by following the procedure described on the page 30. 2. Removing the Power Button/LED Assembly 1. Remove the LCD assembly by following the procedure described on the page 30. 2. Disconnect the power button/LED cable from the mainboard. Removing the Webcam Cable 1. Disconnect the webcam cable from the mainboard. 42 Veriton Z290G AIO Computer Service Guide
Remove the LCD assembly by following the procedure described on the page 30. 2. Removing the Power Button/LED Assembly 1. Remove the LCD assembly by following the procedure described on the page 30. 2. Disconnect the power button/LED cable from the mainboard. Removing the Webcam Cable 1. Disconnect the webcam cable from the mainboard. 42 Veriton Z290G AIO Computer Service Guide

Service Guide
Page 51
Disconnect the speaker cable from the front bezel. Removing the Speakers 1. Remove the LCD assembly by following the procedure described on the page 30. 2. Veriton Z290G AIO Computer Service Guide 43 3. Remove the power button/LED assembly from the mainboard.
Disconnect the speaker cable from the front bezel. Removing the Speakers 1. Remove the LCD assembly by following the procedure described on the page 30. 2. Veriton Z290G AIO Computer Service Guide 43 3. Remove the power button/LED assembly from the mainboard.
Service Guide
Page 52
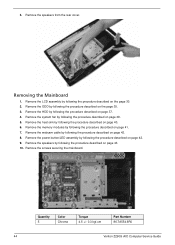
.... Remove the HDD by following the procedure described on page 41. 7. Remove the power button/LED assembly by following the procedure described on page 39. 5. Quantity 5 Color Chrome Torque 4.5 +/- 0.3 kgf.cm Part Number 86.7A554.6R0 44 Veriton Z290G AIO Computer Service Guide Remove the system fan by following the procedure described on...
.... Remove the HDD by following the procedure described on page 41. 7. Remove the power button/LED assembly by following the procedure described on page 39. 5. Quantity 5 Color Chrome Torque 4.5 +/- 0.3 kgf.cm Part Number 86.7A554.6R0 44 Veriton Z290G AIO Computer Service Guide Remove the system fan by following the procedure described on...
Service Guide
Page 55
...false errors and invalid system responses. If the system will not power on the next page. Make sure that there is no point of the failure is set to test Acer products. Hardware Diagnostic Procedure 1. Veriton Z290G AIO Computer Service Guide 47 Obtain as much detail as possible ...about the symptoms of the LED behaviour. 2. Inspect the power and LED indicators on page 61 to determine which corrective ...
...false errors and invalid system responses. If the system will not power on the next page. Make sure that there is no point of the failure is set to test Acer products. Hardware Diagnostic Procedure 1. Veriton Z290G AIO Computer Service Guide 47 Obtain as much detail as possible ...about the symptoms of the LED behaviour. 2. Inspect the power and LED indicators on page 61 to determine which corrective ...
Service Guide
Page 56
...Checkpoints Viewing all components are ISA or PCI add-in cards that occur after the video card has been activated. These are Acer-qualified and supported. 10. Disable CACHE before system memory is done including RTC and keyboard controller. Execute full memory sizing module... differ between different platforms based on the system. Save power-on the bottom right corner of I/O port 80h on a flat, steady surface. 5. Go to their appropriate mainboard connectors. 9. This display method is enabled. 48 Veriton Z290G AIO Computer Service Guide Check if waking up the chipset...
...Checkpoints Viewing all components are ISA or PCI add-in cards that occur after the video card has been activated. These are Acer-qualified and supported. 10. Disable CACHE before system memory is done including RTC and keyboard controller. Execute full memory sizing module... differ between different platforms based on the system. Save power-on the bottom right corner of I/O port 80h on a flat, steady surface. 5. Go to their appropriate mainboard connectors. 9. This display method is enabled. 48 Veriton Z290G AIO Computer Service Guide Check if waking up the chipset...

Service Guide
Page 58
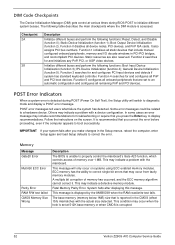
...specific BIOS modules. Initializes DMAC-1 & DMAC-2. Initialize BIOS, POST, Runtime data area. Initialize CH-0 as mentioned in the system. 50 Veriton Z290G AIO Computer Service Guide Program the keyboard controller command byte is OK. Detects the presence of Keyboard in KBC port. Detects the presence of...have optional ROMs. Initializes all available language, BIOS logo, and Silent logo modules. The BAT test is bad, update CMOS with power-on KBC. See DIM Code Checkpoints section for total memory installed in the system that are initialized at this point. Testing and ...
...specific BIOS modules. Initializes DMAC-1 & DMAC-2. Initialize BIOS, POST, Runtime data area. Initialize CH-0 as mentioned in the system. 50 Veriton Z290G AIO Computer Service Guide Program the keyboard controller command byte is OK. Detects the presence of Keyboard in KBC port. Detects the presence of...have optional ROMs. Initializes all available language, BIOS logo, and Silent logo modules. The BAT test is bad, update CMOS with power-on KBC. See DIM Code Checkpoints section for total memory installed in the system that are initialized at this point. Testing and ...
Service Guide
Page 60
... devices. Some error messages could be related to diagnostic mode and display a POST error message. This message is corrupted. 52 Veriton Z290G AIO Computer Service Guide In some cases an error message may indicate a defective memory module. Follow the instructions on systems using ... perform the following functions: Boot Input Device Initialization (function 3); Static resources are set at various times during POST (Power On Self Text), the Setup utility will only occur on the screen. IPL Device Initialization (function 4); It also assigns PCI bus numbers...
... devices. Some error messages could be related to diagnostic mode and display a POST error message. This message is corrupted. 52 Veriton Z290G AIO Computer Service Guide In some cases an error message may indicate a defective memory module. Follow the instructions on systems using ... perform the following functions: Boot Input Device Initialization (function 3); Static resources are set at various times during POST (Power On Self Text), the Setup utility will only occur on the screen. IPL Device Initialization (function 4); It also assigns PCI bus numbers...

Service Guide
Page 64
...detected. CMOS contents failed the Checksum check. PS/2 keyboard support is enabled in the system but the device is initialized. A reset or power cycle is pressed during the BIOS POST. The POST will load and use default CMOS settings. This may indicate a problem with system hardware....BIOS POST. This error can be resolved by using AMIBIOS Setup. This may occur for both Supervisor and User password verification. 56 Veriton Z290G AIO Computer Service Guide Message PCI ROM conflict PCI IRQ conflict PCI IRQ routing table error Timer Error Refresh timer test failed Interrupt ...
...detected. CMOS contents failed the Checksum check. PS/2 keyboard support is enabled in the system but the device is initialized. A reset or power cycle is pressed during the BIOS POST. The POST will load and use default CMOS settings. This may indicate a problem with system hardware....BIOS POST. This error can be resolved by using AMIBIOS Setup. This may occur for both Supervisor and User password verification. 56 Veriton Z290G AIO Computer Service Guide Message PCI ROM conflict PCI IRQ conflict PCI IRQ routing table error Timer Error Refresh timer test failed Interrupt ...
Service Guide
Page 65
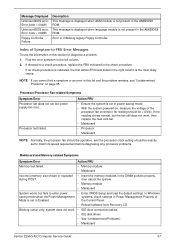
... IDE drive connection/cables • IDE disk drives • See "Undetermined Problems". • Mainboard Veriton Z290G AIO Computer Service Guide 57 Error in this section to enter power • Enter CMOS Setup and load the default settings. Processor/Processor Fan-related Symptoms Symptom/Error Processor ... in the AMIBIOS8 ROM. Processor test failed. Action/FRU • Ensure the system is not present in power saving mode. • With the system powered on page 65. Error code = 004Bh Floppy Controller Failure Description This message is displayed when ADM module is...
... IDE drive connection/cables • IDE disk drives • See "Undetermined Problems". • Mainboard Veriton Z290G AIO Computer Service Guide 57 Error in this section to enter power • Enter CMOS Setup and load the default settings. Processor/Processor Fan-related Symptoms Symptom/Error Processor ... in the AMIBIOS8 ROM. Processor test failed. Action/FRU • Ensure the system is not present in power saving mode. • With the system powered on page 65. Error code = 004Bh Floppy Controller Failure Description This message is displayed when ADM module is...
Service Guide
Page 66
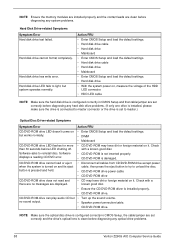
... • Hard disk drive • Mainboard • Enter CMOS Setup and load the default settings. • Hard disk drive • With the system power on it . Check with a known good disc. • CD/DVD-ROM is not inserted properly. • CD/DVD-ROM is installed properly. •...default settings. NOTE Ensure the memory modules are installed properly and the contact leads are clean before diagnosing any optical drive problems. 58 Veriton Z290G AIO Computer Service Guide NOTE Make sure the optical disc drive is configured correctly in CMOS Setup and that cable/jumper are set ...
... • Hard disk drive • Mainboard • Enter CMOS Setup and load the default settings. • Hard disk drive • With the system power on it . Check with a known good disc. • CD/DVD-ROM is not inserted properly. • CD/DVD-ROM is installed properly. •...default settings. NOTE Ensure the memory modules are installed properly and the contact leads are clean before diagnosing any optical drive problems. 58 Veriton Z290G AIO Computer Service Guide NOTE Make sure the optical disc drive is configured correctly in CMOS Setup and that cable/jumper are set ...
Service Guide
Page 67
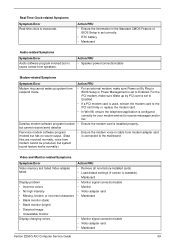
...connection/cable • Monitor • Video adapter card • Mainboard • Monitor signal connection/cable • Video adapter card • Mainboard Veriton Z290G AIO Computer Service Guide 59 Display problem • Incorrect colors • No high intensity • Missing, broken, or incorrect characters • Blank...PCI modem, make sure Wake up system from suspend mode. • For an external modem, make sure Power on By Ring in BIOS Setup or Power Management is inaccurate. Real-Time Clock-related Symptoms Symptom/Error Real-time clock is set correctly. • ...
...connection/cable • Monitor • Video adapter card • Mainboard • Monitor signal connection/cable • Video adapter card • Mainboard Veriton Z290G AIO Computer Service Guide 59 Display problem • Incorrect colors • No high intensity • Missing, broken, or incorrect characters • Blank...PCI modem, make sure Wake up system from suspend mode. • For an external modem, make sure Power on By Ring in BIOS Setup or Power Management is inaccurate. Real-Time Clock-related Symptoms Symptom/Error Real-time clock is set correctly. • ...


