Service Guide
Page 7
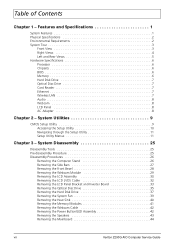
... the System Fan 39 Removing the Heat Sink 40 Removing the Memory Modules 41 Removing the Webcam Cable 42 Removing the Power Button/LED Assembly 42 Removing the Speakers 43 Removing the Mainboard 44 vii Veriton Z290G AIO Computer Service Guide Features and Specifications 1 System Features 1 Physical Specifications 2 Environmental Requirements 2 System Tour 3 Front...
... the System Fan 39 Removing the Heat Sink 40 Removing the Memory Modules 41 Removing the Webcam Cable 42 Removing the Power Button/LED Assembly 42 Removing the Speakers 43 Removing the Mainboard 44 vii Veriton Z290G AIO Computer Service Guide Features and Specifications 1 System Features 1 Physical Specifications 2 Environmental Requirements 2 System Tour 3 Front...
Service Guide
Page 9
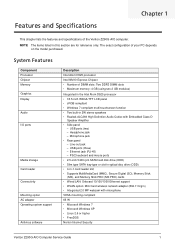
... 65 W • Microsoft Windows 7 • Microsoft Windows XP • Linux 2.6 or higher • FreeDOS Norton Internet Security Veriton Z290G AIO Computer Service Guide 1 PS/2 keyboard and mouse ports • 2.5-inch 5400 rpm SATA hard disk drive (HDD) • ... 2.0 MP webcam with Embedded Class D Speaker Amplifier • Side panel - Ethernet jack (RJ-45) - Features and Specifications Chapter 1 This chapter lists the features and specifications of your PC depends on the model purchased. USB ports (three) - The exact configuration of the Veriton Z290G AIO computer...
... 65 W • Microsoft Windows 7 • Microsoft Windows XP • Linux 2.6 or higher • FreeDOS Norton Internet Security Veriton Z290G AIO Computer Service Guide 1 PS/2 keyboard and mouse ports • 2.5-inch 5400 rpm SATA hard disk drive (HDD) • ... 2.0 MP webcam with Embedded Class D Speaker Amplifier • Side panel - Ethernet jack (RJ-45) - Features and Specifications Chapter 1 This chapter lists the features and specifications of your PC depends on the model purchased. USB ports (three) - The exact configuration of the Veriton Z290G AIO computer...
Service Guide
Page 11
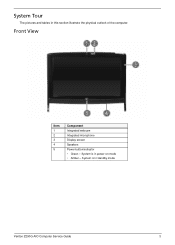
Front View Item 1 2 3 4 5 Component Integrated webcam Integrated microphone Display screen Speakers Power button/indicator • Green - System is in power-on mode • Amber - System is in this section illustrate the physical outlook of the computer. System Tour The pictures and tables in standby mode Veriton Z290G AIO Computer Service Guide 3
Front View Item 1 2 3 4 5 Component Integrated webcam Integrated microphone Display screen Speakers Power button/indicator • Green - System is in power-on mode • Amber - System is in this section illustrate the physical outlook of the computer. System Tour The pictures and tables in standby mode Veriton Z290G AIO Computer Service Guide 3

Service Guide
Page 16
Right panel: Microphone and headphone jacks - Rear panel: Line-out jack Webcam Item Resolution Supported models Specification 2.0 MP • Chicony CNF924621004591L • Park Orchid C04PL036H LCD Panel Item Model Type Screen size (diagonal) Active area (H × V) ...(65 W) • 90V to 240V and 50Hz to 60Hz AC • 19V DC Output • 3 prong ICE-320-C13 or IEC-320-C5 AC connector 8 Veriton Z290G AIO Computer Service Guide Audio Item Controller Features Specification Realtek ALC269 High Definition Audio Codec with Embedded Class D Speaker Amplifier • Two built-in 2W...
Right panel: Microphone and headphone jacks - Rear panel: Line-out jack Webcam Item Resolution Supported models Specification 2.0 MP • Chicony CNF924621004591L • Park Orchid C04PL036H LCD Panel Item Model Type Screen size (diagonal) Active area (H × V) ...(65 W) • 90V to 240V and 50Hz to 60Hz AC • 19V DC Output • 3 prong ICE-320-C13 or IEC-320-C5 AC connector 8 Veriton Z290G AIO Computer Service Guide Audio Item Controller Features Specification Realtek ALC269 High Definition Audio Codec with Embedded Class D Speaker Amplifier • Two built-in 2W...
Service Guide
Page 36
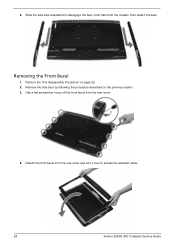
3. Slide the side bars downward to disengage the bars' inner tabs from the rear cover. 4. Use a flat screwdriver to access the webcam cable. 28 Veriton Z290G AIO Computer Service Guide Remove the side bars by following the procedure described on page 25. 2. Perform the "Pre-disassembly Procedure" on the previous section. 3. Removing the Front Bezel 1. Detach the front bezel from the rear cover and turn it over to pry off the front bezel from the chassis, then detach the bars.
3. Slide the side bars downward to disengage the bars' inner tabs from the rear cover. 4. Use a flat screwdriver to access the webcam cable. 28 Veriton Z290G AIO Computer Service Guide Remove the side bars by following the procedure described on page 25. 2. Perform the "Pre-disassembly Procedure" on the previous section. 3. Removing the Front Bezel 1. Detach the front bezel from the rear cover and turn it over to pry off the front bezel from the chassis, then detach the bars.
Service Guide
Page 37
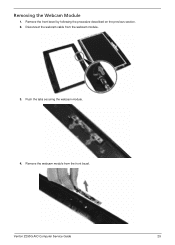
Push the tabs securing the webcam module. 4. Removing the Webcam Module 1. Remove the webcam module from the webcam module. 3. Disconnect the webcam cable from the front bezel. Veriton Z290G AIO Computer Service Guide 29 Remove the front bezel by following the procedure described on the previous section. 2.
Push the tabs securing the webcam module. 4. Removing the Webcam Module 1. Remove the webcam module from the webcam module. 3. Disconnect the webcam cable from the front bezel. Veriton Z290G AIO Computer Service Guide 29 Remove the front bezel by following the procedure described on the previous section. 2.
Service Guide
Page 38
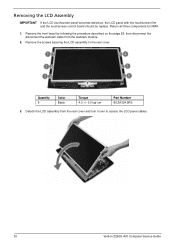
Remove the front bezel by following the procedure described on the page 28, then disconnect the disconnect the webcam cable from the rear cover and turn it over to the rear cover. Removing the LCD Assembly IMPORTANT If the LCD touchscreen panel ... touchscreen control board should be replace. Quantity 6 Color Black Torque 4.0 +/- 0.3 kgf.cm Part Number 86.ZA324.8R0 3. Detach the LCD assembly from the webcam module. 2. Return all three components for RMA. 1. Remove the screws securing the LCD assembly to access the LCD panel cables. 30 Veriton Z290G AIO Computer Service Guide
Remove the front bezel by following the procedure described on the page 28, then disconnect the disconnect the webcam cable from the rear cover and turn it over to the rear cover. Removing the LCD Assembly IMPORTANT If the LCD touchscreen panel ... touchscreen control board should be replace. Quantity 6 Color Black Torque 4.0 +/- 0.3 kgf.cm Part Number 86.ZA324.8R0 3. Detach the LCD assembly from the webcam module. 2. Return all three components for RMA. 1. Remove the screws securing the LCD assembly to access the LCD panel cables. 30 Veriton Z290G AIO Computer Service Guide
Service Guide
Page 50
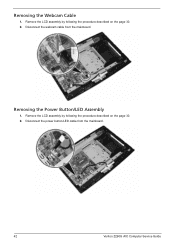
Disconnect the webcam cable from the mainboard. 42 Veriton Z290G AIO Computer Service Guide Removing the Power Button/LED Assembly 1. Remove the LCD assembly by following the procedure described on the page 30. 2. Disconnect the power button/LED cable from the mainboard. Removing the Webcam Cable 1. Remove the LCD assembly by following the procedure described on the page 30. 2.
Disconnect the webcam cable from the mainboard. 42 Veriton Z290G AIO Computer Service Guide Removing the Power Button/LED Assembly 1. Remove the LCD assembly by following the procedure described on the page 30. 2. Disconnect the power button/LED cable from the mainboard. Removing the Webcam Cable 1. Remove the LCD assembly by following the procedure described on the page 30. 2.
Service Guide
Page 52
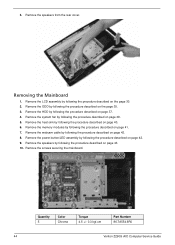
... on the page 30. 2. Remove the LCD assembly by following the procedure described on page 42. 9. 3. Remove the webcam cable by following the procedure described on page 42. 8. Quantity 5 Color Chrome Torque 4.5 +/- 0.3 kgf.cm Part Number 86.7A554.6R0 44 Veriton Z290G AIO Computer Service Guide Remove the speakers from the rear cover.
... on the page 30. 2. Remove the LCD assembly by following the procedure described on page 42. 9. 3. Remove the webcam cable by following the procedure described on page 42. 8. Quantity 5 Color Chrome Torque 4.5 +/- 0.3 kgf.cm Part Number 86.7A554.6R0 44 Veriton Z290G AIO Computer Service Guide Remove the speakers from the rear cover.
Service Guide
Page 73
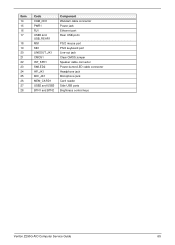
Item 14 15 16 17 18 19 20 21 22 23 24 25 26 27 28 Code CAM_CN1 PWR1 RJ1 USB5 and USB_REAR1 MS1 KB1 LINEOUT_JK1 CMOS1 INT_SPK1 SWLED2 HP_JK1 MIC_JK1 MEM_CARD1 USB2 and USB3 BTN1 and BTN2 Component Webcam cable connector Power jack Ethernet port Rear USB ports PS/2 mouse port PS/2 keyboard port Line-out jack Clear CMOS jumper Speaker cable connector Power button/LED cable connector Headphone jack Microphone jack Card reader Side USB ports Brightness control keys Veriton Z290G AIO Computer Service Guide 65
Item 14 15 16 17 18 19 20 21 22 23 24 25 26 27 28 Code CAM_CN1 PWR1 RJ1 USB5 and USB_REAR1 MS1 KB1 LINEOUT_JK1 CMOS1 INT_SPK1 SWLED2 HP_JK1 MIC_JK1 MEM_CARD1 USB2 and USB3 BTN1 and BTN2 Component Webcam cable connector Power jack Ethernet port Rear USB ports PS/2 mouse port PS/2 keyboard port Line-out jack Clear CMOS jumper Speaker cable connector Power button/LED cable connector Headphone jack Microphone jack Card reader Side USB ports Brightness control keys Veriton Z290G AIO Computer Service Guide 65

Service Guide
Page 80
Category ODD bezel LCD panel bracket Inverter board cover Part Name DVD-RW ODD BEZEL TOUCH PANEL BRACKET LEFT TOUCH PANEL BRACKET RIGHT Cables Power button/LED cable POWER LED SWITCH CABLE ODD SATA cable ODD SATA CABLE Inverter board cable INVERTER BOIARD CABLE LCD LVDS cable Webcam cable LVDS CABLE CAMERA CABLE Touchscreen control board cable CONTROL CABLE Serial port cable COM PORT CABLE Part Number 42.VBK01.003 33.VBK01.003 33.VBK01.004 50.VBK01.003 50.VBK01.001 50.VBK01.006 50.VBK01.005 50.VBK01.002 50.VBK01.004 50.VBK01.007 72 Veriton Z290G AIO Computer Service Guide
Category ODD bezel LCD panel bracket Inverter board cover Part Name DVD-RW ODD BEZEL TOUCH PANEL BRACKET LEFT TOUCH PANEL BRACKET RIGHT Cables Power button/LED cable POWER LED SWITCH CABLE ODD SATA cable ODD SATA CABLE Inverter board cable INVERTER BOIARD CABLE LCD LVDS cable Webcam cable LVDS CABLE CAMERA CABLE Touchscreen control board cable CONTROL CABLE Serial port cable COM PORT CABLE Part Number 42.VBK01.003 33.VBK01.003 33.VBK01.004 50.VBK01.003 50.VBK01.001 50.VBK01.006 50.VBK01.005 50.VBK01.002 50.VBK01.004 50.VBK01.007 72 Veriton Z290G AIO Computer Service Guide
Service Guide
Page 103
... CMOS Setup Utility access 10 Advanced BIOS Features menu 14 Advanced Chipset Features menu 15 BIOS Security Features menu 20 Exit Without Saving 24 Veriton Z290G AIO Computer Service Guide Index Frequency/Voltage Control menu 19 Integrated Peripherals menu 16 Load Default Settings 23 navigation keys 11 overview 9 PC ...memory 41 optical disc drive 35 power button/LED assembly 42 preparatory steps 25 side bars 27 speakers 43 system fan 39 tools 25 webcam cable 42 webcam module 29 display inverter board, remove 33 LCD assembly, remove 30 LCD LVDS cable, remove 32 LCD panel bracket, remove 33 ...
... CMOS Setup Utility access 10 Advanced BIOS Features menu 14 Advanced Chipset Features menu 15 BIOS Security Features menu 20 Exit Without Saving 24 Veriton Z290G AIO Computer Service Guide Index Frequency/Voltage Control menu 19 Integrated Peripherals menu 16 Load Default Settings 23 navigation keys 11 overview 9 PC ...memory 41 optical disc drive 35 power button/LED assembly 42 preparatory steps 25 side bars 27 speakers 43 system fan 39 tools 25 webcam cable 42 webcam module 29 display inverter board, remove 33 LCD assembly, remove 30 LCD LVDS cable, remove 32 LCD panel bracket, remove 33 ...
Service Guide
Page 105
...71 speakers 71 system fan 70 touchscreen control board 69 touchscreen control cable 72 touchscreen LCD assembly 70 touchscreen panel film 70 webcam cable 72 webcam module 69 WLAN antennas 69 WLAN module 69 PC Health Status menu 18 POST, see Power-On Self-Test 50 power... 60 wake-up options 17 power button, part number 71 power management configure 17 specifications 2 Power-On Self-Test checkpoints 50 error messages 52 Veriton Z290G AIO Computer Service Guide processor check type/speed 12 specifications 6 troubleshooting 57 Product Information menu 12 PS/2 keyboard port 5 PS/2 mouse port 5...
...71 speakers 71 system fan 70 touchscreen control board 69 touchscreen control cable 72 touchscreen LCD assembly 70 touchscreen panel film 70 webcam cable 72 webcam module 69 WLAN antennas 69 WLAN module 69 PC Health Status menu 18 POST, see Power-On Self-Test 50 power... 60 wake-up options 17 power button, part number 71 power management configure 17 specifications 2 Power-On Self-Test checkpoints 50 error messages 52 Veriton Z290G AIO Computer Service Guide processor check type/speed 12 specifications 6 troubleshooting 57 Product Information menu 12 PS/2 keyboard port 5 PS/2 mouse port 5...
Service Guide
Page 106
... bootable device 16 legacy device 16 right 4, 5 user password 20 V VESA mounting 1 VGA out port 5 W wall mount option 5 webcam cable, part number 72 cable, remove 42 location 3 module, part number 69 module, remove 29 specifications 8 wireless LAN antennas, part number 69 module, part number 69 specifications 7 98 Veriton Z290G AIO Computer Service Guide
... bootable device 16 legacy device 16 right 4, 5 user password 20 V VESA mounting 1 VGA out port 5 W wall mount option 5 webcam cable, part number 72 cable, remove 42 location 3 module, part number 69 module, remove 29 specifications 8 wireless LAN antennas, part number 69 module, part number 69 specifications 7 98 Veriton Z290G AIO Computer Service Guide


