Service Guide
Page 3
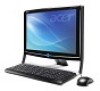
All rights reserved. Acer is ". Veriton Z290G AIO Computer Service Guide iii Any Acer Incorporated software described in any form or by Acer Incorporated. No part of Acer Incorporated. Acer Incorporated makes no representations or warranties, either expressed or implied, with respect to change ..., optical, chemical, manual or otherwise, without notice. Should the programs prove defective following their purchase, the buyer (and not Acer Incorporated, its distributor, or its dealer) assumes the entire cost of all necessary servicing, repair, and any incidental or consequential ...
All rights reserved. Acer is ". Veriton Z290G AIO Computer Service Guide iii Any Acer Incorporated software described in any form or by Acer Incorporated. No part of Acer Incorporated. Acer Incorporated makes no representations or warranties, either expressed or implied, with respect to change ..., optical, chemical, manual or otherwise, without notice. Should the programs prove defective following their purchase, the buyer (and not Acer Incorporated, its distributor, or its dealer) assumes the entire cost of all necessary servicing, repair, and any incidental or consequential ...
Service Guide
Page 5
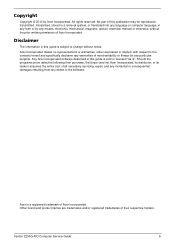
... by your regional Acer office to -date information available on card, modem, or extra memory capability). Veriton Z290G AIO Computer Service Guide v FRU Information Please note WHEN ORDERING FRU PARTS, that you should check the most up-to order FRU parts for whatever reason, a part number change is made...or the responsible personnel/channel to those given in this printed service guide. add-on your regional office MAY have a DIFFERENT part number code to provide you with all technical information relating to extend the functionality of customer machines. To better fit local market...
... by your regional Acer office to -date information available on card, modem, or extra memory capability). Veriton Z290G AIO Computer Service Guide v FRU Information Please note WHEN ORDERING FRU PARTS, that you should check the most up-to order FRU parts for whatever reason, a part number change is made...or the responsible personnel/channel to those given in this printed service guide. add-on your regional office MAY have a DIFFERENT part number code to provide you with all technical information relating to extend the functionality of customer machines. To better fit local market...
Service Guide
Page 17
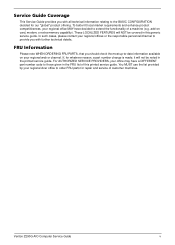
System Utilities Chapter 2 CMOS Setup Utility CMOS Setup Utility is booted. This memory area is not part of reading, CMOS Setup Utility will need to resolve IRQ conflicts • When a configuration error is detected by the system and you repeatedly receive "Run ... RTC battery located on the mainboard (BT1) may be defective. If the values and the actual hardware do not agree, POST generates an error message. Veriton Z290G Service Guide 9 You must run this utility. Replace the RTC battery with a new one. POST uses these values to be simply referred to as "Setup...
System Utilities Chapter 2 CMOS Setup Utility CMOS Setup Utility is booted. This memory area is not part of reading, CMOS Setup Utility will need to resolve IRQ conflicts • When a configuration error is detected by the system and you repeatedly receive "Run ... RTC battery located on the mainboard (BT1) may be defective. If the values and the actual hardware do not agree, POST generates an error message. Veriton Z290G Service Guide 9 You must run this utility. Replace the RTC battery with a new one. POST uses these values to be simply referred to as "Setup...
Service Guide
Page 34
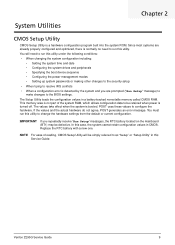
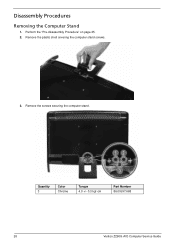
Remove the plastic shell covering the computer stand screws. 3. Perform the "Pre-disassembly Procedure" on page 25. 2. Disassembly Procedures Removing the Computer Stand 1. Quantity 3 Color Chrome Torque 4.0 +/- 0.3 kgf-cm Part Number 86.00J97.668 26 Veriton Z290G AIO Computer Service Guide Remove the screws securing the computer stand.
Remove the plastic shell covering the computer stand screws. 3. Perform the "Pre-disassembly Procedure" on page 25. 2. Disassembly Procedures Removing the Computer Stand 1. Quantity 3 Color Chrome Torque 4.0 +/- 0.3 kgf-cm Part Number 86.00J97.668 26 Veriton Z290G AIO Computer Service Guide Remove the screws securing the computer stand.

Service Guide
Page 35
4. Remove the computer stand. Quantity 2 Color Black Torque 4.0 +/- 0.3 kgf-cm Part Number 86.ZA324.8R0 Veriton Z290G AIO Computer Service Guide 27 Removing the Side Bars 1. Remove the screws securing the side bars. Perform the "Pre-disassembly Procedure" on page 25. 2.
4. Remove the computer stand. Quantity 2 Color Black Torque 4.0 +/- 0.3 kgf-cm Part Number 86.ZA324.8R0 Veriton Z290G AIO Computer Service Guide 27 Removing the Side Bars 1. Remove the screws securing the side bars. Perform the "Pre-disassembly Procedure" on page 25. 2.
Service Guide
Page 38
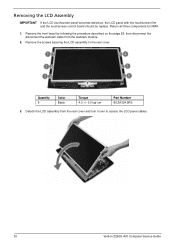
... Part Number 86.ZA324.8R0 3. Remove the front bezel by following the procedure described on the page 28, then disconnect the disconnect the webcam cable from the rear cover and turn it over to the rear cover. Remove the screws securing the LCD assembly to access the LCD panel cables. 30 Veriton Z290G...
... Part Number 86.ZA324.8R0 3. Remove the front bezel by following the procedure described on the page 28, then disconnect the disconnect the webcam cable from the rear cover and turn it over to the rear cover. Remove the screws securing the LCD assembly to access the LCD panel cables. 30 Veriton Z290G...

Service Guide
Page 40
Remove the touchscreen control board. Remove the LCD assembly by following the procedure described on the previous section. 2. Disconnect the LCD cable from the LCD board. 32 Veriton Z290G AIO Computer Service Guide Quantity 2 Color Chrome Torque 4.5 +/- 0.3 kgf.cm 8. 7. Part Number 86.00K96.644 Removing the LCD LVDS Cable 1. Remove the screws securing the touchscreen control board.
Remove the touchscreen control board. Remove the LCD assembly by following the procedure described on the previous section. 2. Disconnect the LCD cable from the LCD board. 32 Veriton Z290G AIO Computer Service Guide Quantity 2 Color Chrome Torque 4.5 +/- 0.3 kgf.cm 8. 7. Part Number 86.00K96.644 Removing the LCD LVDS Cable 1. Remove the screws securing the touchscreen control board.

Service Guide
Page 41
Disconnect the inverter board cables from the LCD panel, then turn over the inverter board bracket to access the inverter board cables. 4. Remove the screws securing the LCD panel and inverter board brackets. Removing the LCD Panel Bracket and Inverter Board 1. Veriton Z290G AIO Computer Service Guide 33 Quantity 4 Color Chrome Torque 4.0 +/- 0.3 kgf.cm Part Number 86.00K96.644 3. Remove the LCD assembly by following the procedure described on the page 30. 2. Detach the LCD panel bracket from the inverter board.
Disconnect the inverter board cables from the LCD panel, then turn over the inverter board bracket to access the inverter board cables. 4. Remove the screws securing the LCD panel and inverter board brackets. Removing the LCD Panel Bracket and Inverter Board 1. Veriton Z290G AIO Computer Service Guide 33 Quantity 4 Color Chrome Torque 4.0 +/- 0.3 kgf.cm Part Number 86.00K96.644 3. Remove the LCD assembly by following the procedure described on the page 30. 2. Detach the LCD panel bracket from the inverter board.

Service Guide
Page 42
Remove the screws securing the inverter board. Part Number 86.7A554.6R0 34 Veriton Z290G AIO Computer Service Guide Quantity 2 Color Chrome Torque 4.5 +/- 0.3 kgf.cm 6. Remove the inverter board cage from its bracket. 5.
Remove the screws securing the inverter board. Part Number 86.7A554.6R0 34 Veriton Z290G AIO Computer Service Guide Quantity 2 Color Chrome Torque 4.5 +/- 0.3 kgf.cm 6. Remove the inverter board cage from its bracket. 5.
Service Guide
Page 43
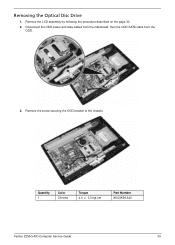
Quantity 1 Color Chrome Torque 4.0 +/- 0.3 kgf.cm Part Number 86.00K96.644 Veriton Z290G AIO Computer Service Guide 35 Remove the LCD assembly by following the procedure described on the page 30. 2. Remove the screw securing the ODD bracket to the chassis. Disconnect the ODD power and data cables from the mainboard, then the ODD SATA cable from the ODD. 3. Removing the Optical Disc Drive 1.
Quantity 1 Color Chrome Torque 4.0 +/- 0.3 kgf.cm Part Number 86.00K96.644 Veriton Z290G AIO Computer Service Guide 35 Remove the LCD assembly by following the procedure described on the page 30. 2. Remove the screw securing the ODD bracket to the chassis. Disconnect the ODD power and data cables from the mainboard, then the ODD SATA cable from the ODD. 3. Removing the Optical Disc Drive 1.

Service Guide
Page 44
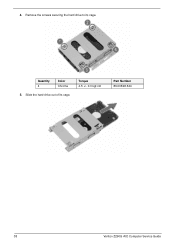
Remove the screw securing the ODD bracket. Quantity 2 Color Chrome Torque 2.0 +/- 0.2 kgf.cm 6. Part Number 86.00K77.223 36 Veriton Z290G AIO Computer Service Guide Detach the ODD bezel from the module. 4. Slide the ODD out of the rear cover. 5.
Remove the screw securing the ODD bracket. Quantity 2 Color Chrome Torque 2.0 +/- 0.2 kgf.cm 6. Part Number 86.00K77.223 36 Veriton Z290G AIO Computer Service Guide Detach the ODD bezel from the module. 4. Slide the ODD out of the rear cover. 5.
Service Guide
Page 45
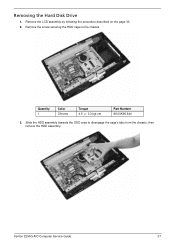
Veriton Z290G AIO Computer Service Guide 37 Remove the screw securing the HDD cage to disengage the cage's tabs from the chassis, then remove the HDD assembly. Slide the HDD assembly towards the ODD area to the chassis. Quantity 1 Color Chrome Torque 4.5 +/- 0.3 kgf.cm Part Number 86.00K96.644 3. Remove the LCD assembly by following the procedure described on the page 30. 2. Removing the Hard Disk Drive 1.
Veriton Z290G AIO Computer Service Guide 37 Remove the screw securing the HDD cage to disengage the cage's tabs from the chassis, then remove the HDD assembly. Slide the HDD assembly towards the ODD area to the chassis. Quantity 1 Color Chrome Torque 4.5 +/- 0.3 kgf.cm Part Number 86.00K96.644 3. Remove the LCD assembly by following the procedure described on the page 30. 2. Removing the Hard Disk Drive 1.
Service Guide
Page 46
Remove the screws securing the hard drive to its cage. Quantity 4 Color Chrome 5. Slide the hard drive out of its cage. Torque 4.5 +/- 0.3 kgf.cm Part Number 86.00K96.644 38 Veriton Z290G AIO Computer Service Guide 4.
Remove the screws securing the hard drive to its cage. Quantity 4 Color Chrome 5. Slide the hard drive out of its cage. Torque 4.5 +/- 0.3 kgf.cm Part Number 86.00K96.644 38 Veriton Z290G AIO Computer Service Guide 4.

Service Guide
Page 47
Disconnect the system fan cable from the mainboard. 3. Quantity 2 Color Chrome Torque 2.0 +/- 0.2 kgf.cm Part Number 86.7A122.4R0 Veriton Z290G AIO Computer Service Guide 39 Removing the System Fan 1. Remove the LCD assembly by following the procedure described on the page 30. 2. Remove the screw securing the system fan.
Disconnect the system fan cable from the mainboard. 3. Quantity 2 Color Chrome Torque 2.0 +/- 0.2 kgf.cm Part Number 86.7A122.4R0 Veriton Z290G AIO Computer Service Guide 39 Removing the System Fan 1. Remove the LCD assembly by following the procedure described on the page 30. 2. Remove the screw securing the system fan.
Service Guide
Page 52
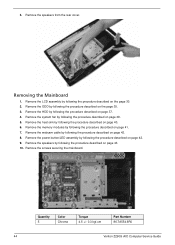
... described on page 43. 10. Remove the speakers by following the procedure described on page 42. 8. Quantity 5 Color Chrome Torque 4.5 +/- 0.3 kgf.cm Part Number 86.7A554.6R0 44 Veriton Z290G AIO Computer Service Guide 3. Removing the Mainboard 1. Remove the memory modules by following the procedure described on the page 35. 3. Remove the ODD...
... described on page 43. 10. Remove the speakers by following the procedure described on page 42. 8. Quantity 5 Color Chrome Torque 4.5 +/- 0.3 kgf.cm Part Number 86.7A554.6R0 44 Veriton Z290G AIO Computer Service Guide 3. Removing the Mainboard 1. Remove the memory modules by following the procedure described on the page 35. 3. Remove the ODD...

Service Guide
Page 57
... Refer to determine if BIOS recovery is corrupt. Some interrupt vectors are initialized. Recovery file not found flash part size. Erase the flash part. Veriton Z290G AIO Computer Service Guide 49 Restore CPUID value back into register. Jump back to BIOS POST (ExecutePOSTKernel). Disable... L1 cache. Detect proper flash part. Give control to the current configuration of RAM. Both key sequence and OEM ...
... Refer to determine if BIOS recovery is corrupt. Some interrupt vectors are initialized. Recovery file not found flash part size. Erase the flash part. Veriton Z290G AIO Computer Service Guide 49 Restore CPUID value back into register. Jump back to BIOS POST (ExecutePOSTKernel). Disable... L1 cache. Detect proper flash part. Give control to the current configuration of RAM. Both key sequence and OEM ...
Service Guide
Page 63
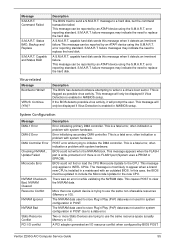
...POST error while trying to clear the NVRAM data. This message only applies to a hard disk, but the command transaction failed. Veriton Z290G AIO Computer Service Guide 55 S.M.A.R.T. S.M.A.R.T. Virus-related Message BootSector Write!! capable hard disk sends this message when it detects an imminent... failure. Message S.M.A.R.T. This is no FLASH part (System uses a PROM or EPROM). This message will prompt the user. More than one system device is a fatal error, ...
...POST error while trying to clear the NVRAM data. This message only applies to a hard disk, but the command transaction failed. Veriton Z290G AIO Computer Service Guide 55 S.M.A.R.T. S.M.A.R.T. Virus-related Message BootSector Write!! capable hard disk sends this message when it detects an imminent... failure. Message S.M.A.R.T. This is no FLASH part (System uses a PROM or EPROM). This message will prompt the user. More than one system device is a fatal error, ...

Service Guide
Page 75
... regional office on your regional office to order FRU parts for RMA (Return Merchandise Authorization). Refer to this printed Service Guide. Veriton Z290G AIO Computer Service Guide 67 The part numbers listed in this list when ordering for repair parts or for repair and service of the Veriton Z290G computer global configurations. Field Replaceable Unit (FRU) List...
... regional office on your regional office to order FRU parts for RMA (Return Merchandise Authorization). Refer to this printed Service Guide. Veriton Z290G AIO Computer Service Guide 67 The part numbers listed in this list when ordering for repair parts or for repair and service of the Veriton Z290G computer global configurations. Field Replaceable Unit (FRU) List...

Service Guide
Page 79
... CARD 56K PRO-NETS PRONETS VD56UL EXTERNAL USB REV 1.0 MODEM CARD 56K PRO-NETS USB Case / Cover / Bracket / Assembly Front bezel FRONT BEZEL 18.5" W/LOGO Part Number 23.VBK01.003 23.VBK01.004 FX.10100.001 FX.10100.023 60.VBK01.003 Rear cover BACK COVER 18.5 60.VBK01.002 Computer... BRACKET 60.VBK01.001 42.VBK01.002 60.VBK01.005 60.VBK01.006 42.VBK01.001 60.VBK01.004 33.VBK01.002 33.VBK01.001 Veriton Z290G AIO Computer Service Guide 71
... CARD 56K PRO-NETS PRONETS VD56UL EXTERNAL USB REV 1.0 MODEM CARD 56K PRO-NETS USB Case / Cover / Bracket / Assembly Front bezel FRONT BEZEL 18.5" W/LOGO Part Number 23.VBK01.003 23.VBK01.004 FX.10100.001 FX.10100.023 60.VBK01.003 Rear cover BACK COVER 18.5 60.VBK01.002 Computer... BRACKET 60.VBK01.001 42.VBK01.002 60.VBK01.005 60.VBK01.006 42.VBK01.001 60.VBK01.004 33.VBK01.002 33.VBK01.001 Veriton Z290G AIO Computer Service Guide 71

Service Guide
Page 80
Category ODD bezel LCD panel bracket Inverter board cover Part Name DVD-RW ODD BEZEL TOUCH PANEL BRACKET LEFT TOUCH PANEL BRACKET RIGHT Cables Power button/LED cable POWER LED SWITCH CABLE ODD SATA cable ODD SATA CABLE Inverter board cable INVERTER BOIARD CABLE LCD LVDS cable Webcam cable LVDS CABLE CAMERA CABLE Touchscreen control board cable CONTROL CABLE Serial port cable COM PORT CABLE Part Number 42.VBK01.003 33.VBK01.003 33.VBK01.004 50.VBK01.003 50.VBK01.001 50.VBK01.006 50.VBK01.005 50.VBK01.002 50.VBK01.004 50.VBK01.007 72 Veriton Z290G AIO Computer Service Guide
Category ODD bezel LCD panel bracket Inverter board cover Part Name DVD-RW ODD BEZEL TOUCH PANEL BRACKET LEFT TOUCH PANEL BRACKET RIGHT Cables Power button/LED cable POWER LED SWITCH CABLE ODD SATA cable ODD SATA CABLE Inverter board cable INVERTER BOIARD CABLE LCD LVDS cable Webcam cable LVDS CABLE CAMERA CABLE Touchscreen control board cable CONTROL CABLE Serial port cable COM PORT CABLE Part Number 42.VBK01.003 33.VBK01.003 33.VBK01.004 50.VBK01.003 50.VBK01.001 50.VBK01.006 50.VBK01.005 50.VBK01.002 50.VBK01.004 50.VBK01.007 72 Veriton Z290G AIO Computer Service Guide


