
Veriton 7200
Page 2
...of merchantability or fitness for a particular purpose. All correspondence concerning your computer. Veriton 7200 User's guide Changes may be made periodically to the information in the space ...and purchase information. Model Number Serial Number Purchase Date Place of Purchase Acer and the Acer Logo are used herein for identification purposes only and belong to the ...respective companies. No part of this publication without the prior written permission of this manual or supplementary documents and publications. Other company's product names or trademarks are registered...
...of merchantability or fitness for a particular purpose. All correspondence concerning your computer. Veriton 7200 User's guide Changes may be made periodically to the information in the space ...and purchase information. Model Number Serial Number Purchase Date Place of Purchase Acer and the Acer Logo are used herein for identification purposes only and belong to the ...respective companies. No part of this publication without the prior written permission of this manual or supplementary documents and publications. Other company's product names or trademarks are registered...

Veriton 7200
Page 27
... in between the two buttons is called clicking. 17 Mouse Your mouse has one ratchet wheel and two buttons: a left -handed, refer to your Windows manual for left-handed use. For information on how to clean your mouse, see "To clean your mouse" on how to set up your index finger...
... in between the two buttons is called clicking. 17 Mouse Your mouse has one ratchet wheel and two buttons: a left -handed, refer to your Windows manual for left-handed use. For information on how to clean your mouse, see "To clean your mouse" on how to set up your index finger...

Veriton 7200
Page 37
27 Note: If you are using a PS/2 mouse, plug the mouse cable into the PS/2 mouse port your computer. (green port) located on the rear panel of Monitor To connect a monitor, simply plug the monitor cable into the monitor port located on the rear panel of your computer. Note: Refer to the monitor manual for additonal instructions and information.
27 Note: If you are using a PS/2 mouse, plug the mouse cable into the PS/2 mouse port your computer. (green port) located on the rear panel of Monitor To connect a monitor, simply plug the monitor cable into the monitor port located on the rear panel of your computer. Note: Refer to the monitor manual for additonal instructions and information.

Veriton 7200
Page 44
To do so, simply plug the network cable into the network port on how to a Local Area Network (LAN) using a network cable. 34 3 Setting up your computer Network You can connect your computer. Note: Consult your operating system manual for information on the rear panel of your computer to configure your network setup.
To do so, simply plug the network cable into the network port on how to a Local Area Network (LAN) using a network cable. 34 3 Setting up your computer Network You can connect your computer. Note: Consult your operating system manual for information on the rear panel of your computer to configure your network setup.

Veriton 7200 Service Guide
Page 2
... warranties, either expressed or implied, with respect to change without the prior written permission of Intel Corporation. Any Acer Incorporated software described in this manual is sold or licensed "as is a registered trademark of Acer Corporation. No part of all necessary servicing, repair, and any incidental or consequential damages resulting from any defect...
... warranties, either expressed or implied, with respect to change without the prior written permission of Intel Corporation. Any Acer Incorporated software described in this manual is sold or licensed "as is a registered trademark of Acer Corporation. No part of all necessary servicing, repair, and any incidental or consequential damages resulting from any defect...

Veriton 7200 Service Guide
Page 3
Alerts you to do specific actions relevant to the accomplishment of additional information related to any damage that appear on screen. III Gives precautionary measures to avoid possible hardware or software problems. Reminds you to the current topic. Conventions The following conventions are used in this manual: Screen messages Denotes actual messages that might result from doing or not doing specific actions. NOTE WARNING CAUTION IMPORTANT Gives bits and pieces of procedures.
Alerts you to do specific actions relevant to the accomplishment of additional information related to any damage that appear on screen. III Gives precautionary measures to avoid possible hardware or software problems. Reminds you to the current topic. Conventions The following conventions are used in this manual: Screen messages Denotes actual messages that might result from doing or not doing specific actions. NOTE WARNING CAUTION IMPORTANT Gives bits and pieces of procedures.

Veriton 7200 Service Guide
Page 34
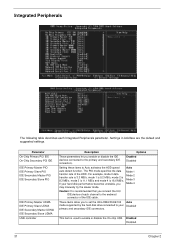
... HDD AutoDetection IDE Primary Master Access Mode Capacity Cylinder Head Precomp Landing Zone Sector Description Auto-detects your hard disk's number of sectors Auto None Manual Auto Large LBA CHS xxxxx MB 0 to 65535 0 to 255 0 to 65535 0 to 65535 0 to 255 27 Chapter 2 Shows your hard disk drive...
... HDD AutoDetection IDE Primary Master Access Mode Capacity Cylinder Head Precomp Landing Zone Sector Description Auto-detects your hard disk's number of sectors Auto None Manual Auto Large LBA CHS xxxxx MB 0 to 65535 0 to 255 0 to 65535 0 to 65535 0 to 255 27 Chapter 2 Shows your hard disk drive...
Veriton 7200 Service Guide
Page 38
... items to the endmost connector of the HDD. This item is 16.6 MB/s. Auto Mode 1 Mode 2 Mode 3 Mode 4 Caution: It is recommended that you may manually try the slower mode.
... items to the endmost connector of the HDD. This item is 16.6 MB/s. Auto Mode 1 Mode 2 Mode 3 Mode 4 Caution: It is recommended that you may manually try the slower mode.
Veriton 7200 Service Guide
Page 44
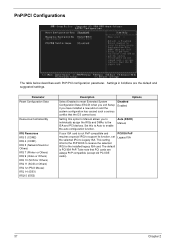
...Auto to enable the auto-configuration function. This setting informs the PnP BIOS to Legacy ISA. Take note that the OS cannot boot. Auto (ESCD) Manual If your ISA card is PCI/ISA PnP. Parameter Reset Configuration Data Resources Controlled By IRQ Resources IRQ 3 (COM2) IRQ 4 (COM1) IRQ ... Select Enabled to reset Extended System Configuration Data (ESCD) when you exit Setup if you to individually assign the IRQs and DMAs to Manual allows you have installed a new add-on and the system configuration has caused such a serious conflict that PCI cards are the default and...
...Auto to enable the auto-configuration function. This setting informs the PnP BIOS to Legacy ISA. Take note that the OS cannot boot. Auto (ESCD) Manual If your ISA card is PCI/ISA PnP. Parameter Reset Configuration Data Resources Controlled By IRQ Resources IRQ 3 (COM2) IRQ 4 (COM1) IRQ ... Select Enabled to reset Extended System Configuration Data (ESCD) when you exit Setup if you to individually assign the IRQs and DMAs to Manual allows you have installed a new add-on and the system configuration has caused such a serious conflict that PCI cards are the default and...

Veriton 7200 Service Guide
Page 45
... the CPR send a signal to all RAMDAC data has been updated. NOTE: Some VGA cards have required settings for this parameter. Check your VGA card manual before setting this feature. The PVI/VGA palette snoop function allows the control palette register (CPR) to manage and update the VGA RAMDAC Disabled Enabled...
... the CPR send a signal to all RAMDAC data has been updated. NOTE: Some VGA cards have required settings for this parameter. Check your VGA card manual before setting this feature. The PVI/VGA palette snoop function allows the control palette register (CPR) to manage and update the VGA RAMDAC Disabled Enabled...

Veriton 7200 Service Guide
Page 83
... cable assembly. Error Symptom Action/FRU Parallel/Serial Ports Execute "Load BIOS Default Settings" in BIOS Setup to the printer service manual. 2. Make sure that the LPT# or COM# you test is not set to the service manual for the power cable) is the same as the setting in BIOS Setup. 2. Printer. 3.
... cable assembly. Error Symptom Action/FRU Parallel/Serial Ports Execute "Load BIOS Default Settings" in BIOS Setup to the printer service manual. 2. Make sure that the LPT# or COM# you test is not set to the service manual for the power cable) is the same as the setting in BIOS Setup. 2. Printer. 3.

Veriton 7200 Service Guide
Page 105
... : ! In the Technical Information section you can be obtained directly from Acer CSD Taiwan. Troubleshooting guides ! Also contained on Acer's International Traveler's Warranty (ITW) ! Returned material authorization procedures ! Acer Branch Offices and Regional Business Units may access our website. Basic repair guidelines ! User's manuals ! Software utilities ! TABs (Technical Announcement Bulletin) The service repair section...
... : ! In the Technical Information section you can be obtained directly from Acer CSD Taiwan. Troubleshooting guides ! Also contained on Acer's International Traveler's Warranty (ITW) ! Returned material authorization procedures ! Acer Branch Offices and Regional Business Units may access our website. Basic repair guidelines ! User's manuals ! Software utilities ! TABs (Technical Announcement Bulletin) The service repair section...


