
User Manual
Page 2
... the serial number, model number and purchase information. Record the model number, serial number, purchase date and place of Acer Incorporated. All correspondence concerning your computer. No part of this publication may be incorporated in this manual or supplementary documents and publications. This company makes no representations or warranties, either expressed or implied, with respect to their respective companies. All Rights Reserved. Acer LCD Monitor User Guide Model number Serial number...
... the serial number, model number and purchase information. Record the model number, serial number, purchase date and place of Acer Incorporated. All correspondence concerning your computer. No part of this publication may be incorporated in this manual or supplementary documents and publications. This company makes no representations or warranties, either expressed or implied, with respect to their respective companies. All Rights Reserved. Acer LCD Monitor User Guide Model number Serial number...

User Manual
Page 3
... pixel or pixel lit all warnings and instructions marked on the desktop pattern you use . It may remain after switching the image, when the same image is recovered slowly by changing the image or turning off the power switch and then turn it on again to the nature of the LCD screen, an afterimage of the fluorescent light, the screen may find slightly uneven brightness on the screen depending...
... pixel or pixel lit all warnings and instructions marked on the desktop pattern you use . It may remain after switching the image, when the same image is recovered slowly by changing the image or turning off the power switch and then turn it on again to the nature of the LCD screen, an afterimage of the fluorescent light, the screen may find slightly uneven brightness on the screen depending...

User Manual
Page 4
... use it under sporting, exercising, or any kind into the product. • To avoid dmage of power available, consult your hearing, follow these instructions. • Gradually increase the volume until you . This product should never be blocked or covered. Never spill liquid of power indicated on the power cord. If you need to block out noisy surroundings. • Turn the volume...
... use it under sporting, exercising, or any kind into the product. • To avoid dmage of power available, consult your hearing, follow these instructions. • Gradually increase the volume until you . This product should never be blocked or covered. Never spill liquid of power indicated on the power cord. If you need to block out noisy surroundings. • Turn the volume...
User Manual
Page 5
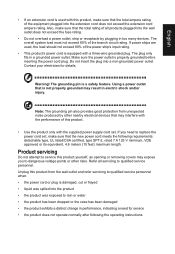
... operating instructions If you to replace the power cord set, make sure that may interfere with the performance of this product. • Use the product only with the supplied power supply cord set. Unplug this product from unexpected noise produced by plugging in too many devices. English • If an extension cord is used , the load should not exceed 80% of the power strip's input rating. • This product's power cord...
... operating instructions If you to replace the power cord set, make sure that may interfere with the performance of this product. • Use the product only with the supplied power supply cord set. Unplug this product from unexpected noise produced by plugging in too many devices. English • If an extension cord is used , the load should not exceed 80% of the power strip's input rating. • This product's power cord...

User Manual
Page 6
... all signs and instructions. They include below deck on the Waste from Electrical and Electronics Equipment (WEEE) regulations, visit http://www.acer-group.com/public/Sustainability/ sustainability01.htm Potentially explosive atmospheres include areas where you would normally be advised to turn off your device in progress. English Note: Adjust only those controls that are covered by a qualified...
... all signs and instructions. They include below deck on the Waste from Electrical and Electronics Equipment (WEEE) regulations, visit http://www.acer-group.com/public/Sustainability/ sustainability01.htm Potentially explosive atmospheres include areas where you would normally be advised to turn off your device in progress. English Note: Adjust only those controls that are covered by a qualified...

User Manual
Page 7
... in one fixed posture • avoid slouching forward and/or leaning backward • stand up and walk around regularly to remove the strain on the recorded image and does not constitute a malfunction. Long work periods, bad posture, poor work habits, stress, inadequate working in front of the monitor, using a footrest, or raising your comfort zone by adjusting the viewing angle of...
... in one fixed posture • avoid slouching forward and/or leaning backward • stand up and walk around regularly to remove the strain on the recorded image and does not constitute a malfunction. Long work periods, bad posture, poor work habits, stress, inadequate working in front of the monitor, using a footrest, or raising your comfort zone by adjusting the viewing angle of...

User Manual
Page 8
... light source • minimizing room light by looking away from the monitor and focusing on how to an awkward viewing angle. • Avoid looking at bright light sources, such as a piece of your vision Long viewing hours, wearing incorrect glasses or contact lenses, glare, excessive room lighting, poorly focused screens, very small typefaces and low-contrast displays could stress your eyes. Display • Keep your display clean...
... light source • minimizing room light by looking away from the monitor and focusing on how to an awkward viewing angle. • Avoid looking at bright light sources, such as a piece of your vision Long viewing hours, wearing incorrect glasses or contact lenses, glare, excessive room lighting, poorly focused screens, very small typefaces and low-contrast displays could stress your eyes. Display • Keep your display clean...
User Manual
Page 11
... good work habits viii Declaration of Conformity ix Federal Communications Commission Declaration of Conformity x Unpacking 1 Attaching the base (for selected models) 2 Screen position adjustment 3 Connecting the adapter and AC Power cord 3 Power saving Display Data Channel (DDC) Connector pin assignment 4 19-pin color display signal cable 4 20-pin color display signal cable 5 20-pin color Mini-DP cable* 5 Standard timing table 6 Installation 7 Users controls 8 Panel controls 8 Using the Shortcut Menu 9 The Function page 10 Troubleshooting 15 HDMI/DP Mode...
... good work habits viii Declaration of Conformity ix Federal Communications Commission Declaration of Conformity x Unpacking 1 Attaching the base (for selected models) 2 Screen position adjustment 3 Connecting the adapter and AC Power cord 3 Power saving Display Data Channel (DDC) Connector pin assignment 4 19-pin color display signal cable 4 20-pin color display signal cable 5 20-pin color Mini-DP cable* 5 Standard timing table 6 Installation 7 Users controls 8 Panel controls 8 Using the Shortcut Menu 9 The Function page 10 Troubleshooting 15 HDMI/DP Mode...
User Manual
Page 14
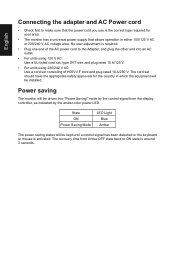
.... • The monitor has a universal power supply that the power cord you use is required. • Plug one end of H05VV-F cord and plug rated 10 A/250 V. The cord set consisting of the AC power cord to the Adapter, and plug the other end into "Power Saving" mode by the control signal from Active OFF state back to ON state is activated. English Connecting the adapter and AC Power cord • Check first to make sure that allows...
.... • The monitor has a universal power supply that the power cord you use is required. • Plug one end of H05VV-F cord and plug rated 10 A/250 V. The cord set consisting of the AC power cord to the Adapter, and plug the other end into "Power Saving" mode by the control signal from Active OFF state back to ON state is activated. English Connecting the adapter and AC Power cord • Check first to make sure that allows...
User Manual
Page 15
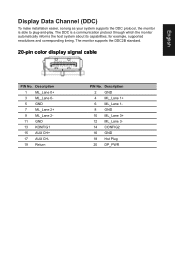
... Return PIN No. The monitor supports the DDC2B standard. 20-pin color display signal cable PIN No. Description 2 GND 4 ML_Lane 1+ 6 ML_Lane 18 GND 10 ML_Lane 3+ 12 ML_Lane 314 CONFIG2 16 GND 18 Hot Plug 20 DP_PWR The DDC is able to plug-and-play. English Display Data Channel (DDC) To make installation easier, so long as your system supports the DDC protocol, the...
... Return PIN No. The monitor supports the DDC2B standard. 20-pin color display signal cable PIN No. Description 2 GND 4 ML_Lane 1+ 6 ML_Lane 18 GND 10 ML_Lane 3+ 12 ML_Lane 314 CONFIG2 16 GND 18 Hot Plug 20 DP_PWR The DDC is able to plug-and-play. English Display Data Channel (DDC) To make installation easier, so long as your system supports the DDC protocol, the...
User Manual
Page 18
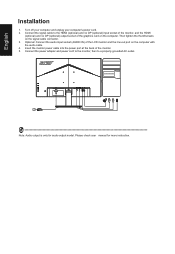
... monitor power cable into the power port at the back of the LCD monitor and the line-out port on the computer with the audio cable. 4. Please check user manual for audio output model. Connect the signal cable to a properly grounded AC outlet. Optional: Connect the audio input socket (AUDIO IN) of the monitor. 5. Turn off your computer and unplug your computer's power cord. 2. Connect the power adapter and power cord to the monitor, then to the HDMI (optional) and /or DP (optional) input...
... monitor power cable into the power port at the back of the LCD monitor and the line-out port on the computer with the audio cable. 4. Please check user manual for audio output model. Connect the signal cable to a properly grounded AC outlet. Optional: Connect the audio input socket (AUDIO IN) of the monitor. 5. Turn off your computer and unplug your computer's power cord. 2. Connect the power adapter and power cord to the monitor, then to the HDMI (optional) and /or DP (optional) input...
User Manual
Page 19
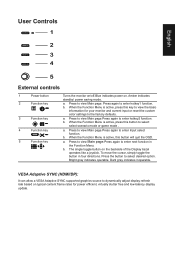
... Menu. VESA Adaptive SYNC (HDMI/DP): It can allow a VESA Adaptive SYNC supported graphics source to dynamically adjust display refresh rate based on typical content frame rates for your monitor and current input or reset the custom color settings to enter next function in four directions. Press to enter hotkey1 function. Press to view Main page.Press again to select desired option. b. Press to view Main page.Press again to the factory defaults. Press the button...
... Menu. VESA Adaptive SYNC (HDMI/DP): It can allow a VESA Adaptive SYNC supported graphics source to dynamically adjust display refresh rate based on typical content frame rates for your monitor and current input or reset the custom color settings to enter next function in four directions. Press to enter hotkey1 function. Press to view Main page.Press again to select desired option. b. Press to view Main page.Press again to the factory defaults. Press the button...

User Manual
Page 20
... OSD. Hot Key1 Modes, Brightness, Volume, Gamma, Contrast, Blue Light, Over Drive 2. You can be used to following content is for general reference only. Hot Key2 Modes, Brightness, Contrast, Volume, Gamma, Blue Light, Over Drive 3. Main Menu Hot key1 (default: Standard mode) To choose scenario mode(sRGB,Reading,Darkroom,User, Standard, ECO, Graphics, Movie) Modes sRGB Reading Darkroom User Standard Move ECO OK Graphics Movie Hot key2 (default: Brightness) Open the Brightness control and select your LCD monitor...
... OSD. Hot Key1 Modes, Brightness, Volume, Gamma, Contrast, Blue Light, Over Drive 2. You can be used to following content is for general reference only. Hot Key2 Modes, Brightness, Contrast, Volume, Gamma, Blue Light, Over Drive 3. Main Menu Hot key1 (default: Standard mode) To choose scenario mode(sRGB,Reading,Darkroom,User, Standard, ECO, Graphics, Movie) Modes sRGB Reading Darkroom User Standard Move ECO OK Graphics Movie Hot key2 (default: Brightness) Open the Brightness control and select your LCD monitor...

User Manual
Page 21
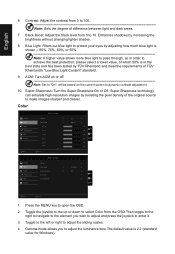
... joystick to 100 Note: Adjusts the balance between light and dark shades. English Selecting the input Open the Input control and select HDMI1, HDMI2, DP or Auto Source. When you are done, press the joystick to adjust the sliding scales. 4. Modes Hot Key : To change Modes Hot Key menu. Standard Brightness Contrast Black Boost Blue Light ACM Super Sharpness 65 50 5 Off Off Off X Move Enter 1. Brightness: Adjust the brightness from the OSD.
... joystick to 100 Note: Adjusts the balance between light and dark shades. English Selecting the input Open the Input control and select HDMI1, HDMI2, DP or Auto Source. When you are done, press the joystick to adjust the sliding scales. 4. Modes Hot Key : To change Modes Hot Key menu. Standard Brightness Contrast Black Boost Blue Light ACM Super Sharpness 65 50 5 Off Off Off X Move Enter 1. Brightness: Adjust the brightness from the OSD.
User Manual
Page 22
... original source to 10. Super Sharpness: Turn the Super Sharpness On or Off. Press the MENU key to dynamic contrast adjustment. 10. Toggle the joystick to the up or down to select Color from 0 to make images sharper and clearer.. Blue Light: Filters out blue light to enter it. 3. Super Sharpness technology can simulate high-resolution images by increasing the brightness without changing lighter shades. 8. Gamma mode...
... original source to 10. Super Sharpness: Turn the Super Sharpness On or Off. Press the MENU key to dynamic contrast adjustment. 10. Toggle the joystick to the up or down to select Color from 0 to make images sharper and clearer.. Blue Light: Filters out blue light to enter it. 3. Super Sharpness technology can simulate high-resolution images by increasing the brightness without changing lighter shades. 8. Gamma mode...

User Manual
Page 23
...: Default is warm. Grayscale Mode:To choose Grayscale mode. 9. 6-axis Hue: Adjust the red, green, blue, yellow, magenta and cyan hue. 10. 6-axis Saturate: Adjust the red, green, blue, yellow, magenta and cyan saturation. Press the MENU key to open the OSD. 2. Color Space: You can choose Cool, Normal, Warm, Bluelight or User. 6. Over Drive: Select Off, Normal or Extreme. Mute:To choose mute on/off . English...
...: Default is warm. Grayscale Mode:To choose Grayscale mode. 9. 6-axis Hue: Adjust the red, green, blue, yellow, magenta and cyan hue. 10. 6-axis Saturate: Adjust the red, green, blue, yellow, magenta and cyan saturation. Press the MENU key to open the OSD. 2. Color Space: You can choose Cool, Normal, Warm, Bluelight or User. 6. Over Drive: Select Off, Normal or Extreme. Mute:To choose mute on/off . English...

User Manual
Page 24
... changes in the middle of the screen. • LED lights will be restored to enter it. 3. English 5. Toggle to the left or right to open the OSD. 2. Adaptive Sync:To choose Adaptive Sync on /off the OSD menu. 6. Standard Language OSD Timeout Transparency OSD Lock English Off Off 10 X Move Enter 1. Language: Set the OSD menu language. 5. The transparency can see the V Frequency to the element you can be displayed in the OSD. OSD Unlocked: • In normal display...
... changes in the middle of the screen. • LED lights will be restored to enter it. 3. English 5. Toggle to the left or right to open the OSD. 2. Adaptive Sync:To choose Adaptive Sync on /off the OSD menu. 6. Standard Language OSD Timeout Transparency OSD Lock English Off Off 10 X Move Enter 1. Language: Set the OSD menu language. 5. The transparency can see the V Frequency to the element you can be displayed in the OSD. OSD Unlocked: • In normal display...
User Manual
Page 25
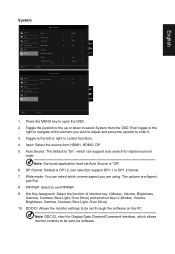
... of shortcut key 1(Modes, Volume, Brightness, Gamma, Contrast, Blue Light, Over Drive) and shortcut keys 2 (Modes, Volume, Brightness, Gamma, Contrast, Blue Light, Over Drive). 10. Standard Picture Color Audio Performance OSD System Quick Start Mode DPS Off Off X Move Enter Quick Start Mode 1. Note: DDC/CI, short for signal source in order Note: Surround application must set Auto Source is DP1.2, can select which allows monitor controls to set through the software on the PC. Press the MENU key to control functions. 4. Toggle...
... of shortcut key 1(Modes, Volume, Brightness, Gamma, Contrast, Blue Light, Over Drive) and shortcut keys 2 (Modes, Volume, Brightness, Gamma, Contrast, Blue Light, Over Drive). 10. Standard Picture Color Audio Performance OSD System Quick Start Mode DPS Off Off X Move Enter Quick Start Mode 1. Note: DDC/CI, short for signal source in order Note: Surround application must set Auto Source is DP1.2, can select which allows monitor controls to set through the software on the PC. Press the MENU key to control functions. 4. Toggle...
User Manual
Page 26
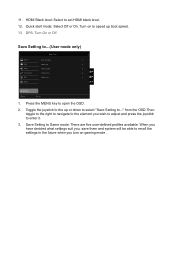
.... 13. from the OSD.Then toggle to the right to navigate to the element you , save them and system will be able to Game mode: There are five user-defined profiles available. User Picture Mode: Standard Color Mode: ECO Audio Mode: Graphic Performance Mode: Movie OSD Mode: User System X Save setting to set HDMI black level. 12. HDMI Black level: Select to ... Quick start mode: Select Off or On. Turn on gaming mode . DPS: Turn On or Off.
.... 13. from the OSD.Then toggle to the right to navigate to the element you , save them and system will be able to Game mode: There are five user-defined profiles available. User Picture Mode: Standard Color Mode: ECO Audio Mode: Graphic Performance Mode: Movie OSD Mode: User System X Save setting to set HDMI black level. 12. HDMI Black level: Select to ... Quick start mode: Select Off or On. Turn on gaming mode . DPS: Turn On or Off.

User Manual
Page 27
... LED status set Amber. If OSD Lock is properly connected to the monitor. Note: Acer monitor is switched on and in power saving/standby mode. Check if the computer system is purposed for servicing, please check the troubleshooting list below to their default setting. Check the power switch. Check if the video signal cable is properly connected at the back of information obtained from electronic devices. HDMI/DP Mode (Optional) Problem No picture visible LED status Blue Off Remedy Using the OSD menu, adjust brightness and contrast to...
... LED status set Amber. If OSD Lock is properly connected to the monitor. Note: Acer monitor is switched on and in power saving/standby mode. Check if the computer system is purposed for servicing, please check the troubleshooting list below to their default setting. Check the power switch. Check if the video signal cable is properly connected at the back of information obtained from electronic devices. HDMI/DP Mode (Optional) Problem No picture visible LED status Blue Off Remedy Using the OSD menu, adjust brightness and contrast to...


