

User Manual
Page 1
All Rights Reserved. Acer Projector User's Guide Original Issue: 06/2018 Acer Incorporated. Acer Projector U5530/U5330W/U5230/R350/R320/R310/ PU-F20/PU-W20/PU-X20/SP150/SP130/ SP110/FU-420/FU-320/FU-120/D1P1801/ DWX1802/DNX1803 User's Guide Copyright © 2018.
All Rights Reserved. Acer Projector User's Guide Original Issue: 06/2018 Acer Incorporated. Acer Projector U5530/U5330W/U5230/R350/R320/R310/ PU-F20/PU-W20/PU-X20/SP150/SP130/ SP110/FU-420/FU-320/FU-120/D1P1801/ DWX1802/DNX1803 User's Guide Copyright © 2018.

User Manual
Page 2
... Multimedia Interface are used herein for a particular purpose. Other companies' product names or trademarks are trademarks or registered trademarks of Acer Incorporated. Record the model number, serial number, purchase date and place of this publication without obligation to notify any means, ...unit should include the serial number, model number and purchase information. The serial number and model number are registered trademarks of Acer Incorporated. Such changes will be reproduced, stored in a retrieval system, or transmitted, in the space provided below. Model number...
... Multimedia Interface are used herein for a particular purpose. Other companies' product names or trademarks are trademarks or registered trademarks of Acer Incorporated. Record the model number, serial number, purchase date and place of this publication without obligation to notify any means, ...unit should include the serial number, model number and purchase information. The serial number and model number are registered trademarks of Acer Incorporated. Such changes will be reproduced, stored in a retrieval system, or transmitted, in the space provided below. Model number...

User Manual
Page 3
... of power, disconnect power from the power supplies. Do not use this product from the wall outlet before removing the power supply unit from the projector. • If the system has multiple sources of internal components and to the AC power outlet. • Unplug the power cord before cleaning. The openings...
... of power, disconnect power from the power supplies. Do not use this product from the wall outlet before removing the power supply unit from the projector. • If the system has multiple sources of internal components and to the AC power outlet. • Unplug the power cord before cleaning. The openings...

User Manual
Page 5
...environments: • Space that are higher than 10000 feet. • Unplug immediately if there is to wait for the fan to ensure the projector completes its enhancements may contaminate optical components, shortening the life span and darkening the image. • Locations near fire alarms. • Locations... or cigarette smoke may contain small parts. Warning! At least 50cm clearance from walls and free flow of air around the projector is on the projector first and then signal sources • Do not place the product in damage and will often require extensive work by the ...
...environments: • Space that are higher than 10000 feet. • Unplug immediately if there is to wait for the fan to ensure the projector completes its enhancements may contaminate optical components, shortening the life span and darkening the image. • Locations near fire alarms. • Locations... or cigarette smoke may contain small parts. Warning! At least 50cm clearance from walls and free flow of air around the projector is on the projector first and then signal sources • Do not place the product in damage and will often require extensive work by the ...

User Manual
Page 6
...open the lens shutter or remove the lens cap when the projector is on rare occasions. • Never replace the lamp assembly or any object when the projector is operating. Only use acer ceiling mount kit for mounting the projector and ensure it is showing warning message. • When ...176; There are dangerous high voltages inside may rise and cause damage when the filter/ventilation slots clogged with any electronic components unless the projector is unplugged. • The product will detect the life of desktop or ceiling mount mode only, and its own removable cover. The...
...open the lens shutter or remove the lens cap when the projector is on rare occasions. • Never replace the lamp assembly or any object when the projector is operating. Only use acer ceiling mount kit for mounting the projector and ensure it is showing warning message. • When ...176; There are dangerous high voltages inside may rise and cause damage when the filter/ventilation slots clogged with any electronic components unless the projector is unplugged. • The product will detect the life of desktop or ceiling mount mode only, and its own removable cover. The...

User Manual
Page 7
... local, state or federal laws. For more information on the Waste from Electrical and Electronics Equipment (WEEE) regulations, visit http://www.acer-group.com/public/Sustainability/sustainability01.htm Mercury advisory For projectors or electronic products containing an LCD/CRT monitor or display: "Lamp(s) contain Mercury, Dispose Properly." Disposal instructions Do not throw...
... local, state or federal laws. For more information on the Waste from Electrical and Electronics Equipment (WEEE) regulations, visit http://www.acer-group.com/public/Sustainability/sustainability01.htm Mercury advisory For projectors or electronic products containing an LCD/CRT monitor or display: "Lamp(s) contain Mercury, Dispose Properly." Disposal instructions Do not throw...

User Manual
Page 8
... Disconnect the power plug from the Onscreen display "OPTIONS | Lamp Settings" menu after replacing the lamp module. • When switching the projector off, please ensure the projector completes its life, it shows warning messages. • Reset the "Lamp Reset" function from AC outlet if the product is on until...replaced. The bright light may hurt your unit. If this may make a loud popping sound. Warning: • Do not look into the projector's lens when the lamp is not being used for ventilation. • Use abrasive cleaners, waxes or solvents to change the lamp when it ...
... Disconnect the power plug from the Onscreen display "OPTIONS | Lamp Settings" menu after replacing the lamp module. • When switching the projector off, please ensure the projector completes its life, it shows warning messages. • Reset the "Lamp Reset" function from AC outlet if the product is on until...replaced. The bright light may hurt your unit. If this may make a loud popping sound. Warning: • Do not look into the projector's lens when the lamp is not being used for ventilation. • Use abrasive cleaners, waxes or solvents to change the lamp when it ...

User Manual
Page 9
... 8 Connect to 3D Video Devices 9 Using the 3D glasses 11 Powering On/Off the Projector...........12 Powering On the Projector 12 Powering Off the Projector 13 Warning Indicator 14 Adjusting the Projected Image...........15 Adjusting the Projector's Height ........ 15 Adjusting the Projector's Focus.......... 16 Adjusting Projection Image Size......... 16 User Controls 19 Control Panel & Remote...
... 8 Connect to 3D Video Devices 9 Using the 3D glasses 11 Powering On/Off the Projector...........12 Powering On the Projector 12 Powering Off the Projector 13 Warning Indicator 14 Adjusting the Projected Image...........15 Adjusting the Projector's Height ........ 15 Adjusting the Projector's Focus.......... 16 Adjusting Projection Image Size......... 16 User Controls 19 Control Panel & Remote...

User Manual
Page 10
Introduction Package Overview Unpack and inspect the box contents to ensure all parts listed below are in the box. If something is missing, please contact Acer customer service. Standard Accessories Power Switch Freeze L R Enter Page- Laser Page+ Keystone -+ Volume -+ 1 4 HDMI 7 User1 Source 2 Menu 5 VGA 8 User2 0 3 3D 6 Video 9 User3 Resync Projector Power Cord Remote CD User Manual Warranty Card Quick Start Guide VGA Cable 2 × AAA Batteries Documentation English 2
Introduction Package Overview Unpack and inspect the box contents to ensure all parts listed below are in the box. If something is missing, please contact Acer customer service. Standard Accessories Power Switch Freeze L R Enter Page- Laser Page+ Keystone -+ Volume -+ 1 4 HDMI 7 User1 Source 2 Menu 5 VGA 8 User2 0 3 3D 6 Video 9 User3 Resync Projector Power Cord Remote CD User Manual Warranty Card Quick Start Guide VGA Cable 2 × AAA Batteries Documentation English 2

User Manual
Page 11
IR Camera (Only for interactive version) 3 English Focus Switch 4. Input/Output Connections 6. Speaker 9. Introduction Product Overview Main Unit 12 3 4 5 6 9 ™™ Do not block projector in/out air vents. 7 8 1. Lamp Cover 2. Lens 7. IR Receiver 5. Power Socket 8. Control Panel 3.
IR Camera (Only for interactive version) 3 English Focus Switch 4. Input/Output Connections 6. Speaker 9. Introduction Product Overview Main Unit 12 3 4 5 6 9 ™™ Do not block projector in/out air vents. 7 8 1. Lamp Cover 2. Lens 7. IR Receiver 5. Power Socket 8. Control Panel 3.

User Manual
Page 15
Installation Connecting to the Projector Connecting a Computer/Notebook MOLEX 12 3 4 58 Microphone input SERVICE VGA IN 2 / VGA OUT RS-232 VGA IN 1 HDMI 2 VIDEO 3D SYNC HDMI 1 AUDIO IN 2 R-AUDIO ...
Installation Connecting to the Projector Connecting a Computer/Notebook MOLEX 12 3 4 58 Microphone input SERVICE VGA IN 2 / VGA OUT RS-232 VGA IN 1 HDMI 2 VIDEO 3D SYNC HDMI 1 AUDIO IN 2 R-AUDIO ...
User Manual
Page 17
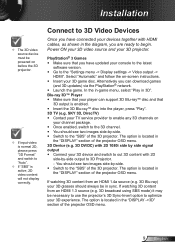
... option is active, 2D video content will not display correctly. Installation ™™ The 3D video source device must be powered on before the 3D projector. ™™ If input video is normal 2D, please press "3D Format" and switch to "Auto". ™™ If "SBS" is located ...sure that your player can download games (and 3D updates) via the PlayStation® network. yy You should always be necessary to use the projector's 3D Sync-Invert option to optimize your console to the latest software version. The option is enabled. Alternatively you have updated your 3D experience...
... option is active, 2D video content will not display correctly. Installation ™™ The 3D video source device must be powered on before the 3D projector. ™™ If input video is normal 2D, please press "3D Format" and switch to "Auto". ™™ If "SBS" is located ...sure that your player can download games (and 3D updates) via the PlayStation® network. yy You should always be necessary to use the projector's 3D Sync-Invert option to optimize your console to the latest software version. The option is enabled. Alternatively you have updated your 3D experience...

User Manual
Page 18
Installation 3D Broadcast 3D Blu-ray™ Disc 3D Console Games SKY+HD, cable/satellite box 3D Blu-ray™ Player PlayStation® 3 3D DLP®Link™ Glasses Full 3D 1080p DLP® Projector 3D RF Glasses 3D Emitter English 10
Installation 3D Broadcast 3D Blu-ray™ Disc 3D Console Games SKY+HD, cable/satellite box 3D Blu-ray™ Player PlayStation® 3 3D DLP®Link™ Glasses Full 3D 1080p DLP® Projector 3D RF Glasses 3D Emitter English 10

User Manual
Page 19
...turn OFF 3D glasses: Press the "Power" button and hold until the LED switches off. 8. Verify that 3D content is being sent to the projector and signal is located in 3D, please check 3D device set up correctly to optimize your 3D experience. If the image does not appear in ... on when input signal is located in 3D without eyestrain. 5. Or "SBS" should turn on which type of glasses you are using) of the projector OSD menu. 4. The option is compatible with projector specifications. 3. The option is 2D 1080i sideby-side and repeat previous steps 1 ~ 4. 6. It may be necessary to use...
...turn OFF 3D glasses: Press the "Power" button and hold until the LED switches off. 8. Verify that 3D content is being sent to the projector and signal is located in 3D, please check 3D device set up correctly to optimize your 3D experience. If the image does not appear in ... on when input signal is located in 3D without eyestrain. 5. Or "SBS" should turn on which type of glasses you are using) of the projector OSD menu. 4. The option is compatible with projector specifications. 3. The option is 2D 1080i sideby-side and repeat previous steps 1 ~ 4. 6. It may be necessary to use...

User Manual
Page 20
...Red. 2. If not, push menu button and go to select the preferred language and power saving mode. 3. The first time you use the projector, you connect multiple sources at the same time, press the "Source" button on the Remote Control or direct source keys on the remote control... 7 User1 Source 2 Menu 5 VGA 8 User2 0 3 3D 6 Video 9 User3 Resync Turn on the lamp by pressing " " button either on the top of the projector or on the screen (computer, notebook, video player, etc). The projector will turn Blue. Make sure that you want to switch between inputs. ™™ Turn on the...
...Red. 2. If not, push menu button and go to select the preferred language and power saving mode. 3. The first time you use the projector, you connect multiple sources at the same time, press the "Source" button on the Remote Control or direct source keys on the remote control... 7 User1 Source 2 Menu 5 VGA 8 User2 0 3 3D 6 Video 9 User3 Resync Turn on the lamp by pressing " " button either on the top of the projector or on the screen (computer, notebook, video player, etc). The projector will turn Blue. Make sure that you want to switch between inputs. ™™ Turn on the...

User Manual
Page 21
...again to turn off procedure. 13 English When the On/Standby LED lights solid Red, the projector has entered standby mode. Do not turn the projector back on the screen. Installation Powering Off the Projector 1. When you press the " " button for cooling cycle and the On/Standby LED will... after 15 seconds. Press the " " button on the remote control or on the projector immediately following message will shut down. 2. Disconnect the power cord from the electrical outlet and the projector. 4. The cooling fans continue to operate for about 10 seconds for the second time,...
...again to turn off procedure. 13 English When the On/Standby LED lights solid Red, the projector has entered standby mode. Do not turn the projector back on the screen. Installation Powering Off the Projector 1. When you press the " " button for cooling cycle and the On/Standby LED will... after 15 seconds. Press the " " button on the remote control or on the projector immediately following message will shut down. 2. Disconnect the power cord from the electrical outlet and the projector. 4. The cooling fans continue to operate for about 10 seconds for the second time,...

User Manual
Page 22
Under normal conditions, the projector can be switched back on , the projector will automatically shutdown: "LAMP" LED indicator is lit red and if "On/Standby" indicator flashes red. "TEMP" LED indicator is lit red ... service center for 30 seconds and try again. Unplug the power cord from the projector, wait for assistance. English 14 This indicates the projector has overheated. Installation Warning Indicator ™™ Contact the nearest service center if the projector displays these symptoms. When the warning indicators (see below) come on . "TEMP" ...
Under normal conditions, the projector can be switched back on , the projector will automatically shutdown: "LAMP" LED indicator is lit red and if "On/Standby" indicator flashes red. "TEMP" LED indicator is lit red ... service center for 30 seconds and try again. Unplug the power cord from the projector, wait for assistance. English 14 This indicates the projector has overheated. Installation Warning Indicator ™™ Contact the nearest service center if the projector displays these symptoms. When the warning indicators (see below) come on . "TEMP" ...

User Manual
Page 23
Installation Adjusting the Projected Image Adjusting the Projector's Height The projector is equipped with the remaining feet as needed. Repeat with elevator feet for adjusting the image height. 1. Locate the adjustable foot you wish to lower it. Tilt-Adjustment Feet Tilt-Adjustment Ring 15 English Rotate the adjustable ring clockwise to raise the projector or counter clockwise to modify on the underside of the projector. 2.
Installation Adjusting the Projected Image Adjusting the Projector's Height The projector is equipped with the remaining feet as needed. Repeat with elevator feet for adjusting the image height. 1. Locate the adjustable foot you wish to lower it. Tilt-Adjustment Feet Tilt-Adjustment Ring 15 English Rotate the adjustable ring clockwise to raise the projector or counter clockwise to modify on the underside of the projector. 2.

User Manual
Page 24
...03 to 0.56 meters) counted from the center of lens. Standard throw series (1080p): The projector will focus at distance from the center of lens. English 16 Installation Adjusting the Projector's Focus To focus the image, slide the focus switch until the image is clear. Standard throw... series (XGA): The projector will focus at distances from 1.55 to 2.21 feet (0.47 to 0.68 ...
...03 to 0.56 meters) counted from the center of lens. Standard throw series (1080p): The projector will focus at distance from the center of lens. English 16 Installation Adjusting the Projector's Focus To focus the image, slide the focus switch until the image is clear. Standard throw... series (XGA): The projector will focus at distances from 1.55 to 2.21 feet (0.47 to 0.68 ...

User Manual
Page 25
... of the vertical image. Installation Variables: "a": Image Offset (m) from the center of the lens to the bottom of the projector. "p": Distance from top of the Image. "H": Height of projector to the back of the projector. "d": Image Diagonal. "m": Distance between the wall (projection surface) to the mounting hole. "c": Distance between the wall (projection surface...
... of the vertical image. Installation Variables: "a": Image Offset (m) from the center of the lens to the bottom of the projector. "p": Distance from top of the Image. "H": Height of projector to the back of the projector. "d": Image Diagonal. "m": Distance between the wall (projection surface) to the mounting hole. "c": Distance between the wall (projection surface...


