

User Manual
Page 17
Connects to a Kensington-compatible security lock. Accepts one card can operate at a time. Connects to USB devices. Right view Model A Your Acer notebook tour - 17 Model B 1 2 34 5 1 # Icon Item 1 Power button 2 SIM SIM card slot (optional) 3 MicroSD card reader 4 USB port 5 Kensington lock slot 6 Stylus slot (optional) 6 2 34 5 Description Turns the computer on and off. Only one Secure Digital (microSD) card. Holds the stylus pen. Insert a nano SIM card into the slot.
Connects to a Kensington-compatible security lock. Accepts one card can operate at a time. Connects to USB devices. Right view Model A Your Acer notebook tour - 17 Model B 1 2 34 5 1 # Icon Item 1 Power button 2 SIM SIM card slot (optional) 3 MicroSD card reader 4 USB port 5 Kensington lock slot 6 Stylus slot (optional) 6 2 34 5 Description Turns the computer on and off. Only one Secure Digital (microSD) card. Holds the stylus pen. Insert a nano SIM card into the slot.

User Manual
Page 20
To store the pen, push it back into the slot until you hear an audible click. 20 - Your Acer notebook tour # Icon Item 3 Stylus pen (optional) Description Remove the pen from the slot and perform touch actions on the screen.
To store the pen, push it back into the slot until you hear an audible click. 20 - Your Acer notebook tour # Icon Item 3 Stylus pen (optional) Description Remove the pen from the slot and perform touch actions on the screen.

Lifecycle Extension Guide
Page 8
Remove the microSD card from the SIM tray (D) as shown in Figure 1-2. 6. Remove the stylus (C) (B311R-32/B311RN-32 model only) as shown in Figure 1-2. 5. Remove the SIM card (B311R-32/B311RN-32 model only) from the SD card slot (E) as shown in Figure 1-2. C DE Figure 1-2. 4. Stylus, SIM Card, and SD Card Removal NOTE: NOTE: Make sure the system is completely powered off. 1-6 Disassembly Procedures
Remove the microSD card from the SIM tray (D) as shown in Figure 1-2. 6. Remove the stylus (C) (B311R-32/B311RN-32 model only) as shown in Figure 1-2. 5. Remove the SIM card (B311R-32/B311RN-32 model only) from the SD card slot (E) as shown in Figure 1-2. C DE Figure 1-2. 4. Stylus, SIM Card, and SD Card Removal NOTE: NOTE: Make sure the system is completely powered off. 1-6 Disassembly Procedures

Lifecycle Extension Guide
Page 47
Figure 1-61. Top Assembly Removal 0 Prerequisite: Ensure that the Power Board, Touchpad Module, Stylus holder, Camera Module (rear), USB Board, Speaker, LCD Module, and Keyboard have been disassembled prior removing the top assembly. Top Assembly Disassembly Procedures 1-45
Figure 1-61. Top Assembly Removal 0 Prerequisite: Ensure that the Power Board, Touchpad Module, Stylus holder, Camera Module (rear), USB Board, Speaker, LCD Module, and Keyboard have been disassembled prior removing the top assembly. Top Assembly Disassembly Procedures 1-45
Lifecycle Extension Guide
Page 51
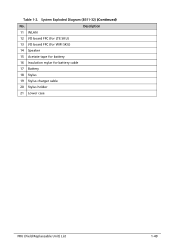
System Exploded Diagram (B311-32) (Continued) No. Table 1-2. Description 11 WLAN 12 I/O board FFC (for LTE SKU) 13 I/O board FFC (for WIFI SKU) 14 Speaker 15 Acetate tape for battery 16 Insulation mylar for battery cable 17 Battery 18 Stylus 19 Stylus charger cable 20 Stylus holder 21 Lower case FRU (Field Replaceable Unit) List 1-49
System Exploded Diagram (B311-32) (Continued) No. Table 1-2. Description 11 WLAN 12 I/O board FFC (for LTE SKU) 13 I/O board FFC (for WIFI SKU) 14 Speaker 15 Acetate tape for battery 16 Insulation mylar for battery cable 17 Battery 18 Stylus 19 Stylus charger cable 20 Stylus holder 21 Lower case FRU (Field Replaceable Unit) List 1-49

Lifecycle Extension Guide
Page 52
System Exploded Diagram (B311R-32/B311RN-32) No. 1 Keyboard 2 Upper case (for WIFI SKU) Upper case (for LTE SKU) 3 Touchpad 4 Mainboard 5 I/O board 6 Hall sensor board 7 SSD 8 Heatsink 9 Hall sensor FFC 10 Dummy stylus 11 I/O board FFC 12 Touchpad FFC Description 1-50 FRU (Field Replaceable Unit) List System Exploded Diagram (B311R-32/B311RN-32) Table 1-3. 1 2 3 4 5 6 7 8 11 12 9 13 14 10 15 16 Figure 1-63.
System Exploded Diagram (B311R-32/B311RN-32) No. 1 Keyboard 2 Upper case (for WIFI SKU) Upper case (for LTE SKU) 3 Touchpad 4 Mainboard 5 I/O board 6 Hall sensor board 7 SSD 8 Heatsink 9 Hall sensor FFC 10 Dummy stylus 11 I/O board FFC 12 Touchpad FFC Description 1-50 FRU (Field Replaceable Unit) List System Exploded Diagram (B311R-32/B311RN-32) Table 1-3. 1 2 3 4 5 6 7 8 11 12 9 13 14 10 15 16 Figure 1-63.


