Acer TravelMate 4740 Research

View Results Below
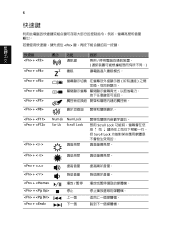
Free Acer TravelMate 4740 manuals!
Problems with Acer TravelMate 4740?
Ask a Question
Free Acer TravelMate 4740 manuals!
Problems with Acer TravelMate 4740?
Ask a Question
Related Manual Pages


Related Videos

Acer Travelmate 4740 Laptop Unboxing and Review
Duration: 4:43
Total Views: 204
Duration: 4:43
Total Views: 204
Similar Questions

Can U Pls Help Me With A Password Code For My Acer 4740. My Bios Is Locker
(Posted by mack20ng 9 years ago)
Acer Travelmate 4740 Body
the laptop body of my acer travelmate 4740 is broken at the hinges. the acer authorised service cent...
the laptop body of my acer travelmate 4740 is broken at the hinges. the acer authorised service cent...
(Posted by batchurangadham 10 years ago)

Is There A Manual Restore To Factory Settings Switch On An Acer Aspire 3680
(Posted by williamobrien631 10 years ago)


How To Connect Acer Travelmate 4740 To Lcd Projector?what Function Key2 Use?
how to connect acer travelmate 4740 to lcd projector?what function key2 use?
how to connect acer travelmate 4740 to lcd projector?what function key2 use?
(Posted by mkalpanaa 11 years ago)