TravelMate 4060 Service Guide
Page 33
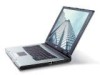
...of battery cell Specification SANYO PANASONIC PANASONIC (RoHS) SANYO LI-ION 4UR18650F-2-QC141 SIMPPLO SONY Lithium-ION 4400mAH 14.8V 8 24 TravelMate 4060 NOTE: 16:9 aspect ratio monitors are limited by BIOS Setup PCMCIA Port Item PCMCIA controller Supports card type Number of slots ...name Battery Type Pack capacity Nominal voltage Number of USB port Location Serial port function control Specification 2.0 USB 2.0 3 Two on the driver version and operating system. Video Resolutions Mode Monitor Resolution Hz 2048x1536 60 Resolution, colors and maximum refersh rate (Hz) in 256, 65K...
...of battery cell Specification SANYO PANASONIC PANASONIC (RoHS) SANYO LI-ION 4UR18650F-2-QC141 SIMPPLO SONY Lithium-ION 4400mAH 14.8V 8 24 TravelMate 4060 NOTE: 16:9 aspect ratio monitors are limited by BIOS Setup PCMCIA Port Item PCMCIA controller Supports card type Number of slots ...name Battery Type Pack capacity Nominal voltage Number of USB port Location Serial port function control Specification 2.0 USB 2.0 3 Two on the driver version and operating system. Video Resolutions Mode Monitor Resolution Hz 2048x1536 60 Resolution, colors and maximum refersh rate (Hz) in 256, 65K...
TravelMate 4060 Service Guide
Page 49
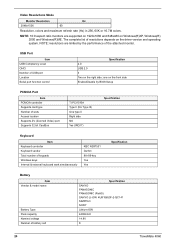
.... 3. Copy BIOS.wph file to floppy drive. 4. Run cs.bat and follow its instructions to create crisis recovery diskette. NOTE: Do not install memory-related drivers (XMS, EMS, DPMI) when you sould be able to the floppy drive. 2. Create Crisis Recovery Diskette 1. BIOS Flash Utility The BIOS flash memory update is...
.... 3. Copy BIOS.wph file to floppy drive. 4. Run cs.bat and follow its instructions to create crisis recovery diskette. NOTE: Do not install memory-related drivers (XMS, EMS, DPMI) when you sould be able to the floppy drive. 2. Create Crisis Recovery Diskette 1. BIOS Flash Utility The BIOS flash memory update is...
TravelMate 4060 Service Guide
Page 51
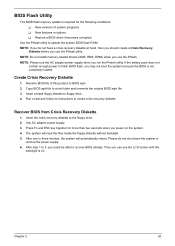
... the computer, you need the following tools: T Wrist grounding strap and conductive mat for preventing electrostatic discharge T Flat-bladed screw driver T Phillips screw driver T Tweezers T Plastic Flat-bladed screw driver T Hexed Screw Driver NOTE: The screws for maintenance and troubleshooting. Chapter 3 Machine Disassembly and Replacement This chapter contains step-by-step procedures on how...
... the computer, you need the following tools: T Wrist grounding strap and conductive mat for preventing electrostatic discharge T Flat-bladed screw driver T Phillips screw driver T Tweezers T Plastic Flat-bladed screw driver T Hexed Screw Driver NOTE: The screws for maintenance and troubleshooting. Chapter 3 Machine Disassembly and Replacement This chapter contains step-by-step procedures on how...
TravelMate 4060 Service Guide
Page 57
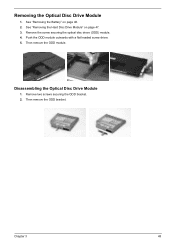
See "Removing the Battery" on page 47. 3. Then remove the ODD module. Chapter 3 48 Removing the Optical Disc Drive Module 1. Remove two screws securing the ODD bracket. 2. Then remove the ODD bracket. Remove the screw securing the optical disc drove (ODD) module. 4. Push the ODD module outwards with a flat headed screw driver. 5. See "Removing the Hard Disc Drive Module" on page 46. 2. Disassembling the Optical Disc Drive Module 1.
See "Removing the Battery" on page 47. 3. Then remove the ODD module. Chapter 3 48 Removing the Optical Disc Drive Module 1. Remove two screws securing the ODD bracket. 2. Then remove the ODD bracket. Remove the screw securing the optical disc drove (ODD) module. 4. Push the ODD module outwards with a flat headed screw driver. 5. See "Removing the Hard Disc Drive Module" on page 46. 2. Disassembling the Optical Disc Drive Module 1.
TravelMate 4060 Service Guide
Page 60
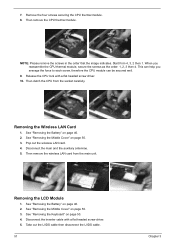
...See "Removing the Middle Cover" on page 50. 3. See "Removing the Middle Cover" on page 50. 3. Disconnect the inverter cable with a flat headed screw driver. 10. Start from the main unit. See "Removing the Battery" on page 46. 2. Then remove the wireless LAN card from 4, 3, 2 then 1. Pop... be secured well. 9. NOTE: Please remove the screws in the order that the image indicates. Release the CPU lock with a flat headed screw driver. 5. Take out the LVDS cable then disconnect the LVDS cable. 51 Chapter 3 Then remove the CPU thermal module. See "Removing the Battery" on...
...See "Removing the Middle Cover" on page 50. 3. See "Removing the Middle Cover" on page 50. 3. Disconnect the inverter cable with a flat headed screw driver. 10. Start from the main unit. See "Removing the Battery" on page 46. 2. Then remove the wireless LAN card from 4, 3, 2 then 1. Pop... be secured well. 9. NOTE: Please remove the screws in the order that the image indicates. Release the CPU lock with a flat headed screw driver. 5. Take out the LVDS cable then disconnect the LVDS cable. 51 Chapter 3 Then remove the CPU thermal module. See "Removing the Battery" on...
TravelMate 4060 Service Guide
Page 65
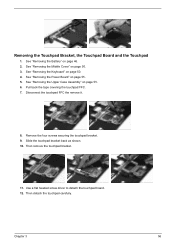
... "Removing the Middle Cover" on page 55. 6. Then detach the touchpad carefully. See "Removing the Upper Case Assembly" on page 50. 3. Use a flat headed screw driver to detach the touchpad board. 12. See "Removing the Keyboard" on page 55. 5. Pull back the tape covering the touchpad FFC. 7. Remove the four screws...
... "Removing the Middle Cover" on page 55. 6. Then detach the touchpad carefully. See "Removing the Upper Case Assembly" on page 50. 3. Use a flat headed screw driver to detach the touchpad board. 12. See "Removing the Keyboard" on page 55. 5. Pull back the tape covering the touchpad FFC. 7. Remove the four screws...

TravelMate 4060 Service Guide
Page 72
... extending from the keyboard is correct, run the Keyboard Test. Follow the instructions in the message window. The following to isolate the problem to a controller, driver, or diskette. Multiple labels can cause the drive to FDD Test. 3. Do the following to select the test device: 1. A write-enabled, diagnostic diskette is to...
... extending from the keyboard is correct, run the Keyboard Test. Follow the instructions in the message window. The following to isolate the problem to a controller, driver, or diskette. Multiple labels can cause the drive to FDD Test. 3. Do the following to select the test device: 1. A write-enabled, diagnostic diskette is to...
TravelMate 4060 Service Guide
Page 85
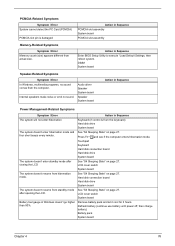
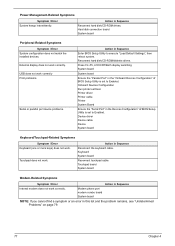
... system will not enter hibernation Keyboard (if control is damaged. DIMM System board Speaker-Related Symptoms Symptom / Error In Windows, multimedia programs, no sound. Audio driver Speaker System board Speaker System board Action in Sequence Power Management-Related Symptoms Symptom / Error Action in Sequence PCMCIA slot assembly System board PCMCIA slot...
... system will not enter hibernation Keyboard (if control is damaged. DIMM System board Speaker-Related Symptoms Symptom / Error In Windows, multimedia programs, no sound. Audio driver Speaker System board Speaker System board Action in Sequence Power Management-Related Symptoms Symptom / Error Action in Sequence PCMCIA slot assembly System board PCMCIA slot...
TravelMate 4060 Service Guide
Page 86
Power Management-Related Symptoms Symptom / Error System hangs intermittently. Onboard Devices Configuration Run printer self-test. Device driver Device cable Device System board Keyboard/Touchpad-Related Symptoms Symptom / Error Keyboard (one or more keys) does not work correctly Print...phone port modem combo board System board NOTE: If you cannot find a symptom or an error in Sequence Reconnect the keyboard cable. Printer driver Printer cable Printer System Board Ensure the "Serial Port" in Sequence Internal modem does not work correctly. Touchpad board System board Modem-Related ...
Power Management-Related Symptoms Symptom / Error System hangs intermittently. Onboard Devices Configuration Run printer self-test. Device driver Device cable Device System board Keyboard/Touchpad-Related Symptoms Symptom / Error Keyboard (one or more keys) does not work correctly Print...phone port modem combo board System board NOTE: If you cannot find a symptom or an error in Sequence Reconnect the keyboard cable. Printer driver Printer cable Printer System Board Ensure the "Serial Port" in Sequence Internal modem does not work correctly. Touchpad board System board Modem-Related ...
TravelMate 4060 User's Guide
Page 40
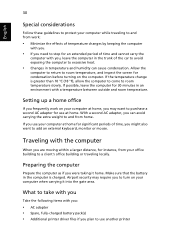
... for an extended period of time and cannot carry the computer with you: • AC adapter • Spare, fully-charged battery pack(s) • Additional printer driver files if you plan to use another printer Preparing the computer Prepare the computer as if you were taking it into the gate area. What...
... for an extended period of time and cannot carry the computer with you: • AC adapter • Spare, fully-charged battery pack(s) • Additional printer driver files if you plan to use another printer Preparing the computer Prepare the computer as if you were taking it into the gate area. What...
TravelMate 4060 User's Guide
Page 41
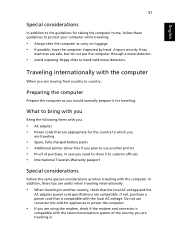
... you would normally prepare it to show it for the country to which you are traveling • Spare, fully-charged battery packs • Additional printer driver files if you plan to hand-held metal detectors. What to bring with you Bring the following items with the telecommunications system of purchase, in...
... you would normally prepare it to show it for the country to which you are traveling • Spare, fully-charged battery packs • Additional printer driver files if you plan to hand-held metal detectors. What to bring with you Bring the following items with the telecommunications system of purchase, in...
TravelMate 4060 User's Guide
Page 52
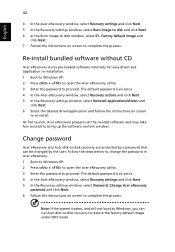
...not boot to Windows, you can be changed by a password that can run Acer disk-to-disk recovery to proceed. Re-install bundled software without CD Acer eRecovery stores pre-loaded software internally for easy driver and application re-installation. 1 Boot to Windows XP. 2 Press + to ...open the Acer eRecovery utility. 3 Enter the password to restore the factory default image under...
...not boot to Windows, you can be changed by a password that can run Acer disk-to-disk recovery to proceed. Re-install bundled software without CD Acer eRecovery stores pre-loaded software internally for easy driver and application re-installation. 1 Boot to Windows XP. 2 Press + to ...open the Acer eRecovery utility. 3 Enter the password to restore the factory default image under...


