

User Manual
Page 1
TABLE OF CONTENTS Special notes on LCD monitors 1 Information for your safety and comfort 2 Unpacking 5 Screen position adjustment 6 Connecting the power cord 7 Safety precaution 7 Cleaning your monitor 7 Power saving 8 DDC 8 Connector Pin Assignment 9 Standard Timing Table 11 Installation 12 User controls 13 Troubleshooting 19
TABLE OF CONTENTS Special notes on LCD monitors 1 Information for your safety and comfort 2 Unpacking 5 Screen position adjustment 6 Connecting the power cord 7 Safety precaution 7 Cleaning your monitor 7 Power saving 8 DDC 8 Connector Pin Assignment 9 Standard Timing Table 11 Installation 12 User controls 13 Troubleshooting 19
User Manual
Page 2
... LCD screen, an afterimage of the previous screen may remain after switching the image, when the same image is recovered slowly by changing the image or turning off the Power Switch and then turn it on again to make sure the flicker disappears. · You may find slightly uneven brightness on the screen depending on the desktop pattern you use. · The LCD screen has effective pixels of the fluorescent light...
... LCD screen, an afterimage of the previous screen may remain after switching the image, when the same image is recovered slowly by changing the image or turning off the Power Switch and then turn it on again to make sure the flicker disappears. · You may find slightly uneven brightness on the screen depending on the desktop pattern you use. · The LCD screen has effective pixels of the fluorescent light...
User Manual
Page 3
... surroundings. • Turn the volume down if you can't hear people speaking near water. • Do not place this product on an unstable cart, stand or table. These openings must not be sure to unplug the power cord from the electrical outlet. Never spill liquid of the following power supplies: Ob je c t / Part No. Manufacturer/ Trademark Type/ Model Power Adapter Chicony A10...
... surroundings. • Turn the volume down if you can't hear people speaking near water. • Do not place this product on an unstable cart, stand or table. These openings must not be sure to unplug the power cord from the electrical outlet. Never spill liquid of the following power supplies: Ob je c t / Part No. Manufacturer/ Trademark Type/ Model Power Adapter Chicony A10...
User Manual
Page 4
... fixed posture • avoid slouching forward and/or leaning backward • stand up and walk around regularly to computer use . Unplug this product yourself, as black or red dots. nel when: • the power cord or plug is produced with high-precision manufacturing techniques. Users are covered by the operating instructions, since improper adjustment of other controls may result in front of the monitor, using...
... fixed posture • avoid slouching forward and/or leaning backward • stand up and walk around regularly to computer use . Unplug this product yourself, as black or red dots. nel when: • the power cord or plug is produced with high-precision manufacturing techniques. Users are covered by the operating instructions, since improper adjustment of other controls may result in front of the monitor, using...

User Manual
Page 5
... • install the external display, keyboard and mouse properly and within comfort able reach • if you view your monitor more than the top edge of the display so your eyes point downward when looking at bright light sources, such as a piece of the display. • Adjust the display brightness and/or contrast to reduce eyestrain. The following websites: Worldwide: http://www.acer-group...
... • install the external display, keyboard and mouse properly and within comfort able reach • if you view your monitor more than the top edge of the display so your eyes point downward when looking at bright light sources, such as a piece of the display. • Adjust the display brightness and/or contrast to reduce eyestrain. The following websites: Worldwide: http://www.acer-group...

User Manual
Page 6
UNPACKING Please check the following items are present when you unpack the box, and save the packing materials in case you will need to ship or transport the monitor in future. · LCD Monitor · Power Adapter · AC Power Cord · DP Cable (Optional) · DVI Cable (Optional) · HDMI Cable (Optional) · User Manual · Quick Start Guide · USB Cable · Audio Cable (Optional) (Optional) EN-5
UNPACKING Please check the following items are present when you unpack the box, and save the packing materials in case you will need to ship or transport the monitor in future. · LCD Monitor · Power Adapter · AC Power Cord · DP Cable (Optional) · DVI Cable (Optional) · HDMI Cable (Optional) · User Manual · Quick Start Guide · USB Cable · Audio Cable (Optional) (Optional) EN-5

User Manual
Page 7
SCREEN POSITION ADJUSTMENT In oder to optimize the best viewing position, you can be adjusted 10 degrees to hold the edges of your hands to 60 degrees up as shown in the figure below . 100 60 0 EN-6 The monitor can adjust the tilt of the monitor by using both of the monitor as indicated by arrow below .
SCREEN POSITION ADJUSTMENT In oder to optimize the best viewing position, you can be adjusted 10 degrees to hold the edges of your hands to 60 degrees up as shown in the figure below . 100 60 0 EN-6 The monitor can adjust the tilt of the monitor by using both of the monitor as indicated by arrow below .
User Manual
Page 8
... and plug rated 10 A/125 V. · For unit using at 220/240 V AC (outside of U.S.): Use a Cord Set consisting of the monitor. CONNECTING THE POWER CORD · Check first to make sure that the power cord you use is the correct type required for the country in which the equipment will be installed. Place the monitor just below guidelines when cleaning the monitor. · Always unplug the monitor before cleaning. · Use...
... and plug rated 10 A/125 V. · For unit using at 220/240 V AC (outside of U.S.): Use a Cord Set consisting of the monitor. CONNECTING THE POWER CORD · Check first to make sure that the power cord you use is the correct type required for the country in which the equipment will be installed. Place the monitor just below guidelines when cleaning the monitor. · Always unplug the monitor before cleaning. · Use...
User Manual
Page 9
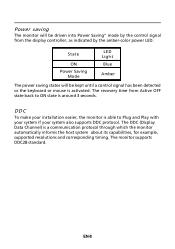
... host system about its capabilities, for example, supported resolutions and corresponding timing. EN-8 The monitor supports DDC2B standard. Power saving The monitor will be driven into Power Saving" mode by the amber-color power LED. The DDC (Display Data Channel) is able to ON state is activated. State ON Power Saving Mode LED Light Blue Amber The power saving states will be kept until a control signal has been detected or the keyboard or mouse...
... host system about its capabilities, for example, supported resolutions and corresponding timing. EN-8 The monitor supports DDC2B standard. Power saving The monitor will be driven into Power Saving" mode by the amber-color power LED. The DDC (Display Data Channel) is able to ON state is activated. State ON Power Saving Mode LED Light Blue Amber The power saving states will be kept until a control signal has been detected or the keyboard or mouse...

User Manual
Page 10
TMDS Data2+ 14. +5V Power 3. TMDS Data4- 16. TMDS Data 0/5 Shield 8. NC 20. TMDS Data1+ 22. TMDS Data 1/3 Shield 23. Hot Plug Detect 5. SCL 18. TMDS Data3- 24. GND 4. TMDS Data0+ 7. TMDS Data5+ 10. TMDS Clock Shield 11. TMDS Data2- 13. TMDS Data 2/4 Shield 15. TMDS Data0- 6. DDC TMDS Clock- * only for certain models EN-9 CONNECTOR PIN ASSIGNMENT 24-Pin Color Display Signal Cable* PIN Meaning PIN Meaning 1. TMDS Data5- 9. TMDS Clock+ 12. SDA 19. TMDS Data1- 21. TMDS Data4+ 17. TMDS Data3+ 2.
TMDS Data2+ 14. +5V Power 3. TMDS Data4- 16. TMDS Data 0/5 Shield 8. NC 20. TMDS Data1+ 22. TMDS Data 1/3 Shield 23. Hot Plug Detect 5. SCL 18. TMDS Data3- 24. GND 4. TMDS Data0+ 7. TMDS Data5+ 10. TMDS Clock Shield 11. TMDS Data2- 13. TMDS Data 2/4 Shield 15. TMDS Data0- 6. DDC TMDS Clock- * only for certain models EN-9 CONNECTOR PIN ASSIGNMENT 24-Pin Color Display Signal Cable* PIN Meaning PIN Meaning 1. TMDS Data5- 9. TMDS Clock+ 12. SDA 19. TMDS Data1- 21. TMDS Data4+ 17. TMDS Data3+ 2.

User Manual
Page 11
... 18 +5V Power 19 Hot Plug Detect * only for certain models DisplayPort Connector Pin Number 1 2 3 4 5 6 7 8 9 10 20-pin Side of the Connected Signal Cable ML3(n) GND ML3(p) ML2(n) GND ML2(p) ML1(n) GND ML1(p) ML0(n) Pin Number 11 12 13... 14 15 16 17 18 19 20 20-pin Side of the Connected Signal Cable GND ML0(p) CONFIG1 CONFIG2 AUX(p) GND AUX(n) HPD Return DP_PWR EN-10 19-pin Color Display Signal Cable...
... 18 +5V Power 19 Hot Plug Detect * only for certain models DisplayPort Connector Pin Number 1 2 3 4 5 6 7 8 9 10 20-pin Side of the Connected Signal Cable ML3(n) GND ML3(p) ML2(n) GND ML2(p) ML1(n) GND ML1(p) ML0(n) Pin Number 11 12 13... 14 15 16 17 18 19 20 20-pin Side of the Connected Signal Cable GND ML0(p) CONFIG1 CONFIG2 AUX(p) GND AUX(n) HPD Return DP_PWR EN-10 19-pin Color Display Signal Cable...
User Manual
Page 13
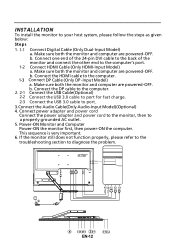
.... Make sure both the monitor and computer are powered-OFF. b. Connect power adapter and power cord Connect the power adapter and power cord to the monitor, then to the computer. 1-3 Connect DP Cable (Only DP -Input Model) a. Connect the HDMI cable to a properly grounded AC outlet. 5. Connect the DP cable to the computer. 2. 2-1 Connect the USB Cable(Optional) 2-2 Connect the USB 3.0 cable to port for fast charge. 2-3 Connect the USB 3.0 cable to diagnose the problem. 2-2 USB3.0 port -supporting fast charge 2-3 USB3.0 port DVI DP HDMI USB 2-1 3 1-1 1-2 DVI USB HDMI 1-3 DP...
.... Make sure both the monitor and computer are powered-OFF. b. Connect power adapter and power cord Connect the power adapter and power cord to the monitor, then to the computer. 1-3 Connect DP Cable (Only DP -Input Model) a. Connect the HDMI cable to a properly grounded AC outlet. 5. Connect the DP cable to the computer. 2. 2-1 Connect the USB Cable(Optional) 2-2 Connect the USB 3.0 cable to port for fast charge. 2-3 Connect the USB 3.0 cable to diagnose the problem. 2-2 USB3.0 port -supporting fast charge 2-3 USB3.0 port DVI DP HDMI USB 2-1 3 1-1 1-2 DVI USB HDMI 1-3 DP...
User Manual
Page 14
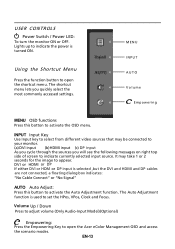
... sources you quickly select the most commonly accessed settings. EN-13 Using the Shortcut Menu Press the function button to indicate currently selected input source. INPUT Input Key Use Input key to select from different video sources that may take 1 or 2 seconds for the image to open the shortcut menu. Lights up to activate the OSD menu. MENU INPUT AUTO Volume Empowering MENU OSD functions Press this button to set the HPos, VPos, Clock and Focus. USER CONTROLS Power Switch / Power LED: To turn the monitor...
... sources you quickly select the most commonly accessed settings. EN-13 Using the Shortcut Menu Press the function button to indicate currently selected input source. INPUT Input Key Use Input key to select from different video sources that may take 1 or 2 seconds for the image to open the shortcut menu. Lights up to activate the OSD menu. MENU INPUT AUTO Volume Empowering MENU OSD functions Press this button to set the HPos, VPos, Clock and Focus. USER CONTROLS Power Switch / Power LED: To turn the monitor...
User Manual
Page 15
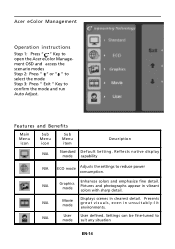
... lay mode capability N/A ECO mode Adjusts the settings to suit any situation EN-14 N/A Movie mode Displays scenes in unsuitably-lit environments. Presents great visuals, even in clearest detail. Enhances colors and emphasize fine detail. N/A User mode User defined. N/A Graphics mode Pictures and photographs appear in vibrant colors with sharp detail. Acer eColor Management Operation instructions Step 1: Press " " Key to open the Acer eColor Management OSD and access...
... lay mode capability N/A ECO mode Adjusts the settings to suit any situation EN-14 N/A Movie mode Displays scenes in unsuitably-lit environments. Presents great visuals, even in clearest detail. Enhances colors and emphasize fine detail. N/A User mode User defined. N/A Graphics mode Pictures and photographs appear in vibrant colors with sharp detail. Acer eColor Management Operation instructions Step 1: Press " " Key to open the Acer eColor Management OSD and access...
User Manual
Page 16
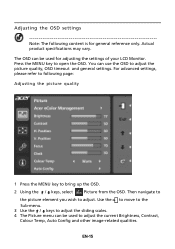
... adjusting the settings of your LCD Monitor. Use the to move to the Sub-menu. 3 Use the / keys to adjust the current Brightness, Contrast, Colour Temp, Auto Config and other image-related qualities. EN-15 Adjusting the OSD settings Note: The following page: Adjusting the picture quality 1 Press the MENU key to open the OSD. Then navigate to the picture element you wish to adjust the picture quality, OSD timeout and general settings. You can use...
... adjusting the settings of your LCD Monitor. Use the to move to the Sub-menu. 3 Use the / keys to adjust the current Brightness, Contrast, Colour Temp, Auto Config and other image-related qualities. EN-15 Adjusting the OSD settings Note: The following page: Adjusting the picture quality 1 Press the MENU key to open the OSD. Then navigate to the picture element you wish to adjust the picture quality, OSD timeout and general settings. You can use...

User Manual
Page 18
EN-17 Then navigate to the feature you wish to enable/disable Power-off USB charge function. Use the to move to the Sub-menu. 3 The Setting menu can be used to adjust the screen Menu Language and other important settings. 4 Select Power-off USB charge ON/OFF to adjust. Adjusting the setting 1 Press the MENU key to bring up the OSD. 2 Using the / keys, select Setting from the OSD.
EN-17 Then navigate to the feature you wish to enable/disable Power-off USB charge function. Use the to move to the Sub-menu. 3 The Setting menu can be used to adjust the screen Menu Language and other important settings. 4 Select Power-off USB charge ON/OFF to adjust. Adjusting the setting 1 Press the MENU key to bring up the OSD. 2 Using the / keys, select Setting from the OSD.

User Manual
Page 20
... volume setup of computer system is in minimum position and try to raise the volume level. LED OFF · Check the power switch. TROUBLESHOOTING Before sending your LCD monitor for servicing, please check the troubleshooting list below to see if you can self-diagnose the problem. (DVI/HDMI Mode) Problems Current Status Remedy LED ON · Using OSD, adjust brightness and contrast to maximum or reset to the monitor. No Picture · Check if AC power cord is properly connected to their default settings...
... volume setup of computer system is in minimum position and try to raise the volume level. LED OFF · Check the power switch. TROUBLESHOOTING Before sending your LCD monitor for servicing, please check the troubleshooting list below to see if you can self-diagnose the problem. (DVI/HDMI Mode) Problems Current Status Remedy LED ON · Using OSD, adjust brightness and contrast to maximum or reset to the monitor. No Picture · Check if AC power cord is properly connected to their default settings...
User Manual
Page 21
...setting of EMC Directive 2004/108/EC, Low Voltage Directive 2006/95/EC, and RoHS Directive 2011/65/EU and Directive 2009/125/EC with regard to begin affixing CE marking 2013. May.7,2013 Date RU Jan / Sr. Manager Regulation, Acer Inc. Declaration of Conformity We, Acer..., 40, 20020 Lainate (MI) Italy Tel: +39-02-939-921 ,Fax: +39-02 9399-2913 www.acer.it Declare under our own responsibility that the product: Product: LCD Monitor Trade Name: Acer Model Number: T272HUL SKU Number: T272HUL xxxxxx ("x" = 0~9, a ~ z, A ~ Z, or blank) To which this declaration refers conforms to the ...
...setting of EMC Directive 2004/108/EC, Low Voltage Directive 2006/95/EC, and RoHS Directive 2011/65/EU and Directive 2009/125/EC with regard to begin affixing CE marking 2013. May.7,2013 Date RU Jan / Sr. Manager Regulation, Acer Inc. Declaration of Conformity We, Acer..., 40, 20020 Lainate (MI) Italy Tel: +39-02-939-921 ,Fax: +39-02 9399-2913 www.acer.it Declare under our own responsibility that the product: Product: LCD Monitor Trade Name: Acer Model Number: T272HUL SKU Number: T272HUL xxxxxx ("x" = 0~9, a ~ z, A ~ Z, or blank) To which this declaration refers conforms to the ...

User Manual
Page 23
... the touchscreen & USB function to work, you need to connect the USB cable to open the Charms bar and tap Start. Charms bar The Charms bar is no longer available; Press the Windows key, or swipe the right-hand edge of the screen to the NB or PC, as well as connecting through a DVI or HDMI or DP cable. How do I get started with Windows 8 on...
... the touchscreen & USB function to work, you need to connect the USB cable to open the Charms bar and tap Start. Charms bar The Charms bar is no longer available; Press the Windows key, or swipe the right-hand edge of the screen to the NB or PC, as well as connecting through a DVI or HDMI or DP cable. How do I get started with Windows 8 on...

User Manual
Page 24
... Acer Power Button and select the action you can view weather or stock updates without needing to take . What are similar to the Internet. So, for 'User's Manual') or visit the following pages: - Live tiles are "live -tiles. Programs written for Windows 8 that will automatically use the whole screen and don't require closing in the traditional way. Open the Charms bar, tap Settings > Power...
... Acer Power Button and select the action you can view weather or stock updates without needing to take . What are similar to the Internet. So, for 'User's Manual') or visit the following pages: - Live tiles are "live -tiles. Programs written for Windows 8 that will automatically use the whole screen and don't require closing in the traditional way. Open the Charms bar, tap Settings > Power...

