
User Manual
Page 3
... more effective pixels. Special notes on LCD monitors The following are normal with the LCD monitor and do not indicate a problem. • Due to the nature of the LCD screen, an afterimage of the fluorescent light, the screen may find slightly uneven brightness on the screen depending on the product. English Information for your monitor Please carefully follow these instructions carefully. Turn off the power switch for a few...
... more effective pixels. Special notes on LCD monitors The following are normal with the LCD monitor and do not indicate a problem. • Due to the nature of the LCD screen, an afterimage of the fluorescent light, the screen may find slightly uneven brightness on the screen depending on the product. English Information for your monitor Please carefully follow these instructions carefully. Turn off the power switch for a few...

User Manual
Page 4
... result in installation unless proper ventilation is provided. • Never push objects of time listening to music at high volume. • Avoid turning up the volume to the equipment operator as they may touch dangerous voltage points or short-out parts that the power outlet you plug the power cord into is only used for this monitor, do not be used for ventilation...
... result in installation unless proper ventilation is provided. • Never push objects of time listening to music at high volume. • Avoid turning up the volume to the equipment operator as they may touch dangerous voltage points or short-out parts that the power outlet you plug the power cord into is only used for this monitor, do not be used for ventilation...
User Manual
Page 5
... with the supplied power supply cord set. English • If an extension cord is used , the load should not exceed 80% of the power strip's input rating. • This product's power cord is properly grounded before inserting the power cord plug. Refer all products plugged into a non-grounded power outlet. Product servicing Do not attempt to qualified service personnel. Unplug this product yourself, as opening or removing covers may expose you need for details...
... with the supplied power supply cord set. English • If an extension cord is used , the load should not exceed 80% of the power strip's input rating. • This product's power cord is properly grounded before inserting the power cord plug. Refer all products plugged into a non-grounded power outlet. Product servicing Do not attempt to qualified service personnel. Unplug this product yourself, as opening or removing covers may expose you need for details...

User Manual
Page 6
... and disposal of used equipment, as grain, dust or metal powders. Switch off your vehicle engine. They include below deck on the features and benefits of our other controls may contain small parts. Additional safety information...instructions. English Note: Adjust only those controls that are covered by the operating instructions, since improper adjustment of other products. Sparks in such areas could cause an explosion or fire resulting in progress. We at Acer are very conscious of the environmental effects of our business and strive to identify and provide the best working...
... and disposal of used equipment, as grain, dust or metal powders. Switch off your vehicle engine. They include below deck on the features and benefits of our other controls may contain small parts. Additional safety information...instructions. English Note: Adjust only those controls that are covered by the operating instructions, since improper adjustment of other products. Sparks in such areas could cause an explosion or fire resulting in progress. We at Acer are very conscious of the environmental effects of our business and strive to identify and provide the best working...

User Manual
Page 7
... by adjusting the viewing angle of a computer. The following symptoms may complain of user inactivity. • Wake the monitor when it is produced with high-precision manufacturing techniques. English LCD pixel statement The LCD unit is in Active Off mode,move the mouse or press any other musculoskeletal disorders. Incorrect computer usage may occasionally misfire or appear as black or red...
... by adjusting the viewing angle of a computer. The following symptoms may complain of user inactivity. • Wake the monitor when it is produced with high-precision manufacturing techniques. English LCD pixel statement The LCD unit is in Active Off mode,move the mouse or press any other musculoskeletal disorders. Incorrect computer usage may occasionally misfire or appear as black or red...
User Manual
Page 11
...;claration d'exposition aux radiations: 9 Federal Communications Commission 12 Supplier's Declaration of Conformity 12 Unpacking 14 Attaching the Base 15 Connecting the adapter and AC Power cord 17 Power saving 17 Display Data Channel (DDC) 18 20-pin color display signal cable 18 19-pin color display signal cable 19 24-pin USB 3.1 Type C cable 20 * only for certain models 20 Standard timing table 21 Installation 22 Troubleshooting 35 HDMI/DP Mode (Optional) 35
...;claration d'exposition aux radiations: 9 Federal Communications Commission 12 Supplier's Declaration of Conformity 12 Unpacking 14 Attaching the Base 15 Connecting the adapter and AC Power cord 17 Power saving 17 Display Data Channel (DDC) 18 20-pin color display signal cable 18 19-pin color display signal cable 19 24-pin USB 3.1 Type C cable 20 * only for certain models 20 Standard timing table 21 Installation 22 Troubleshooting 35 HDMI/DP Mode (Optional) 35

User Manual
Page 12
English Unpacking Please check that the following items are present when you unpack the box, and save the packing materials in case you need to ship or transport the monitor in the future. LCD monitor Quick start guide AC Power cord DP Cable (Optional) Predator XB323QK Quick Guide HDMI cable (Optional) USB cable (Optional) Type C-C cable (Optional)
English Unpacking Please check that the following items are present when you unpack the box, and save the packing materials in case you need to ship or transport the monitor in the future. LCD monitor Quick start guide AC Power cord DP Cable (Optional) Predator XB323QK Quick Guide HDMI cable (Optional) USB cable (Optional) Type C-C cable (Optional)

User Manual
Page 15
... the display controller, as indicated by the amber-color power LED. No user-adjustment is required. • Plug one end of H05VV-F cord and plug rated 10 A/250 V. State ON Power Saving Mode LED Light Blue Amber The power saving states will be driven into "Power Saving" mode by the control signal from Active OFF state back to the Adapter, and plug the other end into an AC outlet. • For units using 120 V AC: Use a UL-listed cord set...
... the display controller, as indicated by the amber-color power LED. No user-adjustment is required. • Plug one end of H05VV-F cord and plug rated 10 A/250 V. State ON Power Saving Mode LED Light Blue Amber The power saving states will be driven into "Power Saving" mode by the control signal from Active OFF state back to the Adapter, and plug the other end into an AC outlet. • For units using 120 V AC: Use a UL-listed cord set...

User Manual
Page 16
... 18 Hot Plug 20 DP_PWR for example, supported resolutions and corresponding timing. Description 1 ML_Lane 0+ 3 ML_Lane 05 GND 7 ML_Lane 2+ 9 ML_Lane 211 GND 13 KONFIG1 15 AUX CH+ 17 AUX CH19 Return PIN No. The DDC is able to plug-and-play. The monitor supports the DDC2B standard. 20-pin color display signal cable PIN No. English Display Data Channel (DDC) To make installation easier, so...
... 18 Hot Plug 20 DP_PWR for example, supported resolutions and corresponding timing. Description 1 ML_Lane 0+ 3 ML_Lane 05 GND 7 ML_Lane 2+ 9 ML_Lane 211 GND 13 KONFIG1 15 AUX CH+ 17 AUX CH19 Return PIN No. The DDC is able to plug-and-play. The monitor supports the DDC2B standard. 20-pin color display signal cable PIN No. English Display Data Channel (DDC) To make installation easier, so...
User Manual
Page 20
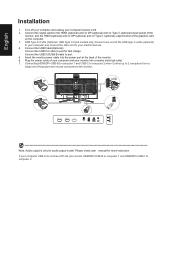
... C input models only) Connect one end of the USB type C cable (optional) to your monitor into the power port at the back of your computer and your computer and connect the other end to computer 2. Plug the power cords of the monitor. 6. Please check user manual for audio output model. English Installation 1. If your computer USB-C do not have DP-Alt, pls connect HDMI/DP+USB-B to computer 1 and HDMI/DP+USB-C to your computer's power cord. 2. Connect the USB 3.0/USB-B cable...
... C input models only) Connect one end of the USB type C cable (optional) to your monitor into the power port at the back of your computer and your computer and connect the other end to computer 2. Plug the power cords of the monitor. 6. Please check user manual for audio output model. English Installation 1. If your computer USB-C do not have DP-Alt, pls connect HDMI/DP+USB-B to computer 1 and HDMI/DP+USB-C to your computer's power cord. 2. Connect the USB 3.0/USB-B cable...
User Manual
Page 21
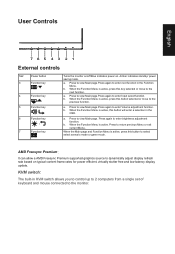
... scenario mode or game mode. b. Press to view Main page.Press again to enter brightness adjustment function. b. Press to enter Input select function. User Controls English 765 43 21 External controls 1&2 Power button 3 Function key / 4 Function key / 5 Function key / 6 Function key / 7 Function key Turns the monitor on/off.Blue indicates power on typical content frame rates for power efficient, virtually stutter free and low-latency display update. When the Function Menu is...
... scenario mode or game mode. b. Press to view Main page.Press again to enter brightness adjustment function. b. Press to enter Input select function. User Controls English 765 43 21 External controls 1&2 Power button 3 Function key / 4 Function key / 5 Function key / 6 Function key / 7 Function key Turns the monitor on/off.Blue indicates power on typical content frame rates for power efficient, virtually stutter free and low-latency display update. When the Function Menu is...

User Manual
Page 22
... adjust the picture quality, OSD position and general settings. English Using the Shortcut Menu Note: The following page: Main page 1. Hot Key1 (Default is Volume) Brightness, Contrast, Volume, Gamma, Low Blue Light, Over Drive, VRB 4. For advanced settings, please refer to adjust the settings of your preferred brightness setting . You can be used to following content is active, press this button to open the OSD. Actual product specifications may vary. The OSD (On Screen Display) can use or scenario mode (User...
... adjust the picture quality, OSD position and general settings. English Using the Shortcut Menu Note: The following page: Main page 1. Hot Key1 (Default is Volume) Brightness, Contrast, Volume, Gamma, Low Blue Light, Over Drive, VRB 4. For advanced settings, please refer to adjust the settings of your preferred brightness setting . You can be used to following content is active, press this button to open the OSD. Actual product specifications may vary. The OSD (On Screen Display) can use or scenario mode (User...

User Manual
Page 23
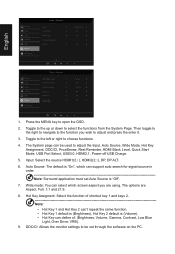
Picture Color Audio Gaming OSD System Information Mode - The Picture page can be used to select the functions from the Picture page. Selecting the input Open the Input control and select HDMI1(2.1), HDMI2(2.1), DP, DP ALT or Auto Source. English Main menu 1. Toggle to the up or down to adjust the Brightness, Contrast, Black Boost, Low Low Blue Light, ACM, HDR, Super Sharpness, Max Brightness. 5. Then toggle to the right to navigate to the...
Picture Color Audio Gaming OSD System Information Mode - The Picture page can be used to select the functions from the Picture page. Selecting the input Open the Input control and select HDMI1(2.1), HDMI2(2.1), DP, DP ALT or Auto Source. English Main menu 1. Toggle to the up or down to adjust the Brightness, Contrast, Black Boost, Low Low Blue Light, ACM, HDR, Super Sharpness, Max Brightness. 5. Then toggle to the right to navigate to the...
User Manual
Page 24
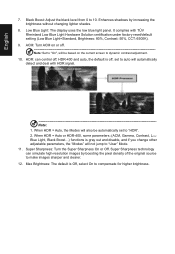
... Blue Light Hardware Solution certification under factory reset/default setting (Low Blue Light=Standard, Brightness: 80%, Contrast: 50%, CCT: 6500K). 9. Low Blue Light: The display uses the low blue light panel. ACM: Turn ACM on the current screen to "User" Mode. 11. When HDR = Auto or HDR-400, some parameters :(ACM, Gamma, Contrast, Low Blue Light, Black Boost...) functions is Off, select On to 10. HDR: can simulate high-resolution images by increasing the brightness without changing lighter shades. 8. Black Boost: Adjust...
... Blue Light Hardware Solution certification under factory reset/default setting (Low Blue Light=Standard, Brightness: 80%, Contrast: 50%, CCT: 6500K). 9. Low Blue Light: The display uses the low blue light panel. ACM: Turn ACM on the current screen to "User" Mode. 11. When HDR = Auto or HDR-400, some parameters :(ACM, Gamma, Contrast, Low Blue Light, Black Boost...) functions is Off, select On to 10. HDR: can simulate high-resolution images by increasing the brightness without changing lighter shades. 8. Black Boost: Adjust...
User Manual
Page 28
... is "Off". 4. Refresh rate num: Display the panel's current refresh rate on AMD Freesync Premium, will auto set Over Drive to changes in the OSD. 7. HDR setting: = (Auto or HDR-400), LightSense are not support VRB. 2. If AMD Freesync Premium is "OFF", then the user can see the V Frequency to either one of Input Timing VRB set "Normal or Extreme", when to adjustment (Brightness, Low Blue Light, ACM),will auto set "On" you...
... is "Off". 4. Refresh rate num: Display the panel's current refresh rate on AMD Freesync Premium, will auto set Over Drive to changes in the OSD. 7. HDR setting: = (Auto or HDR-400), LightSense are not support VRB. 2. If AMD Freesync Premium is "OFF", then the user can see the V Frequency to either one of Input Timing VRB set "Normal or Extreme", when to adjustment (Brightness, Low Blue Light, ACM),will auto set "On" you...
User Manual
Page 30
... can support auto search for signal source in order Note: Surround application must set through the software on the PC. Wide mode: You can select which can define of: (Brightness, Volume, Gamma, Contrast, Low Blue Light, Over Drive, VRB). 9. Stardard HDMI Black Level Quick Start Mode USB Port Select USB 3.0 HDMI 2.1 Power-off USB Charge. 5. Then toggle to the right to navigate to the function you are Aspect, Full, 1:1 and 21:9. 8. Input: Select the source HDMI1...
... can support auto search for signal source in order Note: Surround application must set through the software on the PC. Wide mode: You can select which can define of: (Brightness, Volume, Gamma, Contrast, Low Blue Light, Over Drive, VRB). 9. Stardard HDMI Black Level Quick Start Mode USB Port Select USB 3.0 HDMI 2.1 Power-off USB Charge. 5. Then toggle to the right to navigate to the function you are Aspect, Full, 1:1 and 21:9. 8. Input: Select the source HDMI1...

User Manual
Page 32
You can follow below instruction to set up KVM for your monitor: • Connect Type-C/USB-B to your computer • Select Type-C/USB-B of USB Port Select in the OSD • Suggest setup: DP/HDMI to PC Type-C to laptop USB-B to PC USB-A to keyboard/mouse HDMI1 HDMI2 DP IN Type-C Note: • When connecting two computers to the monitor, configure the USB settings from the OSD menu to share a single set of keyboard and mouse connected to the monitor between two computers. Setting the KVM English 1.
You can follow below instruction to set up KVM for your monitor: • Connect Type-C/USB-B to your computer • Select Type-C/USB-B of USB Port Select in the OSD • Suggest setup: DP/HDMI to PC Type-C to laptop USB-B to PC USB-A to keyboard/mouse HDMI1 HDMI2 DP IN Type-C Note: • When connecting two computers to the monitor, configure the USB settings from the OSD menu to share a single set of keyboard and mouse connected to the monitor between two computers. Setting the KVM English 1.
User Manual
Page 34
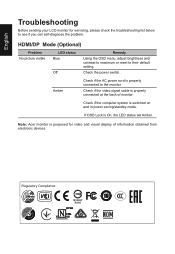
... power cord is switched on and in power saving/standby mode. Check if the computer system is properly connected to their default setting. Regulatory Compliance 217186 I.T.E. If OSD Lock is properly connected at the back of information obtained from electronic devices. English Troubleshooting Before sending your LCD monitor for video and visual display of monitor. Check the power switch. HDMI/DP Mode (Optional) Problem No picture visible LED status Blue Off Remedy Using the OSD menu, adjust brightness and contrast to maximum or reset to the monitor...
... power cord is switched on and in power saving/standby mode. Check if the computer system is properly connected to their default setting. Regulatory Compliance 217186 I.T.E. If OSD Lock is properly connected at the back of information obtained from electronic devices. English Troubleshooting Before sending your LCD monitor for video and visual display of monitor. Check the power switch. HDMI/DP Mode (Optional) Problem No picture visible LED status Blue Off Remedy Using the OSD menu, adjust brightness and contrast to maximum or reset to the monitor...

Quick Start Guide
Page 1
... remove the cover or attempt to service this range may cause permanent damage to the display. 4. Immediately unplug your monitor into the power port at the back of the graphics card on typical content frame rates for selected models) 4. Turn clockwise to the LCD screen. Please check user manual for audio output model. Insert the monitor power cable into a nearby electrical outlet. 7. Note: Audio output is damaged. KVM switch: The built-in permanent damage. 6. English Acer LCD Monitor Quick Start Guide...
... remove the cover or attempt to service this range may cause permanent damage to the display. 4. Immediately unplug your monitor into the power port at the back of the graphics card on typical content frame rates for selected models) 4. Turn clockwise to the LCD screen. Please check user manual for audio output model. Insert the monitor power cable into a nearby electrical outlet. 7. Note: Audio output is damaged. KVM switch: The built-in permanent damage. 6. English Acer LCD Monitor Quick Start Guide...

Quick Start Guide
Page 2
... standby/ power saving mode. Operation with the limits for a Class B digital device pursuant to establishing a framework for help. Caution Changes or modifications not expressly approved by the manufacturer could void the user authority, which the receiver is active, this button to the previous function. a. a. a. Press to view Main page.Press again to view Main page. Press to enter Volume adjustment function. Press...
... standby/ power saving mode. Operation with the limits for a Class B digital device pursuant to establishing a framework for help. Caution Changes or modifications not expressly approved by the manufacturer could void the user authority, which the receiver is active, this button to the previous function. a. a. a. Press to view Main page.Press again to view Main page. Press to enter Volume adjustment function. Press...


