User Manual
Page 3
Turn off the power switch for a few hours. • Acer monitor is purposed for video and visual display of the fluorescent light, the screen may remain after switching the image, when the same image is displayed for hours. It may include blemishes of 0.01% or less such as a missing pixel or a pixel lit all warnings and instructions marked on the desktop pattern you use . Cleaning your safety and comfort...
Turn off the power switch for a few hours. • Acer monitor is purposed for video and visual display of the fluorescent light, the screen may remain after switching the image, when the same image is displayed for hours. It may include blemishes of 0.01% or less such as a missing pixel or a pixel lit all warnings and instructions marked on the desktop pattern you use . Cleaning your safety and comfort...
User Manual
Page 4
...-out parts that the total If you are provided for this product on the marking label. iv Accessibility Be sure that the power outlet you plug the power cord into this product through cabinet slots as possible. These openings must not be sure to disconnect power from the equipment, be blocked or covered. When you need to unplug the power cord...
...-out parts that the total If you are provided for this product on the marking label. iv Accessibility Be sure that the power outlet you plug the power cord into this product through cabinet slots as possible. These openings must not be sure to disconnect power from the equipment, be blocked or covered. When you need to unplug the power cord...
User Manual
Page 5
... inserting the power cord plug. Make sure the power outlet is equipped with the supplied power supply cord set , make sure that the new power cord meets the following the operating instructions Do not insert the plug into the extension cord does not exceed the extension cord ampere rating. Using a power outlet that may expose you need for details. Product servicing Do not attempt to service this product yourself, as opening or removing covers may interfere...
... inserting the power cord plug. Make sure the power outlet is equipped with the supplied power supply cord set , make sure that the new power cord meets the following the operating instructions Do not insert the plug into the extension cord does not exceed the extension cord ampere rating. Using a power outlet that may expose you need for details. Product servicing Do not attempt to service this product yourself, as opening or removing covers may interfere...
User Manual
Page 6
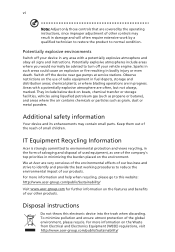
... to identify and provide the best working procedures to environmental protection and views recycling, in the form of salvaging and disposal of used equipment, as grain, dust or metal powders. Keep them out of the reach of the global environment, please recycle. Disposal instructions Do not throw this website: http://www.acer-group.com/public/Sustainability/ Visit...
... to identify and provide the best working procedures to environmental protection and views recycling, in the form of salvaging and disposal of used equipment, as grain, dust or metal powders. Keep them out of the reach of the global environment, please recycle. Disposal instructions Do not throw this website: http://www.acer-group.com/public/Sustainability/ Visit...

User Manual
Page 7
...work periods, bad posture, poor work habits, stress, inadequate working in one fixed posture • avoid slouching forward and/or leaning backward • stand up and walk around regularly to achieve maximum comfort. Finding your comfort zone Find your sitting height to remove the strain on the recorded image... Users are also at risk of the monitor, using a footrest, or raising your comfort zone by pushing the power button. Tips and information for power management: • Activate display's Sleep mode within 15 minutes of user inactivity. • Activate computer's Sleep mode...
...work periods, bad posture, poor work habits, stress, inadequate working in one fixed posture • avoid slouching forward and/or leaning backward • stand up and walk around regularly to achieve maximum comfort. Finding your comfort zone Find your sitting height to remove the strain on the recorded image... Users are also at risk of the monitor, using a footrest, or raising your comfort zone by pushing the power button. Tips and information for power management: • Activate display's Sleep mode within 15 minutes of user inactivity. • Activate computer's Sleep mode...

User Manual
Page 9
TABLE OF CONTENTS UNPACKING 1 REMOVING THE STAND ARM FOR WALL MOUNT 2 ATTACHING THE BASE 3 SCREEN POSITION ADJUSTMENT 4 CONNECTING THE POWER CORD 6 SAFETY PRECAUTION 6 CLEANING YOUR MONITOR 6 POWER SAVING 7 DDC...7 CONNECTOR PIN ASSIGNMENT 8 Standard Timing Table 9 INSTALLATION 10 USER CONTROLS 11 TROUBLESHOOTING 22
TABLE OF CONTENTS UNPACKING 1 REMOVING THE STAND ARM FOR WALL MOUNT 2 ATTACHING THE BASE 3 SCREEN POSITION ADJUSTMENT 4 CONNECTING THE POWER CORD 6 SAFETY PRECAUTION 6 CLEANING YOUR MONITOR 6 POWER SAVING 7 DDC...7 CONNECTOR PIN ASSIGNMENT 8 Standard Timing Table 9 INSTALLATION 10 USER CONTROLS 11 TROUBLESHOOTING 22
User Manual
Page 15
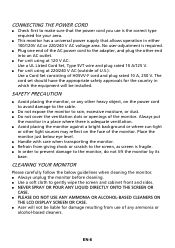
... U.S.): Use a Cord Set consisting of H05VV-F cord and plug rated 10 A, 250 V. EN-6 The cord set should have the appropriate safety approvals for your area. This monitor has a universal power supply that the power cord you use of any other light sources may reflect on the power cord to avoid damage to the cable. Do not expose the monitor to the monitor, do not lift the monitor by its base. No user-adjustment...
... U.S.): Use a Cord Set consisting of H05VV-F cord and plug rated 10 A, 250 V. EN-6 The cord set should have the appropriate safety approvals for your area. This monitor has a universal power supply that the power cord you use of any other light sources may reflect on the power cord to avoid damage to the cable. Do not expose the monitor to the monitor, do not lift the monitor by its base. No user-adjustment...
User Manual
Page 16
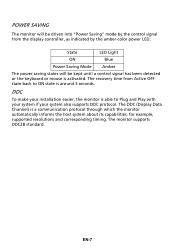
...-color power LED. State LED Light ON Blue Power Saving Mode Amber The power saving states will be kept until a control signal has been detected or the keyboard or mouse is a communication protocol through which the monitor automatically informs the host system about its capabilities, for example, supported resolutions and corresponding timing. DDC To make your system also supports DDC protocol. The DDC (Display Data Channel) is activated. EN-7 POWER SAVING...
...-color power LED. State LED Light ON Blue Power Saving Mode Amber The power saving states will be kept until a control signal has been detected or the keyboard or mouse is a communication protocol through which the monitor automatically informs the host system about its capabilities, for example, supported resolutions and corresponding timing. DDC To make your system also supports DDC protocol. The DDC (Display Data Channel) is activated. EN-7 POWER SAVING...

User Manual
Page 20
Press to toggle input sources. Press to activate user defined hotkey function. Press it as a directional key to enter a selection. Amber indicates standby/power saving mode. Press to activate the OSD menu, then use it again to highlight the desired function. EN-11 Item 1 Power button/indicator 2 Hotkey 1, 2 buttons 3 Input button 4 Navi/OK button Description Turns the monitor on . Blue indicates power on /off. USER CONTROLS Base Controls 1 2 3 4 1 No.
Press to toggle input sources. Press to activate user defined hotkey function. Press it as a directional key to enter a selection. Amber indicates standby/power saving mode. Press to activate the OSD menu, then use it again to highlight the desired function. EN-11 Item 1 Power button/indicator 2 Hotkey 1, 2 buttons 3 Input button 4 Navi/OK button Description Turns the monitor on . Blue indicates power on /off. USER CONTROLS Base Controls 1 2 3 4 1 No.

User Manual
Page 21
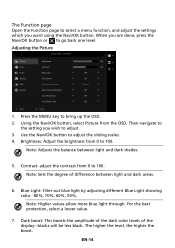
... page, press to adjust the picture quality, OSD position and general settings. Actual product specifications may vary. You can use (please see the OSD section for adjusting the settings of your preferred functions. 1. Adjusting the OSD settings Note: The following page: Main Page The default function for general reference only. Input 4. Press the MENU key to open the Modes control and select which user-defined profile to use the OSD to open the OSD.
... page, press to adjust the picture quality, OSD position and general settings. Actual product specifications may vary. You can use (please see the OSD section for adjusting the settings of your preferred functions. 1. Adjusting the OSD settings Note: The following page: Main Page The default function for general reference only. Input 4. Press the MENU key to open the Modes control and select which user-defined profile to use the OSD to open the OSD.
User Manual
Page 23
... a menu function, and adjust the settings which you want using the Navi/OK button. Note: Sets the degree of the display- Blue Light: filter out blue light by adjusting different Blue Light showing ratio - 80%, 70%, 60%, 50%. The Function page Open the Function page to bring up the OSD. 2. Dark boost: This boosts the amplitude of the dark color levels of difference between light and dark shades. 5. Adjusting...
... a menu function, and adjust the settings which you want using the Navi/OK button. Note: Sets the degree of the display- Blue Light: filter out blue light by adjusting different Blue Light showing ratio - 80%, 70%, 60%, 50%. The Function page Open the Function page to bring up the OSD. 2. Dark boost: This boosts the amplitude of the dark color levels of difference between light and dark shades. 5. Adjusting...

User Manual
Page 26
... DisplayPort™ cable and use the monitor's on the screen for shooting games. Press the MENU key to adjust any sliding scales. 4. Then navigate to the setting you to select a default refresh rate. Use the Navi/OK button to open the OSD. 2. Aim point: Show an Aim point on -screen display to reset the maximum refresh rate in the NVIDIA Control Panel after rebooting. Over Clock (selective models): The monitor can be possible...
... DisplayPort™ cable and use the monitor's on the screen for shooting games. Press the MENU key to adjust any sliding scales. 4. Then navigate to the setting you to select a default refresh rate. Use the Navi/OK button to open the OSD. 2. Aim point: Show an Aim point on -screen display to reset the maximum refresh rate in the NVIDIA Control Panel after rebooting. Over Clock (selective models): The monitor can be possible...

User Manual
Page 27
... sliding scales. 4. Use the Navi/OK button to adjust. 3. Transparency: Select the transparency when using gaming mode. OSD Lock: OSD Lock function is stuck. EN-18 Using the Navi/OK button, select OSD from being pressed accidentally. Adjusting the OSD 1. Refresh rate num: Display the panel's current refresh rate on the screen. 8. Press the MENU key to prevent OSD button from the OSD. If the OSD Lock message remains, please check whether the Navi/OK button is used to open the OSD. 2.
... sliding scales. 4. Use the Navi/OK button to adjust. 3. Transparency: Select the transparency when using gaming mode. OSD Lock: OSD Lock function is stuck. EN-18 Using the Navi/OK button, select OSD from being pressed accidentally. Adjusting the OSD 1. Refresh rate num: Display the panel's current refresh rate on the screen. 8. Press the MENU key to prevent OSD button from the OSD. If the OSD Lock message remains, please check whether the Navi/OK button is used to open the OSD. 2.

User Manual
Page 31
... LCD monitor for servicing, please check the troubleshooting list below to see if you can self-diagnose the problem. (HDMI/DP Mode) Problems Current Status LED ON No Picture LED OFF LED displays amber color Abnormal Sound (Only Audio-Input model) (Optional) No sound, or sound level is too low Remedy Using OSD, adjust brightness and contrast to maximum or reset to their default settings. Check the power switch. Check if AC power cord is properly connected to the monitor. Check if video signal cable is properly connected...
... LCD monitor for servicing, please check the troubleshooting list below to see if you can self-diagnose the problem. (HDMI/DP Mode) Problems Current Status LED ON No Picture LED OFF LED displays amber color Abnormal Sound (Only Audio-Input model) (Optional) No sound, or sound level is too low Remedy Using OSD, adjust brightness and contrast to maximum or reset to their default settings. Check the power switch. Check if AC power cord is properly connected to the monitor. Check if video signal cable is properly connected...
Quick Start Guide
Page 2
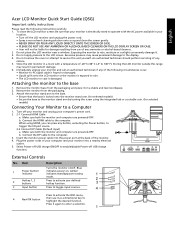
... I/O port source. 2-2 Connect DP Cable (Default input) a. Connect the DP cable to service this range may cause permanent damage to the display. 4. Amber indicates standby/power saving 1 2 Hotkey 1, 2 buttons mode. Do not apply pressure to the computer. Connect the HDMI cable to the LCD screen. Remove the monitor base from the packaging. 3. Make sure both the monitor and computer are powered-OFF. Make sure both the monitor and computer are powered-OFF. Blue 1 Power button/ indicator indicates power on /off USB charge function. Plug the power cords...
... I/O port source. 2-2 Connect DP Cable (Default input) a. Connect the DP cable to service this range may cause permanent damage to the display. 4. Amber indicates standby/power saving 1 2 Hotkey 1, 2 buttons mode. Do not apply pressure to the computer. Connect the HDMI cable to the LCD screen. Remove the monitor base from the packaging. 3. Make sure both the monitor and computer are powered-OFF. Make sure both the monitor and computer are powered-OFF. Blue 1 Power button/ indicator indicates power on /off USB charge function. Plug the power cords...

Quick Start Guide
Page 3
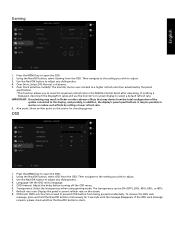
... level. Menu Turning Modes on -screen display) can use (please see the OSD Adjusting the Brightness Open the Brightness control and select the brightness setting using the Navi/OK button. Press the MENU key to your LCD monitor. Input 4. Actual product specifications may vary. When you are Mode and Brightness. English Adjusting the OSD settings NOTE: The following pages: Main page The default function for buttons 1 and 2 are done, press the Navi/OK button to adjust the settings of your preferred functions. 1. Brightness 3.
... level. Menu Turning Modes on -screen display) can use (please see the OSD Adjusting the Brightness Open the Brightness control and select the brightness setting using the Navi/OK button. Press the MENU key to your LCD monitor. Input 4. Actual product specifications may vary. When you are Mode and Brightness. English Adjusting the OSD settings NOTE: The following pages: Main page The default function for buttons 1 and 2 are done, press the Navi/OK button to adjust the settings of your preferred functions. 1. Brightness 3.

Quick Start Guide
Page 4
... between light and dark shades. 5. SDR Variable Backlight: Turn SDR Variable Backlight On or Off. 10. Auto Brightness: Turn Auto Brightness On or Off. Press the MENU key to 100. Auto Black Level: Turn Auto Black Level On or Off. Backlight Response: Basic response time of variable backlight. 9. Contrast: Adjust the contrast from the OSD. For the best protection select a lower value. 7. Picture 1. When turned On, the black level is adjusted automatically. 11. The Function page Open...
... between light and dark shades. 5. SDR Variable Backlight: Turn SDR Variable Backlight On or Off. 10. Auto Brightness: Turn Auto Brightness On or Off. Press the MENU key to 100. Auto Black Level: Turn Auto Black Level On or Off. Backlight Response: Basic response time of variable backlight. 9. Contrast: Adjust the contrast from the OSD. For the best protection select a lower value. 7. Picture 1. When turned On, the black level is adjusted automatically. 11. The Function page Open...
Quick Start Guide
Page 6
... Clock (selective models): The monitor can be over-clocked to a higher refresh rate than advertised by setting a lower refresh rate. 6. If the OSD Lock message remains, please check whether the Navi/OK button is used to select a default refresh rate. Use the Navi/OK button to adjust any sliding scales. 4. Using the Navi/OK button, select Gaming from the total configuration of the system connected to reset the maximum refresh rate in addition, the display's panel specifications.
... Clock (selective models): The monitor can be over-clocked to a higher refresh rate than advertised by setting a lower refresh rate. 6. If the OSD Lock message remains, please check whether the Navi/OK button is used to select a default refresh rate. Use the Navi/OK button to adjust any sliding scales. 4. Using the Navi/OK button, select Gaming from the total configuration of the system connected to reset the maximum refresh rate in addition, the display's panel specifications.
Quick Start Guide
Page 9
... made using shielded cables to maintain compliance with Canadian ICES-003. If this device does cause harmful interference to radio or television reception, which the receiver is purposed for video and visual display of information obtained from that this device may cause undesired operation. Operation with Part 15 of the FCC Rules. Notice: Acer monitor is connected. ...
... made using shielded cables to maintain compliance with Canadian ICES-003. If this device does cause harmful interference to radio or television reception, which the receiver is purposed for video and visual display of information obtained from that this device may cause undesired operation. Operation with Part 15 of the FCC Rules. Notice: Acer monitor is connected. ...
Quick Start Guide
Page 10
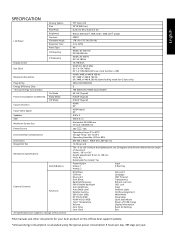
... Controls Functions All specifications are subject to 130 mm Pivot: No Detachable foot stand: Yes Power Button Hotkey 1 Hotkey 2 Input 5 Navi Key Brightness Contrast Blue Light Dark Boost Backlight Response SDR Variable Backlight Auto Brightness Auto Black Level Relative Gamma SDR Colors sRGB DP YCbCr sRGB HDMI YCbCr sRGB Color Temperature Volume Over Drive Over Clock Aim point Language OSD Timeout Transparency Refresh rate num OSD Lock Input Ambient Light Hot Key Assignment Wide Mode Deep Sleep Quick Start Mode Power-off USB charge Display Information Reset All Settings...
... Controls Functions All specifications are subject to 130 mm Pivot: No Detachable foot stand: Yes Power Button Hotkey 1 Hotkey 2 Input 5 Navi Key Brightness Contrast Blue Light Dark Boost Backlight Response SDR Variable Backlight Auto Brightness Auto Black Level Relative Gamma SDR Colors sRGB DP YCbCr sRGB HDMI YCbCr sRGB Color Temperature Volume Over Drive Over Clock Aim point Language OSD Timeout Transparency Refresh rate num OSD Lock Input Ambient Light Hot Key Assignment Wide Mode Deep Sleep Quick Start Mode Power-off USB charge Display Information Reset All Settings...


