
User Manual
Page 2
All correspondence concerning your computer. Acer LCD Monitor User Guide Model number Serial number Date of purchase Place of such revisions or changes. Such changes will be made periodically to the information in ... are recorded on the label affixed to your unit should include the serial number, model number and purchase information. Acer Incorporated. Acer LCD Monitor User Guide Original Issue: 09/2020 Changes may be reproduced, stored in a retrieval system, or transmitted, in this manual or supplementary documents and publications. All ...
All correspondence concerning your computer. Acer LCD Monitor User Guide Model number Serial number Date of purchase Place of such revisions or changes. Such changes will be made periodically to the information in ... are recorded on the label affixed to your unit should include the serial number, model number and purchase information. Acer Incorporated. Acer LCD Monitor User Guide Original Issue: 09/2020 Changes may be reproduced, stored in a retrieval system, or transmitted, in this manual or supplementary documents and publications. All ...
User Manual
Page 3
... may flicker during initial use . • The LCD screen has 99.99% or more effective pixels. Special notes on LCD monitors The following are normal with the LCD monitor and do not indicate a problem. • Due to make sure the flicker disappears. • You may remain after switching the... carefully follow these instructions carefully. Cleaning your safety and comfort Safety instructions Read these guidelines when cleaning the monitor: • Always unplug the monitor before cleaning. • Use a soft cloth to the nature of the LCD screen, an afterimage of 0.01% or less such as ...
... may flicker during initial use . • The LCD screen has 99.99% or more effective pixels. Special notes on LCD monitors The following are normal with the LCD monitor and do not indicate a problem. • Due to make sure the flicker disappears. • You may remain after switching the... carefully follow these instructions carefully. Cleaning your safety and comfort Safety instructions Read these guidelines when cleaning the monitor: • Always unplug the monitor before cleaning. • Use a soft cloth to the nature of the LCD screen, an afterimage of 0.01% or less such as ...
User Manual
Page 4
... the volume until you can hear it clearly and comfortably and without distortion. • After setting the volume level, do not be used for this monitor, do not increase it after your ears have adjusted. • Limit the amount of time listening to music at high volume. • Avoid turning up...
... the volume until you can hear it clearly and comfortably and without distortion. • After setting the volume level, do not be used for this monitor, do not increase it after your ears have adjusted. • Limit the amount of time listening to music at high volume. • Avoid turning up...
User Manual
Page 7
...computer. Long work periods, bad posture, poor work habits, stress, inadequate working in front of user inactivity. • Wake the monitor when it is produced with high-precision manufacturing techniques. Incorrect computer usage may complain of eyestrain and headaches after long hours of physical injury... comfortable use Computer users may lead to carpal tunnel syndrome, tendonitis, tenosynovitis or other factors greatly increase the risk of the monitor, using a footrest, or raising your company's health and safety department. Finding your comfort zone Find your comfort zone by ...
...computer. Long work periods, bad posture, poor work habits, stress, inadequate working in front of user inactivity. • Wake the monitor when it is produced with high-precision manufacturing techniques. Incorrect computer usage may complain of eyestrain and headaches after long hours of physical injury... comfortable use Computer users may lead to carpal tunnel syndrome, tendonitis, tenosynovitis or other factors greatly increase the risk of the monitor, using a footrest, or raising your company's health and safety department. Finding your comfort zone Find your comfort zone by ...

User Manual
Page 8
... incorrect glasses or contact lenses, glare, excessive room lighting, poorly focused screens, very small typefaces and low-contrast displays could stress your eyes from the monitor and focusing on how to reduce eyestrain. Eyes • It is recommended to rest your eyes for 10 minutes every 40 minutes. • Give your...
... incorrect glasses or contact lenses, glare, excessive room lighting, poorly focused screens, very small typefaces and low-contrast displays could stress your eyes from the monitor and focusing on how to reduce eyestrain. Eyes • It is recommended to rest your eyes for 10 minutes every 40 minutes. • Give your...
User Manual
Page 9
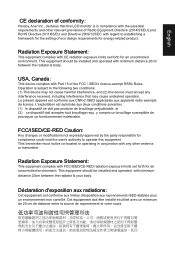
.... This equipment should be installed and operated with CE radiation exposure limits set forth for compliance could void the user's authority to operate this LCD monitor is subject to establishing a framework for the setting of eco design requirements for an uncontrolled environment. USA, Canada: This device complies with FCC/... & your body. Radiation Exposure Statement: This equipment complies with minimum distance 20cm between the radiator & body. English CE declaration of conformity: Hereby, Acer Inc., declares that may cause undesired operation.
.... This equipment should be installed and operated with CE radiation exposure limits set forth for compliance could void the user's authority to operate this LCD monitor is subject to establishing a framework for the setting of eco design requirements for an uncontrolled environment. USA, Canada: This device complies with FCC/... & your body. Radiation Exposure Statement: This equipment complies with minimum distance 20cm between the radiator & body. English CE declaration of conformity: Hereby, Acer Inc., declares that may cause undesired operation.

User Manual
Page 11
... s.r.l. Viale delle Industrie 1/A, 20020 Arese (MI), Italy Tel: +39-02-939-921 ,Fax: +39-02 9399-2913 www.acer.it Product: Trade Name: Model Number: SKU Number: LCD Monitor Acer X25 X25 xxxxxx; ("x" = 0~9, a ~ z, A ~ Z, or blank) We, Acer Incorporated, hereby declare under our sole responsibility that the product described above is in conformity with the relevant Union... 220-1 V3.1.1:2017 EN EN62479:2010 EN 300 220-2 V3.1.1:2017 EN EN62311:2008 Year to begin affixing CE marking: 2020. RU Jan / Sr. Manager Acer Incorporated (Taipei, Taiwan) Oct.30,2020 Date
... s.r.l. Viale delle Industrie 1/A, 20020 Arese (MI), Italy Tel: +39-02-939-921 ,Fax: +39-02 9399-2913 www.acer.it Product: Trade Name: Model Number: SKU Number: LCD Monitor Acer X25 X25 xxxxxx; ("x" = 0~9, a ~ z, A ~ Z, or blank) We, Acer Incorporated, hereby declare under our sole responsibility that the product described above is in conformity with the relevant Union... 220-1 V3.1.1:2017 EN EN62479:2010 EN 300 220-2 V3.1.1:2017 EN EN62311:2008 Year to begin affixing CE marking: 2020. RU Jan / Sr. Manager Acer Incorporated (Taipei, Taiwan) Oct.30,2020 Date
User Manual
Page 12
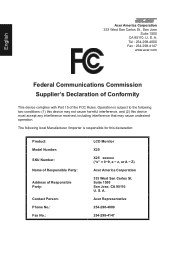
... Supplier's Declaration of Conformity This device complies with Part 15 of Responsible Party: Contact Person: Phone No.: Fax No.: LCD Monitor X25 X25 xxxxxx ("x" = 0~9, a ~ z, or A ~ Z) Acer America Corporation 333 West San Carlos St. English Acer America Corporation 333 West San Carlos St., San Jose Suite 1500 CA 95110, U. The following local Manufacturer /Importer is subject...
... Supplier's Declaration of Conformity This device complies with Part 15 of Responsible Party: Contact Person: Phone No.: Fax No.: LCD Monitor X25 X25 xxxxxx ("x" = 0~9, a ~ z, or A ~ Z) Acer America Corporation 333 West San Carlos St. English Acer America Corporation 333 West San Carlos St., San Jose Suite 1500 CA 95110, U. The following local Manufacturer /Importer is subject...
User Manual
Page 13
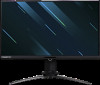
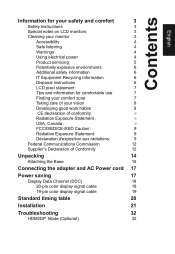
Contents English Information for your safety and comfort 3 Safety instructions 3 Special notes on LCD monitors 3 Cleaning your monitor 3 Accessibility 4 Safe listening 4 Warnings 4 Using electrical power 4 Product servicing 5 Potentially explosive environments 6 Additional safety information 6 IT Equipment Recycling Information 6 Disposal instructions 6 LCD pixel statement 7 Tips ...
Contents English Information for your safety and comfort 3 Safety instructions 3 Special notes on LCD monitors 3 Cleaning your monitor 3 Accessibility 4 Safe listening 4 Warnings 4 Using electrical power 4 Product servicing 5 Potentially explosive environments 6 Additional safety information 6 IT Equipment Recycling Information 6 Disposal instructions 6 LCD pixel statement 7 Tips ...

User Manual
Page 14
LCD monitor Quick start guide AC Power cord DP Cable (Optional) Predator X25 Quick Guide HDMI cable (Optional) USB cable (Optional) English Unpacking Please check that the following items are present when you unpack the box, and save the packing materials in case you need to ship or transport the monitor in the future.
LCD monitor Quick start guide AC Power cord DP Cable (Optional) Predator X25 Quick Guide HDMI cable (Optional) USB cable (Optional) English Unpacking Please check that the following items are present when you unpack the box, and save the packing materials in case you need to ship or transport the monitor in the future.

User Manual
Page 15
English • Attaching the Base Note: Remove the monitor and monitor base from its packaging. Carefully place the monitor face-down on a stable surface -- use a cloth to avoid scratching the screen. • Height Adjustment After pressing the top of the monitor then you can adjust the height of the monitor. 1 2 115mm
English • Attaching the Base Note: Remove the monitor and monitor base from its packaging. Carefully place the monitor face-down on a stable surface -- use a cloth to avoid scratching the screen. • Height Adjustment After pressing the top of the monitor then you can adjust the height of the monitor. 1 2 115mm

User Manual
Page 16
Only at ±90°. 90° 90° • Tilt Please see the illustration below for the most comfortable viewing angle. -20° +20° • Monitor Pivot Before rotating the display,lift it to the top position and then push it back to the utmost degree. Rotate clockwise or counter-clockwise until the monitor stops at the highest point can 25 degrees of recline be offered for the angle of elevation. -5° 25° English • Swivel With the built-in pedestal, you can swivel the monitor for an example of the tilt range.
Only at ±90°. 90° 90° • Tilt Please see the illustration below for the most comfortable viewing angle. -20° +20° • Monitor Pivot Before rotating the display,lift it to the top position and then push it back to the utmost degree. Rotate clockwise or counter-clockwise until the monitor stops at the highest point can 25 degrees of recline be offered for the angle of elevation. -5° 25° English • Swivel With the built-in pedestal, you can swivel the monitor for an example of the tilt range.
User Manual
Page 17
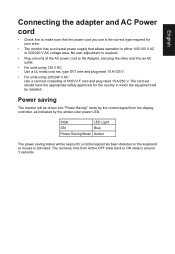
... plug rated 10 A/125 V. • For units using 220/240 V AC: Use a cord set should have the appropriate safety approvals for your area. • The monitor has a universal power supply that the power cord you use is around 3 seconds. No user-adjustment is activated. Power saving The...
... plug rated 10 A/125 V. • For units using 220/240 V AC: Use a cord set should have the appropriate safety approvals for your area. • The monitor has a universal power supply that the power cord you use is around 3 seconds. No user-adjustment is activated. Power saving The...
User Manual
Page 18
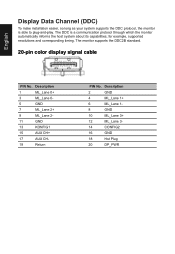
... 3- 14 CONFIG2 16 GND 18 Hot Plug 20 DP_PWR for example, supported resolutions and corresponding timing. The DDC is able to plug-and-play. The monitor supports the DDC2B standard. 20-pin color display signal cable PIN No. Description 1 ML_Lane 0+ 3 ML_Lane 0- 5 GND 7 ML_Lane 2+ 9 ML_Lane 2- 11 GND 13 ... Return PIN No. English Display Data Channel (DDC) To make installation easier, so long as your system supports the DDC protocol, the monitor is a communication protocol through which the monitor automatically informs the host system about its capabilities;
... 3- 14 CONFIG2 16 GND 18 Hot Plug 20 DP_PWR for example, supported resolutions and corresponding timing. The DDC is able to plug-and-play. The monitor supports the DDC2B standard. 20-pin color display signal cable PIN No. Description 1 ML_Lane 0+ 3 ML_Lane 0- 5 GND 7 ML_Lane 2+ 9 ML_Lane 2- 11 GND 13 ... Return PIN No. English Display Data Channel (DDC) To make installation easier, so long as your system supports the DDC protocol, the monitor is a communication protocol through which the monitor automatically informs the host system about its capabilities;

User Manual
Page 21
... to port. 4. Turn off your computer and unplug your computer's power cord. 2. Insert the monitor power cable into the power port at the back of the graphics card on the computer. 3. Connect the USB cable to a properly grounded AC outlet. ... USB Cable(Optional) Connect the USB cable to the HDMI (optional) and /or DP (optional) input socket of the monitor, and the HDMI (optional) and /or DP (optional) output socket of the monitor. 5. English Installation 1. Connect the signal cable to port for audio output model. Please check user manual for more instruction...
... to port. 4. Turn off your computer and unplug your computer's power cord. 2. Insert the monitor power cable into the power port at the back of the graphics card on the computer. 3. Connect the USB cable to a properly grounded AC outlet. ... USB Cable(Optional) Connect the USB cable to the HDMI (optional) and /or DP (optional) input socket of the monitor, and the HDMI (optional) and /or DP (optional) output socket of the monitor. 5. English Installation 1. Connect the signal cable to port for audio output model. Please check user manual for more instruction...
User Manual
Page 22
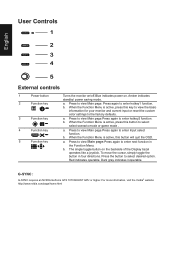
... Dark gray indicates inoperable. b. When the Function Menu is active, press this key to view the basic information for your monitor and current input or reset the custom color settings to enter next function in four directions. a. Red indicates operable. When the.... English User Controls 1 2 3 4 5 External controls 1 Power button 2 Function key / 3 Function key / 4 Function key /X 5 Function key / Turns the monitor on/off.Blue indicates power on the backside of the Display bezel operates like a joystick. When the Function Menu is active, this button to enter...
... Dark gray indicates inoperable. b. When the Function Menu is active, press this key to view the basic information for your monitor and current input or reset the custom color settings to enter next function in four directions. a. Red indicates operable. When the.... English User Controls 1 2 3 4 5 External controls 1 Power button 2 Function key / 3 Function key / 4 Function key /X 5 Function key / Turns the monitor on/off.Blue indicates power on the backside of the Display bezel operates like a joystick. When the Function Menu is active, this button to enter...
User Manual
Page 23
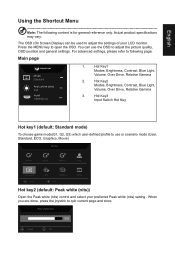
... Racing Sports User Standard Move ECO Graphics OK Movie Hot key2 (default: Peak white (nits)) Open the Peak white (nits) control and select your LCD monitor. You can be used to adjust the settings of your preferred Peak white (nits) setting . Hot Key3 Input Switch Hot Key Hot key1 (default: Standard...
... Racing Sports User Standard Move ECO Graphics OK Movie Hot key2 (default: Peak white (nits)) Open the Peak white (nits) control and select your LCD monitor. You can be used to adjust the settings of your preferred Peak white (nits) setting . Hot Key3 Input Switch Hot Key Hot key1 (default: Standard...

User Manual
Page 24
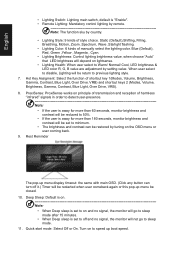
... Boost SDR/HDR Variable Backlight Backlight Response Auto Brightness Max Brightness Move Enter Off Off On Mode1 On Off 315 50 X 1. Information Hot Key : Show Monitor Information and Reset control function. Contrast: Adjust the contrast from the OSD. The toggle to the right to navigate to the element you wish to...
... Boost SDR/HDR Variable Backlight Backlight Response Auto Brightness Max Brightness Move Enter Off Off On Mode1 On Off 315 50 X 1. Information Hot Key : Show Monitor Information and Reset control function. Contrast: Adjust the contrast from the OSD. The toggle to the right to navigate to the element you wish to...

User Manual
Page 26
.... 5. Volume: Adjust the volume. sRGB by default follows the sRGB gamma specification, which is on DP input in SDR mode; BT.1886 by ColorSense, the Monitor color temperature will use sRGB gamma to display YCbCR inputs. 9. 6-axis Color: Adjust the red, green, blue, yellow, magenta and cyan color. Stardard Picture Volume...
.... 5. Volume: Adjust the volume. sRGB by default follows the sRGB gamma specification, which is on DP input in SDR mode; BT.1886 by ColorSense, the Monitor color temperature will use sRGB gamma to display YCbCR inputs. 9. 6-axis Color: Adjust the red, green, blue, yellow, magenta and cyan color. Stardard Picture Volume...
User Manual
Page 30
... transmission and reception of harmless "infrared" signals in order to detect user-presence Note: • If the user is away for more than 60 seconds, monitor brightness and contrast will be reduced to 50%. • If the user is away for more than 180 seconds..., monitor brightness and contrast will be set to minimum. • The brightness and contrast can turn off and no signal, the monitor will go to disable, Lighting will not go to sleep mode after 15 minutes. •...
... transmission and reception of harmless "infrared" signals in order to detect user-presence Note: • If the user is away for more than 60 seconds, monitor brightness and contrast will be reduced to 50%. • If the user is away for more than 180 seconds..., monitor brightness and contrast will be set to minimum. • The brightness and contrast can turn off and no signal, the monitor will go to disable, Lighting will not go to sleep mode after 15 minutes. •...


