CE DoC
Page 1
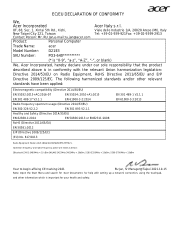
...-3-3:2013 Radio Equipment Model: AX211NGW,AX201NGW,MTK-MT7921, Operation frequency and radio-frequency power are listed as below: [Bluetooth] 2402-2480MHz < 10 dBm [WLAN] 2412MHz-2462MHz < 20dBm, 5180-5320MHz < 23dBm, 5500-5700MHz < 23dBm Year to begin affixing CE marking:2021 RU Jan, Sr.Manager@Taipei 2021-10-15 Note: Open the Start Menu and search for 'Acer Documents' for...
...-3-3:2013 Radio Equipment Model: AX211NGW,AX201NGW,MTK-MT7921, Operation frequency and radio-frequency power are listed as below: [Bluetooth] 2402-2480MHz < 10 dBm [WLAN] 2412MHz-2462MHz < 20dBm, 5180-5320MHz < 23dBm, 5500-5700MHz < 23dBm Year to begin affixing CE marking:2021 RU Jan, Sr.Manager@Taipei 2021-10-15 Note: Open the Start Menu and search for 'Acer Documents' for...
User Manual
Page 3
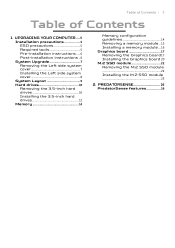
... precautions 5 Required tools 5 Pre-installation instructions .....6 Post-installation instructions ..6 System Upgrade 7 Removing the Left side system cover 7 Installing the Left side system cover 8 System Layout 9 Hard drives 10 Removing the 3.5-inch hard drives 10 Installing the 3.5-inch hard drives 12 Memory 14 Memory configuration guidelines 14 Removing a memory module .. 15 Installing a memory module ... 16 Graphics board 17 Removing the Graphics board17 Installing the Graphics board 20 M.2 SSD module 22 Removing the M.2 SSD module 22 Installing the M.2 SSD module 23 2.
... precautions 5 Required tools 5 Pre-installation instructions .....6 Post-installation instructions ..6 System Upgrade 7 Removing the Left side system cover 7 Installing the Left side system cover 8 System Layout 9 Hard drives 10 Removing the 3.5-inch hard drives 10 Installing the 3.5-inch hard drives 12 Memory 14 Memory configuration guidelines 14 Removing a memory module .. 15 Installing a memory module ... 16 Graphics board 17 Removing the Graphics board17 Installing the Graphics board 20 M.2 SSD module 22 Removing the M.2 SSD module 22 Installing the M.2 SSD module 23 2.
User Manual
Page 6
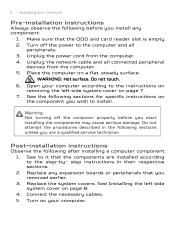
... side system cover on page 7. 7. Place the computer on the component you start installing the components may cause serious damage. Warning Not turning off the power to install. Unplug the network cable and all peripherals. 3. Post-installation instructions Observe the following sections for specific instructions on a flat, steady surface. Open your computer according to the step-by- WARNING: Hot surface. Connect the necessary cables. 5. Upgrading your...
... side system cover on page 7. 7. Place the computer on the component you start installing the components may cause serious damage. Warning Not turning off the power to install. Unplug the network cable and all peripherals. 3. Post-installation instructions Observe the following sections for specific instructions on a flat, steady surface. Open your computer according to the step-by- WARNING: Hot surface. Connect the necessary cables. 5. Upgrading your...
User Manual
Page 7
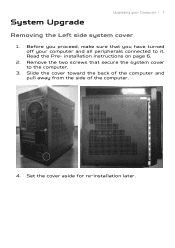
System Upgrade Upgrading your computer and all peripherals connected to the computer. 3. Before you have turned off your Computer - 7 Removing the Left side system cover 1. Set the cover aside for re-installation later. Read the Pre- Remove the two screws that you proceed, make sure that secure the system cover to it. installation instructions on page 6. 2. Slide the cover toward the back of the computer and pull away from the side of the computer. 4.
System Upgrade Upgrading your computer and all peripherals connected to the computer. 3. Before you have turned off your Computer - 7 Removing the Left side system cover 1. Set the cover aside for re-installation later. Read the Pre- Remove the two screws that you proceed, make sure that secure the system cover to it. installation instructions on page 6. 2. Slide the cover toward the back of the computer and pull away from the side of the computer. 4.
User Manual
Page 10
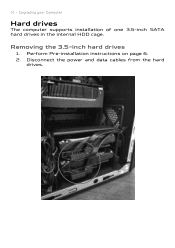
Removing the 3.5-inch hard drives 1. Disconnect the power and data cables from the hard drives. Perform Pre-installation instructions on page 6. 2. 10 - Upgrading your Computer Hard drives The computer supports installation of one 3.5-inch SATA hard drives in the internal HDD cage.
Removing the 3.5-inch hard drives 1. Disconnect the power and data cables from the hard drives. Perform Pre-installation instructions on page 6. 2. 10 - Upgrading your Computer Hard drives The computer supports installation of one 3.5-inch SATA hard drives in the internal HDD cage.
User Manual
Page 12
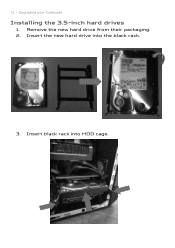
12 - Upgrading your Computer Installing the 3.5-inch hard drives 1. Insert the new hard drive into HDD cage. Insert black rack into the black rack. 3. Remove the new hard drive from their packaging. 2.
12 - Upgrading your Computer Installing the 3.5-inch hard drives 1. Insert the new hard drive into HDD cage. Insert black rack into the black rack. 3. Remove the new hard drive from their packaging. 2.
User Manual
Page 13
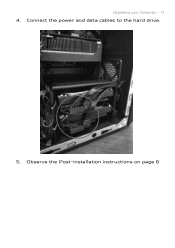
Connect the power and data cables to the hard drive. 5. Upgrading your Computer - 13 4. Observe the Post-installation instructions on page 6
Connect the power and data cables to the hard drive. 5. Upgrading your Computer - 13 4. Observe the Post-installation instructions on page 6
User Manual
Page 17
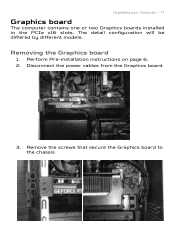
The detail configuration will be differed by different models. Disconnect the power cables from the Graphics board. 3. Removing the Graphics board 1. Remove the screws that secure the Graphics board to the chassis Perform Pre-installation instructions on page 6. 2. Upgrading your Computer - 17 Graphics board The computer contains one or two Graphics boards installed in the PCIe x16 slots.
The detail configuration will be differed by different models. Disconnect the power cables from the Graphics board. 3. Removing the Graphics board 1. Remove the screws that secure the Graphics board to the chassis Perform Pre-installation instructions on page 6. 2. Upgrading your Computer - 17 Graphics board The computer contains one or two Graphics boards installed in the PCIe x16 slots.
User Manual
Page 26
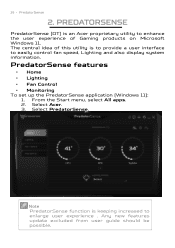
From the Start menu, select All apps. 2. PredatorSense features • Home • Lighting • Fan Control • Monitoring To set up the PredatorSense application (Windows 11): 1. PREDATORSENSE PredatorSense (DT) is to provide a user interface to enhance the user experience of Gaming products on Microsoft Windows 11. Select Acer. 3. Note 26 - The central idea of this utility is an Acer proprietary utility to easily control fan speed, Lighting and also display system information. Select PredatorSense. PredatorSense 2.
From the Start menu, select All apps. 2. PredatorSense features • Home • Lighting • Fan Control • Monitoring To set up the PredatorSense application (Windows 11): 1. PREDATORSENSE PredatorSense (DT) is to provide a user interface to enhance the user experience of Gaming products on Microsoft Windows 11. Select Acer. 3. Note 26 - The central idea of this utility is an Acer proprietary utility to easily control fan speed, Lighting and also display system information. Select PredatorSense. PredatorSense 2.

User Manual
Page 27
... fans including, Front fan , Back fan CPU fan and GPU fan. Category Home Lighting Fan control PredatorSense - 27 Description Provide overview of RAM button. • Provide the two control method including Global Control and Area Control button • Lighting Effects: Off, Normal, Breathing, Heart Beat, Blink, Breathing randomly, Blink randomly, Parallel rainbow, Sequential rainbow, Breathing rainbow, Wave Color cycle. • Lighting profile Provide Fan speed control in Auto, Gaming and Custom mode for fans. Monitoring...
... fans including, Front fan , Back fan CPU fan and GPU fan. Category Home Lighting Fan control PredatorSense - 27 Description Provide overview of RAM button. • Provide the two control method including Global Control and Area Control button • Lighting Effects: Off, Normal, Breathing, Heart Beat, Blink, Breathing randomly, Blink randomly, Parallel rainbow, Sequential rainbow, Breathing rainbow, Wave Color cycle. • Lighting profile Provide Fan speed control in Auto, Gaming and Custom mode for fans. Monitoring...
Safety Guide
Page 6
...Install the external display, keyboard and mouse properly and within comfortable reach. • If you view your monitor more than the top edge of your vision Long viewing hours, wearing incorrect glasses or contact lenses, glare, excessive room lighting, poorly focused screens, very small typefaces and low-contrast displays... and graphics clarity. • Eliminate glare and reflections by: • placing your display in such a way that the side faces the window or any light source, • minimizing room light by looking at the center of your eyes from the monitor and focusing...
...Install the external display, keyboard and mouse properly and within comfortable reach. • If you view your monitor more than the top edge of your vision Long viewing hours, wearing incorrect glasses or contact lenses, glare, excessive room lighting, poorly focused screens, very small typefaces and low-contrast displays... and graphics clarity. • Eliminate glare and reflections by: • placing your display in such a way that the side faces the window or any light source, • minimizing room light by looking at the center of your eyes from the monitor and focusing...
Safety Guide
Page 10
... tips for using your skin or body. • Your device and its enhancements may touch dangerous voltage points or short-out parts that provides adequate cushioning and protection. To avoid injury, ensure they may contain small parts. This product should never be seriously damaged. • Slots and openings are provided for ventilation to ensure reliable operation of...
... tips for using your skin or body. • Your device and its enhancements may touch dangerous voltage points or short-out parts that provides adequate cushioning and protection. To avoid injury, ensure they may contain small parts. This product should never be seriously damaged. • Slots and openings are provided for ventilation to ensure reliable operation of...
Safety Guide
Page 11
... a need for service. • The product does not operate normally after following the operating instructions. • The product exhibits a distinct change in a carrying case while it is off the computer and remove the battery pack if applicable. Basic care and tips for using your computer - 11 Before putting your computer in a carrying case, make sure that are covered by a qualified technician to restore the...
... a need for service. • The product does not operate normally after following the operating instructions. • The product exhibits a distinct change in a carrying case while it is off the computer and remove the battery pack if applicable. Basic care and tips for using your computer - 11 Before putting your computer in a carrying case, make sure that are covered by a qualified technician to restore the...
Safety Guide
Page 12
... electronic device, discharge static electricity by unplugging all power cords from the power supplies. Using electrical power • Do not connect the adapter to the equipment operator as possible. Disconnect the AC adapter. 3. Use a soft, moist cloth. Do not locate this product where people will walk on the plug. • This product should be sure to a drive. When you plug into is easily accessible and located as...
... electronic device, discharge static electricity by unplugging all power cords from the power supplies. Using electrical power • Do not connect the adapter to the equipment operator as possible. Disconnect the AC adapter. 3. Use a soft, moist cloth. Do not locate this product where people will walk on the plug. • This product should be sure to a drive. When you plug into is easily accessible and located as...
Safety Guide
Page 15
... parts approved by an authorized service center. Do not disassemble or dispose of times, but it to purchase a new battery. If the battery leaks and you come into contact with the leaked fluids, rinse thoroughly with batteries. Precautions when replacing the battery Improper replacement or mishandling could damage the battery, cause overheating, result in injury, and risk fire or explosion. • Device with removable battery...
... parts approved by an authorized service center. Do not disassemble or dispose of times, but it to purchase a new battery. If the battery leaks and you come into contact with the leaked fluids, rinse thoroughly with batteries. Precautions when replacing the battery Improper replacement or mishandling could damage the battery, cause overheating, result in injury, and risk fire or explosion. • Device with removable battery...
Safety Guide
Page 19
... qualified for such use of wireless devices in an aircraft may be dangerous to the operation of your device while flying in a vehicle. For vehicles equipped with an air bag, remember that air bags inflate with the manufacturer, or its parts, or enhancements. Sparks in the air bag deployment area. The use . Faulty installation or service may be dangerous...
... qualified for such use of wireless devices in an aircraft may be dangerous to the operation of your device while flying in a vehicle. For vehicles equipped with an air bag, remember that air bags inflate with the manufacturer, or its parts, or enhancements. Sparks in the air bag deployment area. The use . Faulty installation or service may be dangerous...
Safety Guide
Page 22
... wireless adapter operates within the guidelines found in its use is less than the electromagnetic energy emitted by other radio devices, emits radio frequency electromagnetic energy. Do not place credit cards or other magnetic storage media near the device, because information stored on board. Warnings and regulatory information Wireless adapter regulatory information Radio frequency interference Warning For safety reasons, turn off your device's wireless adapter...
... wireless adapter operates within the guidelines found in its use is less than the electromagnetic energy emitted by other radio devices, emits radio frequency electromagnetic energy. Do not place credit cards or other magnetic storage media near the device, because information stored on board. Warnings and regulatory information Wireless adapter regulatory information Radio frequency interference Warning For safety reasons, turn off your device's wireless adapter...
Safety Guide
Page 23
.... Proper operation of this radio according to transmit data unless the antenna is limited by the constraints posed by the safety directors of wireless adapters in hazardous locations is connected; If you turn it on board airplanes, or • Using the wireless adapter in any component containing the radio such that applies to the use of such environments. USA - this manual will...
.... Proper operation of this radio according to transmit data unless the antenna is limited by the constraints posed by the safety directors of wireless adapters in hazardous locations is connected; If you turn it on board airplanes, or • Using the wireless adapter in any component containing the radio such that applies to the use of such environments. USA - this manual will...
Safety Guide
Page 24
... limits set forth by the FCC grant conditions, and the antenna that the potential for U.S operation according to co-channel mobile satellite systems. High power radars are provided for this device. These radar stations can be used indoors for...configurations can cause interference with and /or damage this wireless adapter allowing any other person in the vicinity), or the minimum separation distance as primary users of at www.fcc.gov/oet/ea/ by entering the FCC ID number on airplanes is governed by the Federal Aviation Administration (FAA). • The use due to its operation...
... limits set forth by the FCC grant conditions, and the antenna that the potential for U.S operation according to co-channel mobile satellite systems. High power radars are provided for this device. These radar stations can be used indoors for...configurations can cause interference with and /or damage this wireless adapter allowing any other person in the vicinity), or the minimum separation distance as primary users of at www.fcc.gov/oet/ea/ by entering the FCC ID number on airplanes is governed by the Federal Aviation Administration (FAA). • The use due to its operation...
Safety Guide
Page 25
... - 25 This device complies with the instructions, the wireless adapter may cause undesired operation. • 15.21 You are designed to operate the equipment. Operation of the FCC Rules. This wireless adapter generates, uses, and can be determined by turning the equipment off and on a circuit different from that such interference will not occur in a residential installation. If this wireless adapter does cause harmful...
... - 25 This device complies with the instructions, the wireless adapter may cause undesired operation. • 15.21 You are designed to operate the equipment. Operation of the FCC Rules. This wireless adapter generates, uses, and can be determined by turning the equipment off and on a circuit different from that such interference will not occur in a residential installation. If this wireless adapter does cause harmful...


