
PD100 Quick Start Guide
Page 1
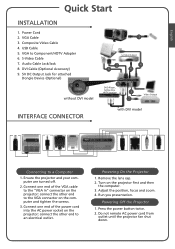
...off. 2. Connect one end of the VGA cable to the "VGA In" connector on the projector; Connect one end of the power cord into the AC power socket on the projector; Turn on the computer and tighten the screws. 3. Run you presentation. connect the other end...VGA to a Computer 1. S-Video Cable 7. Composite Video Cable 4. Powering On the Projector Powering On the Projector 1. Adjust the position, focus and zoom. 4. Remove the lens cap. 2. Do not remote AC power cord from outlet until the projector fan shut down. VGA Cable 3. DVI Cable (Optional Accessory) 9. 5V DC Output ...
...off. 2. Connect one end of the VGA cable to the "VGA In" connector on the projector; Connect one end of the power cord into the AC power socket on the projector; Turn on the computer and tighten the screws. 3. Run you presentation. connect the other end...VGA to a Computer 1. S-Video Cable 7. Composite Video Cable 4. Powering On the Projector Powering On the Projector 1. Adjust the position, focus and zoom. 4. Remove the lens cap. 2. Do not remote AC power cord from outlet until the projector fan shut down. VGA Cable 3. DVI Cable (Optional Accessory) 9. 5V DC Output ...
PD100 User's Guide
Page 1
... of Contents 1 Usage Notice 2 Precautions ...2 Introduction 4 Product Features 4 Package Overview 5 Product Overview 6 Main Unit...6 Control Panel ...7 Connection Ports ...8 Remote Control with Laser Pointer 9 Installation 10 Connecting the Projector 10 Powering On/Off the Projector 11 Powering On the Projector 11 Powering Off the projector 12 Warning Indicator ...12 Adjusting the Projected Image 13 Adjusting the...
... of Contents 1 Usage Notice 2 Precautions ...2 Introduction 4 Product Features 4 Package Overview 5 Product Overview 6 Main Unit...6 Control Panel ...7 Connection Ports ...8 Remote Control with Laser Pointer 9 Installation 10 Connecting the Projector 10 Powering On/Off the Projector 11 Powering On the Projector 11 Powering Off the projector 12 Warning Indicator ...12 Adjusting the Projected Image 13 Adjusting the...

PD100 User's Guide
Page 4
Introduction Product Features This product is an SVGA single chip 0.55" DLPTM projector. Outstanding features include: True SVGA, 800 x 600 addressable pixels Single chip DLPTM technology NTSC3.58/NTSC4.43/PAL/SECAM and HDTV.../p, 720p, 1080i) High-tech DVI connection for digital signal with HDCP function and supports 480p, 576p, 720p and 1080i (Optional) Full function remote control with laser pointer User friendly multilingual on screen display menu Advanced digital keystone correction and high quality full screen image re-scaling...
Introduction Product Features This product is an SVGA single chip 0.55" DLPTM projector. Outstanding features include: True SVGA, 800 x 600 addressable pixels Single chip DLPTM technology NTSC3.58/NTSC4.43/PAL/SECAM and HDTV.../p, 720p, 1080i) High-tech DVI connection for digital signal with HDCP function and supports 480p, 576p, 720p and 1080i (Optional) Full function remote control with laser pointer User friendly multilingual on screen display menu Advanced digital keystone correction and high quality full screen image re-scaling...
PD100 User's Guide
Page 5
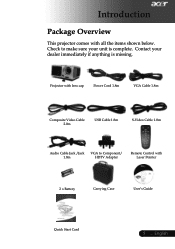
Introduction Package Overview This projector comes with Laser Pointer 2 x Battery Carrying Case User's Guide Quick Start Card 5 ... English Contact your unit is missing. Projector with lens cap Power Cord 1.8m VGA Cable 1.8m Composite Video Cable 2.0m USB Cable 1.8m S-Video Cable 1.8m Audio Cable Jack /Jack VGA to make sure your dealer immediately if anything is complete. Check to Component/ 1.8m HDTV Adapter Remote Control with all the items shown below.
Introduction Package Overview This projector comes with Laser Pointer 2 x Battery Carrying Case User's Guide Quick Start Card 5 ... English Contact your unit is missing. Projector with lens cap Power Cord 1.8m VGA Cable 1.8m Composite Video Cable 2.0m USB Cable 1.8m S-Video Cable 1.8m Audio Cable Jack /Jack VGA to make sure your dealer immediately if anything is complete. Check to Component/ 1.8m HDTV Adapter Remote Control with all the items shown below.
PD100 User's Guide
Page 6
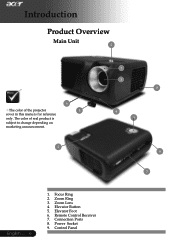
Introduction Product Overview Main Unit 2 6 The color of real product is for reference only. Zoom Lens 4. Remote Control Receiver 7. Control Panel Elevator Button 5. Elevator Foot 6. Power Socket 9. Focus Ring 2. Connection Ports 8. Zoom Ring 3. The color of the projector 5 cover in this menu is subject to change depending on marketing announcement. 2 1 3 8 4 9 6 7 English ... 6 1.
Introduction Product Overview Main Unit 2 6 The color of real product is for reference only. Zoom Lens 4. Remote Control Receiver 7. Control Panel Elevator Button 5. Elevator Foot 6. Power Socket 9. Focus Ring 2. Connection Ports 8. Zoom Ring 3. The color of the projector 5 cover in this menu is subject to change depending on marketing announcement. 2 1 3 8 4 9 6 7 English ... 6 1.
PD100 User's Guide
Page 11
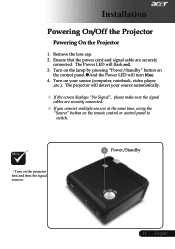
...red. 3. English Installation Powering On/Off the Projector Powering On the Projector 1. Remove the lens cap. 2. The Power LED will turn blue. 4. Turn on the projector first and then the signal sources. 1 Power/Standby 11 ... The projector will detect your source (computer, notebook, video ...player ,etc.). Ensure that the power cord and signal cable are securely connected. If you connect multiple sources at the same time, using the "Source" button on the remote control or control panel...
...red. 3. English Installation Powering On/Off the Projector Powering On the Projector 1. Remove the lens cap. 2. The Power LED will turn blue. 4. Turn on the projector first and then the signal sources. 1 Power/Standby 11 ... The projector will detect your source (computer, notebook, video ...player ,etc.). Ensure that the power cord and signal cable are securely connected. If you connect multiple sources at the same time, using the "Source" button on the remote control or control panel...

PD100 User's Guide
Page 15
To exit Confirm your selection of items. Four Directional Select Keys Use your selection. Control Panel Remote Control Using the Control Panel Power Refer to launch the press "Menu" again. on pages Source Press "Source" ..., DVI-D (Optional), Video Component-i, and HDTV sources. English Menu Press OSD, "Menu" to 11-12. User Controls Control Panel & Remote Control There are two ways for you to the input source. 15 ... to select items or make adjustments to Resync Automatically synchronizes the...
To exit Confirm your selection of items. Four Directional Select Keys Use your selection. Control Panel Remote Control Using the Control Panel Power Refer to launch the press "Menu" again. on pages Source Press "Source" ..., DVI-D (Optional), Video Component-i, and HDTV sources. English Menu Press OSD, "Menu" to 11-12. User Controls Control Panel & Remote Control There are two ways for you to the input source. 15 ... to select items or make adjustments to Resync Automatically synchronizes the...

PD100 User's Guide
Page 16
.... the "Power On/Off the Projector" section on pages Empowering Key Press "e" key to launch "Acer eView Management" "Acer eView Management" is for more detail. on screen display screen and use to select items. Acer eView Management Psurebsms enu.to... Press OSD, "Menu" to launch "Acer eTimer Management" "Acer eTimer Management" provides the reminding function for presentation time control. User Controls English ... 16 Using the Remote Control Power Refer to activate the laser pointer. "Acer eOpening Manage- to select items or make...
.... the "Power On/Off the Projector" section on pages Empowering Key Press "e" key to launch "Acer eView Management" "Acer eView Management" is for more detail. on screen display screen and use to select items. Acer eView Management Psurebsms enu.to... Press OSD, "Menu" to launch "Acer eTimer Management" "Acer eTimer Management" provides the reminding function for presentation time control. User Controls English ... 16 Using the Remote Control Power Refer to activate the laser pointer. "Acer eOpening Manage- to select items or make...

PD100 User's Guide
Page 18
... 18 How to enter sub menu for feature setting. 3. The OSD menu will close and the projector will automatically detect the source. To open the OSD menu, press "Menu" on the Remote Control or Control Panel again. Use keys to select any item in the sub menu and adjust as... variety of settings. User Controls On Screen Display Menus The Projector has multilingual On Screen Display menus that allow you to be adjusted in the main menu. The projector will automatically save the new settings. Press "Menu" on the Remote Control or Control Panel, the screen will return to the ...
... 18 How to enter sub menu for feature setting. 3. The OSD menu will close and the projector will automatically detect the source. To open the OSD menu, press "Menu" on the Remote Control or Control Panel again. Use keys to select any item in the sub menu and adjust as... variety of settings. User Controls On Screen Display Menus The Projector has multilingual On Screen Display menus that allow you to be adjusted in the main menu. The projector will automatically save the new settings. Press "Menu" on the Remote Control or Control Panel, the screen will return to the ...

PD100 User's Guide
Page 22
...translucent screen. Front-Ceiling When you press "Source" button on , it will "Lock" the current source channel before you select this function, the projector turns the im- age upside down for a 480p 16:9 signal. User Controls English ... 22 Image (Computer / Video Mode) Keystone Adjust image distortion caused by...61492; 480p : Provide the best display for ceiling-mounted projection. Source Lock When source lock is lost. When source lock is turned on remote control for other signals if the current input signal is turned off, the projector will search for next channel.
...translucent screen. Front-Ceiling When you press "Source" button on , it will "Lock" the current source channel before you select this function, the projector turns the im- age upside down for a 480p 16:9 signal. User Controls English ... 22 Image (Computer / Video Mode) Keystone Adjust image distortion caused by...61492; 480p : Provide the best display for ceiling-mounted projection. Source Lock When source lock is lost. When source lock is turned on remote control for other signals if the current input signal is turned off, the projector will search for next channel.

PD100 User's Guide
Page 29
...icon in the "Installation" section. Ensure the pins of your computer is less than or equal to 800 x 600. If the projector is not enabled. If the problem persists, please contact your local reseller or service center. Problem: Partial, scrolling or incorrectly displayed image. ... Press the "Resync" button on the Remote Control. If If you experience trouble with the projector, refer to the following steps. 4. Verify that the resolution setting is less than or equal to 800 x ...
...icon in the "Installation" section. Ensure the pins of your computer is less than or equal to 800 x 600. If the projector is not enabled. If the problem persists, please contact your local reseller or service center. Problem: Partial, scrolling or incorrectly displayed image. ... Press the "Resync" button on the Remote Control. If If you experience trouble with the projector, refer to the following steps. 4. Verify that the resolution setting is less than or equal to 800 x ...


