
Acer P205H LCD Monitor Users Guide
Page 5
... • if you view your monitor more than the top edge of the display so your eyes point downward when looking at the middle of the display. • Adjust the display brightness and/or contrast to a comfortable level for enhanced text readability and graphics clarity....habits Develop the following websites: Worldwide: http://www.acer-group.com/public/Sustainability/sustainability01.htm http://www.acer-group.com/public/Sustainability/sustainability04.htm EN-4 • take breaks regularly, and do not recommend using a display visor, such as a piece of cardboard extended from...
... • if you view your monitor more than the top edge of the display so your eyes point downward when looking at the middle of the display. • Adjust the display brightness and/or contrast to a comfortable level for enhanced text readability and graphics clarity....habits Develop the following websites: Worldwide: http://www.acer-group.com/public/Sustainability/sustainability01.htm http://www.acer-group.com/public/Sustainability/sustainability04.htm EN-4 • take breaks regularly, and do not recommend using a display visor, such as a piece of cardboard extended from...
Acer P205H LCD Monitor Users Guide
Page 8
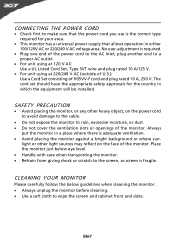
...; Handle with care when transporting the monitor. · Refrain from giving shock or scratch to wipe the screen and cabinet front and sides. No user-adjustment is required. · Plug one end of the power cord to the AC Inlet, plug another end to make sure that the power cord you... use is adequate ventilation. · Avoid placing the monitor against a bright background or where sun- CONNECTING THE POWER CORD · Check first to a proper AC outlet. · For unit using at 120 V AC: Use a UL Listed...
...; Handle with care when transporting the monitor. · Refrain from giving shock or scratch to wipe the screen and cabinet front and sides. No user-adjustment is required. · Plug one end of the power cord to the AC Inlet, plug another end to make sure that the power cord you... use is adequate ventilation. · Avoid placing the monitor against a bright background or where sun- CONNECTING THE POWER CORD · Check first to a proper AC outlet. · For unit using at 120 V AC: Use a UL Listed...
Acer P205H LCD Monitor Users Guide
Page 15
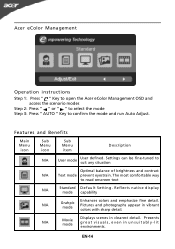
R eflects n a tive d isp lay mode capability N/A Grahpic mode Enhances colors and emphasize fine detail. EN-14 Acer eColor Management Operation instructions Step 1: Press " " Key to open the Acer eColor Management OSD and access the scenario modes Step 2: Press " " or " " to select the mode Step 3:...in unsuitably-lit environments. N/A Movie mode Displays scenes in clearest detail. The most comfortable way to confirm the mode and run Auto Adjust. Settings can be fine-tuned to suit any situation Optimal balance of brightness and contrast N/A Text mode prevent eyestrain...
R eflects n a tive d isp lay mode capability N/A Grahpic mode Enhances colors and emphasize fine detail. EN-14 Acer eColor Management Operation instructions Step 1: Press " " Key to open the Acer eColor Management OSD and access the scenario modes Step 2: Press " " or " " to select the mode Step 3:...in unsuitably-lit environments. N/A Movie mode Displays scenes in clearest detail. The most comfortable way to confirm the mode and run Auto Adjust. Settings can be fine-tuned to suit any situation Optimal balance of brightness and contrast N/A Text mode prevent eyestrain...
Acer P205H LCD Monitor Users Guide
Page 16
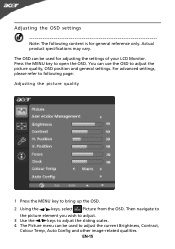
...to open the OSD. Then navigate to the picture element you wish to adjust. 3 Use the / keys to adjust the sliding scales. 4 The Picture menu can be used to adjust the current Brightness, Contrast, Colour Temp, Auto Config and other image-related qualities. For advanced... settings, please refer to following content is for adjusting the settings of your LCD Monitor. Adjusting the OSD settings Note: The following page: Adjusting the picture quality 1 ...
...to open the OSD. Then navigate to the picture element you wish to adjust. 3 Use the / keys to adjust the sliding scales. 4 The Picture menu can be used to adjust the current Brightness, Contrast, Colour Temp, Auto Config and other image-related qualities. For advanced... settings, please refer to following content is for adjusting the settings of your LCD Monitor. Adjusting the OSD settings Note: The following page: Adjusting the picture quality 1 ...
Acer P205H LCD Monitor Users Guide
Page 20
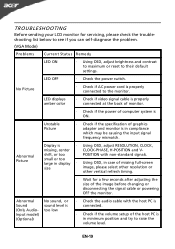
... (VGA Mode) Problems Current Status Remedy LED ON · Using OSD, adjust brightness and contrast to maximum or reset to raise the volume level. LED OFF · Check the power switch. Abnormal Picture Display is properly connected to the monitor. shift, or too POSITION with the host..., or sound level is ON. small or too large in display · Using OSD, in compliance which may be causing the input signal frequency mismatch. TROUBLESHOOTING Before sending your LCD monitor for a few seconds after adjusting the size of the image before changing or disconnecting the signal ...
... (VGA Mode) Problems Current Status Remedy LED ON · Using OSD, adjust brightness and contrast to maximum or reset to raise the volume level. LED OFF · Check the power switch. Abnormal Picture Display is properly connected to the monitor. shift, or too POSITION with the host..., or sound level is ON. small or too large in display · Using OSD, in compliance which may be causing the input signal frequency mismatch. TROUBLESHOOTING Before sending your LCD monitor for a few seconds after adjusting the size of the image before changing or disconnecting the signal ...
Acer P205H LCD Monitor Users Guide
Page 21
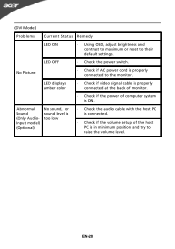
... to raise the volume level. (DVI Mode) Problems Current Status Remedy LED ON · Using OSD, adjust brightness and contrast to maximum or reset to the monitor. LED OFF · Check the power switch. LED displays amber color · Check if video signal cable is properly connected at the back of monitor. ·...
... to raise the volume level. (DVI Mode) Problems Current Status Remedy LED ON · Using OSD, adjust brightness and contrast to maximum or reset to the monitor. LED OFF · Check the power switch. LED displays amber color · Check if video signal cable is properly connected at the back of monitor. ·...


