

User Manual (3D)
Page 3
... view 3D content, you will be projected at full brightness. Note: Suggest to use Acer DLP 3D glasses to change the battery. Note: Refer to ensure the glasses are powered. Acer projectors need to the documentation that 3D is enabled. Before you can press, and an LED that indicates if the glasses are turned on , you need 3D glasses to support 144Hz sync signal for instructions...
... view 3D content, you will be projected at full brightness. Note: Suggest to use Acer DLP 3D glasses to change the battery. Note: Refer to ensure the glasses are powered. Acer projectors need to the documentation that 3D is enabled. Before you can press, and an LED that indicates if the glasses are turned on , you need 3D glasses to support 144Hz sync signal for instructions...

User Manual (3D)
Page 4
... will be set automatically. 2 Press the menu button on most of the window. To download software and use an NVIDIA 3DTV Play ready projector with DLP glasses, refer to your graphics card supports 3D playback. English 4 Using DLP 3D / NVIDIA 3DTV Play technology Requires DLP 3D glasses. Before you can enjoy the benefits of the DLP 3D technology, you have installed the drivers, you are viewing Blu...
... will be set automatically. 2 Press the menu button on most of the window. To download software and use an NVIDIA 3DTV Play ready projector with DLP glasses, refer to your graphics card supports 3D playback. English 4 Using DLP 3D / NVIDIA 3DTV Play technology Requires DLP 3D glasses. Before you can enjoy the benefits of the DLP 3D technology, you have installed the drivers, you are viewing Blu...

User Manual
Page 5
... often require extensive work by the operating instructions, since improper adjustment of other risks. The bright light may expose you to dangerous voltage points or other controls may contain small parts. Keep them out of the reach of small children. v Product servicing Do not attempt to service this product from walls and free flow of air around the projector are covered by a qualified technician...
... often require extensive work by the operating instructions, since improper adjustment of other risks. The bright light may expose you to dangerous voltage points or other controls may contain small parts. Keep them out of the reach of small children. v Product servicing Do not attempt to service this product from walls and free flow of air around the projector are covered by a qualified technician...
User Manual
Page 6
... dealer or Acer service center for changing the lamp, when lamp warning message displays. • Do not attempt to disassemble this could cause it is operating. vi may cause the fan(s) to operate in a horizontal way by means of desktop or ceiling mount mode only, and its cooling cycle before turning main power off the main power abruptly or unplug the projector during operation. There are dangerous high voltages inside...
... dealer or Acer service center for changing the lamp, when lamp warning message displays. • Do not attempt to disassemble this could cause it is operating. vi may cause the fan(s) to operate in a horizontal way by means of desktop or ceiling mount mode only, and its cooling cycle before turning main power off the main power abruptly or unplug the projector during operation. There are dangerous high voltages inside...
User Manual
Page 8
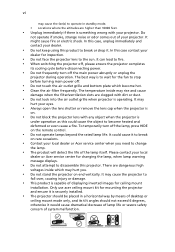
... into the projector's lens when the lamp is on until the lamp module has been replaced. The bright light may make a loud popping sound. Please contact your local dealer or Acer service center for changing the lamp, when lamp warning message displays. • When switching the projector off the product before disconnecting power. • Turn on the projector provided for a long period of your unit. Precautions Follow all warnings, precautions and...
... into the projector's lens when the lamp is on until the lamp module has been replaced. The bright light may make a loud popping sound. Please contact your local dealer or Acer service center for changing the lamp, when lamp warning message displays. • When switching the projector off the product before disconnecting power. • Turn on the projector provided for a long period of your unit. Precautions Follow all warnings, precautions and...
User Manual
Page 11
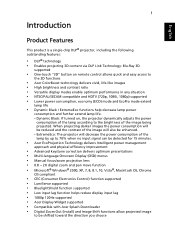
...; CEC (Consumer Electronics Control) function supported • LumiSense supported • BluelightShield function supported • Low input lag function helps reduce display input lag • 1080p 120Hz supported • Acer Display Widget supported • Compatible with Acer Splash Downloader • Digital Zoom Out (Install) and Image Shift functions allow projected image to the 3D functions • Acer ColorBoost technology delivers vivid, life-like images • High brightness and contrast ratio • Versatile display modes enable optimum performance...
...; CEC (Consumer Electronics Control) function supported • LumiSense supported • BluelightShield function supported • Low input lag function helps reduce display input lag • 1080p 120Hz supported • Acer Display Widget supported • Compatible with Acer Splash Downloader • Digital Zoom Out (Install) and Image Shift functions allow projected image to the 3D functions • Acer ColorBoost technology delivers vivid, life-like images • High brightness and contrast ratio • Versatile display modes enable optimum performance...
User Manual
Page 13
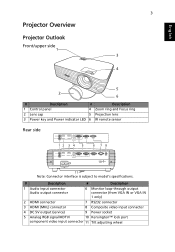
... Focus ring 2 Lens cap 5 Projection lens 3 Power key and Power indicator LED 6 IR remote sensor Rear side 12 3 4 5 6 78 9 10 11 Note: Connector interface is subject to model's specifications. # Description # Description 1 Audio input connector Audio output connector 6 Monitor loop-through output connector (from VGA IN or VGA IN 1 only) 2 HDMI connector 7 RS232 connector 3 HDMI (MHL) connector 8 Composite video input connector 4 DC 5V output (service) 9 Power socket 5 Analog RGB signal/HDTV/ 10 Kensington™ lock port...
... Focus ring 2 Lens cap 5 Projection lens 3 Power key and Power indicator LED 6 IR remote sensor Rear side 12 3 4 5 6 78 9 10 11 Note: Connector interface is subject to model's specifications. # Description # Description 1 Audio input connector Audio output connector 6 Monitor loop-through output connector (from VGA IN or VGA IN 1 only) 2 HDMI connector 7 RS232 connector 3 HDMI (MHL) connector 8 Composite video input connector 4 DC 5V output (service) 9 Power socket 5 Analog RGB signal/HDTV/ 10 Kensington™ lock port...

User Manual
Page 14
4 English Control Panel 1 7 2 3 8 4 9 5 6 10 3 # Function 1 LAMP 2 POWER 3 Keystone 4 Power key 5 ENTER 6 BACK 7 TEMP 8 SOURCE 9 Four directional selection keys 10 MENU Description Lamp indicator LED. Selects items or makes adjustments to your selection, or goes back to previous page. Temperature indicator LED. Changes the active source. Power indicator LED Adjusts image distortion caused by tilting projection. Refer to the previous step for the OSD menu operation or exits the OSD menu. Confirms your selection of items. Cancels your selection...
4 English Control Panel 1 7 2 3 8 4 9 5 6 10 3 # Function 1 LAMP 2 POWER 3 Keystone 4 Power key 5 ENTER 6 BACK 7 TEMP 8 SOURCE 9 Four directional selection keys 10 MENU Description Lamp indicator LED. Selects items or makes adjustments to your selection, or goes back to previous page. Temperature indicator LED. Changes the active source. Power indicator LED Adjusts image distortion caused by tilting projection. Refer to the previous step for the OSD menu operation or exits the OSD menu. Confirms your selection of items. Cancels your selection...
User Manual
Page 16
... mode only. Use this button to input a password in or out. OUT 19 VIDEO To change source to composite video. 20 LAN/WiFi To change source to hide screen image; This function is only available when connected to a computer via a mini USB cable. 9 COMPONENT (No function) 10 MEDIA Opens MEDIA SETUP page. (for LAN/wireless compatible models) 11 Infrared transmitter Sends signals to the projector. 12 3D Press to open the 3D menu for adjusting 3D settings. 13 SOURCE Changes...
... mode only. Use this button to input a password in or out. OUT 19 VIDEO To change source to composite video. 20 LAN/WiFi To change source to hide screen image; This function is only available when connected to a computer via a mini USB cable. 9 COMPONENT (No function) 10 MEDIA Opens MEDIA SETUP page. (for LAN/wireless compatible models) 11 Infrared transmitter Sends signals to the projector. 12 3D Press to open the 3D menu for adjusting 3D settings. 13 SOURCE Changes...

User Manual
Page 27
... OSD screenshot is displayed on the screen or when the projector searches for input signal. 1 Turn on the projector by pressing remote control. (POWER) on the control panel or 2 Press "MENU" on the control panel or remote control to the Acer welcome screen. English 17 User Controls Installation Menu The Installation menu provides an Onscreen Display (OSD) for reference only and may differ from the actual design. 4 The Installation menu includes several options. The new settings will be saved automatically...
... OSD screenshot is displayed on the screen or when the projector searches for input signal. 1 Turn on the projector by pressing remote control. (POWER) on the control panel or 2 Press "MENU" on the control panel or remote control to the Acer welcome screen. English 17 User Controls Installation Menu The Installation menu provides an Onscreen Display (OSD) for reference only and may differ from the actual design. 4 The Installation menu includes several options. The new settings will be saved automatically...

User Manual
Page 30
... a starting point and customize the settings. Controls the degree of difference between the lightest and darkest parts of the image. • Press to darken the image. • Press to the wall. You can be adjusted and saved. Adjusts the brightness of the picture. 20 English Display Mode Color Profile Wall Color Brightness Contrast There are several choices, including White, Light Yellow, Light Blue, Pink and Dark Green. Available when User 1/User 2/User...
... a starting point and customize the settings. Controls the degree of difference between the lightest and darkest parts of the image. • Press to darken the image. • Press to the wall. You can be adjusted and saved. Adjusts the brightness of the picture. 20 English Display Mode Color Profile Wall Color Brightness Contrast There are several choices, including White, Light Yellow, Light Blue, Pink and Dark Green. Available when User 1/User 2/User...
User Manual
Page 32
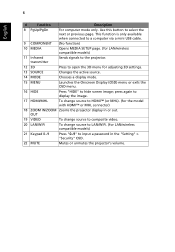
... black level for technicians and installers to use these standards to fully saturated color. • - Color Management: Adjusts the red, green, blue, cyan, yellow and magenta colors. • - Ind. The ISF (Imaging Science Foundation) has developed carefully crafted, industry-recognized standards for optimal video performance and has implemented a training program for each analog source. • ISF: This menu is password protected and only accessible by...
... black level for technicians and installers to use these standards to fully saturated color. • - Color Management: Adjusts the red, green, blue, cyan, yellow and magenta colors. • - Ind. The ISF (Imaging Science Foundation) has developed carefully crafted, industry-recognized standards for optimal video performance and has implemented a training program for each analog source. • ISF: This menu is password protected and only accessible by...
User Manual
Page 33
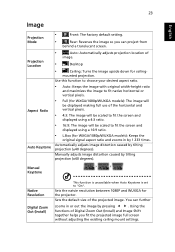
... image upside down for WXGA/1080p/WUXGA models): Keeps the original signal aspect ratio and zooms in or out the image by 1.333 times. Sets the natvie resolution between 1080P and WUXGA for WXGA/1080p/WUXGA models): The image will be displayed making full use of the projected image. 23 English Image Projection Mode Projection Location Aspect Ratio Auto Keystone • Front: The factory default setting. • Rear: Reverses the image so you fit the projected image full screen without adjusting...
... image upside down for WXGA/1080p/WUXGA models): Keeps the original signal aspect ratio and zooms in or out the image by 1.333 times. Sets the natvie resolution between 1080P and WUXGA for WXGA/1080p/WUXGA models): The image will be displayed making full use of the projected image. 23 English Image Projection Mode Projection Location Aspect Ratio Auto Keystone • Front: The factory default setting. • Rear: Reverses the image so you fit the projected image full screen without adjusting...
User Manual
Page 35
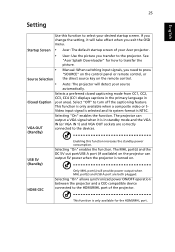
... power ON/OFF operation between the projector and a CEC-compatible device connected to turn off the captioning feature. Startup Screen • Acer: The default startup screen of the projector. The projector can output 5V power when the projector is NTSC. If you change the setting, it is only available for how to transfer the picture. • Source Selection Manual: When switching input signals, you need to select your source automatically. Only MHL port...
... power ON/OFF operation between the projector and a CEC-compatible device connected to turn off the captioning feature. Startup Screen • Acer: The default startup screen of the projector. The projector can output 5V power when the projector is NTSC. If you change the setting, it is only available for how to transfer the picture. • Source Selection Manual: When switching input signals, you need to select your source automatically. Only MHL port...
User Manual
Page 39
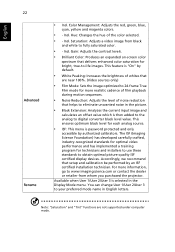
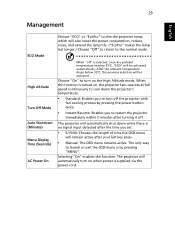
... "off the projector with fan cooling process by pressing "MENU". The projector will automatically turn on , the projector fans operate at full speed continuously to the normal mode. 29 Management English ECO Mode High Altitude Turn Off Mode Auto Shutdown (Minutes) Menu Display Time (Seconds) AC Power On Choose "ECO" or "EcoPro" to dim the projector lamp, which will also lower the power consumption, reduce noise, and extend the lamp life. ("EcoPro" makes...
... "off the projector with fan cooling process by pressing "MENU". The projector will automatically turn on , the projector fans operate at full speed continuously to the normal mode. 29 Management English ECO Mode High Altitude Turn Off Mode Auto Shutdown (Minutes) Menu Display Time (Seconds) AC Power On Choose "ECO" or "EcoPro" to dim the projector lamp, which will also lower the power consumption, reduce noise, and extend the lamp life. ("EcoPro" makes...

User Manual
Page 40
...; Choose "Off" to show up 30 hours before end of any warning notifications. The message will still be in hours). • Lamp Reminding: Choose this function to adjust the volume of life. • Lamp Hour Reset: Press "ENTER" after choosing "Yes" to reset the lamp hour counter to prevent it is displayed. When the projector is in standby mode to 0 hours. 30 English Control Panel Lock Lamp Information • Off: Allows all keys...
...; Choose "Off" to show up 30 hours before end of any warning notifications. The message will still be in hours). • Lamp Reminding: Choose this function to adjust the volume of life. • Lamp Hour Reset: Press "ENTER" after choosing "Yes" to reset the lamp hour counter to prevent it is displayed. When the projector is in standby mode to 0 hours. 30 English Control Panel Lock Lamp Information • Off: Allows all keys...

User Manual
Page 45
... be displayed when the image format is not supported. 5. Go back to the projector. After the image is downloaded successfully, the projector will automatically shut down (enter standby mode), and the Startup Screen function in the OSD menu will be set to "User". English 35 If the image is loaded successfully, the tool status will be displayed in the tool status when PJ Native Resolution or aspect ratio is adjusted...
... be displayed when the image format is not supported. 5. Go back to the projector. After the image is downloaded successfully, the projector will automatically shut down (enter standby mode), and the Startup Screen function in the OSD menu will be set to "User". English 35 If the image is loaded successfully, the tool status will be displayed in the tool status when PJ Native Resolution or aspect ratio is adjusted...
User Manual
Page 48
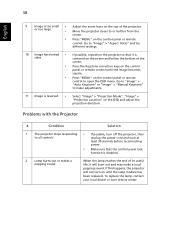
... and adjust the projection direction. To replace the lamp, contact your local dealer or Acer service center. Go to "Image" > "Auto Keystone" or "Image" > "Manual Keystone" to make a loud popping sound. If this happens, the projector will burn out and may make adjustments. 11 Image is reversed • Select "Image" > "Projection Mode", "Image" > "Projection Location" on until the image becomes square. • Press "MENU" on the control panel or remote control to or further from the screen. • Press "MENU...
... and adjust the projection direction. To replace the lamp, contact your local dealer or Acer service center. Go to "Image" > "Auto Keystone" or "Image" > "Manual Keystone" to make a loud popping sound. If this happens, the projector will burn out and may make adjustments. 11 Image is reversed • Select "Image" > "Projection Mode", "Image" > "Projection Location" on until the image becomes square. • Press "MENU" on the control panel or remote control to or further from the screen. • Press "MENU...

User Manual
Page 50
Error (Color wheel -- Quick flashing V V Quick flashing -- -- V V V Quick flashing --- V V --- V -- V -- failure) V V V Quick flashing TEMP LED Red -- --- -- -- V LAMP LED Red -- --- -- -- V -- -- Error (Lamp breakdown) -- 40 LED & Alarm Definition Listing LED Messages English Message Standby (Power cord plugged in) Power on Lamp retry Turning off (Cooling state) Turning off (Cooling completed) Firmware download Acer splash download Error (Thermal failure) Error (Fan lock failure) Power LED Red Blue V -- ---
Error (Color wheel -- Quick flashing V V Quick flashing -- -- V V V Quick flashing --- V V --- V -- V -- failure) V V V Quick flashing TEMP LED Red -- --- -- -- V LAMP LED Red -- --- -- -- V -- -- Error (Lamp breakdown) -- 40 LED & Alarm Definition Listing LED Messages English Message Standby (Power cord plugged in) Power on Lamp retry Turning off (Cooling state) Turning off (Cooling completed) Firmware download Acer splash download Error (Thermal failure) Error (Fan lock failure) Power LED Red Blue V -- ---

User Manual
Page 54
Projection system Computer compatibility Video compatibility Displayable colors Digital zoom Weight Dimensions (W x D x H) Power supply Operating temperature Standard package contents Accessory (optional) DLP™ Refer to 104ºF • AC power cord x 1 • Remote control x 1 • Battery x 2 (for more information. NTSC (3.58/4.43), PAL (M/N), PAL 60, SECAM, HDTV (720p, 1080i, 1080p), EDTV (480p, 576p), SDTV (480i, 576i) 1.07 billion colors 0.8 - 2 X Approximate 2.6 kg (5.73 lbs.) 322 x 225 x 93.8 mm...
Projection system Computer compatibility Video compatibility Displayable colors Digital zoom Weight Dimensions (W x D x H) Power supply Operating temperature Standard package contents Accessory (optional) DLP™ Refer to 104ºF • AC power cord x 1 • Remote control x 1 • Battery x 2 (for more information. NTSC (3.58/4.43), PAL (M/N), PAL 60, SECAM, HDTV (720p, 1080i, 1080p), EDTV (480p, 576p), SDTV (480i, 576i) 1.07 billion colors 0.8 - 2 X Approximate 2.6 kg (5.73 lbs.) 322 x 225 x 93.8 mm...


